In This Article
I’ll be honest with you—the first time I opened an oyster mushroom growing kit, I was skeptical. How could something so simple produce restaurant-quality mushrooms right on my kitchen counter? Fast forward ten days, and I was harvesting massive clusters of pearl-white oysters that would’ve cost me $20 at the farmer’s market.
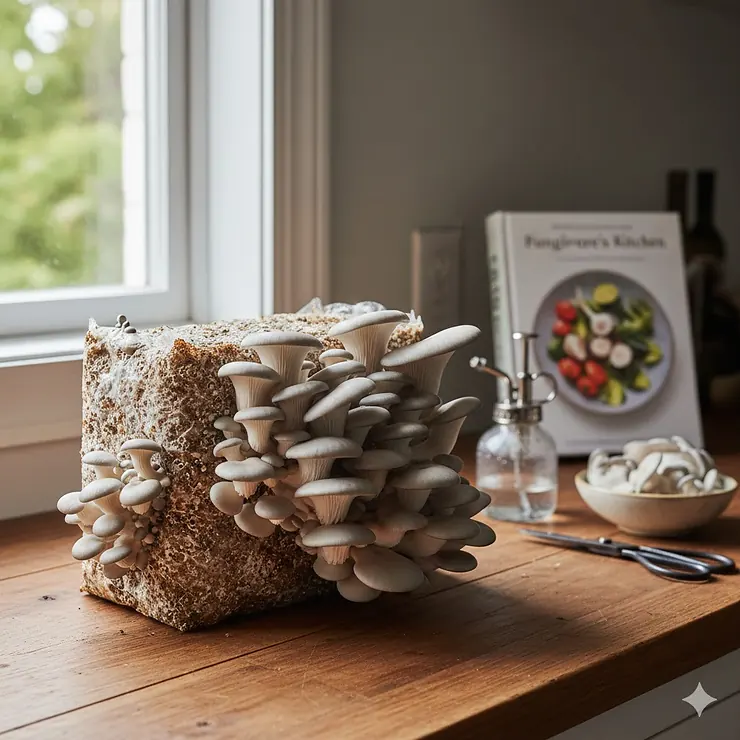
Here’s the thing about oyster mushroom growing kits: they’ve transformed from novelty gifts into legitimate food production tools. With grocery prices climbing and people seeking sustainable food sources, these kits offer something remarkable—fresh, organic mushrooms in less time than it takes to grow a tomato. An oyster mushroom growing kit is a pre-colonized substrate block containing live mushroom mycelium that’s ready to fruit, requiring only basic care like daily misting and indirect light. Unlike traditional gardening, you don’t need soil, a green thumb, or even outdoor space.
The beauty lies in their versatility. Whether you’re craving the delicate pink oyster mushrooms that taste like bacon when crisped, the meaty king oyster perfect for grilling, or the vibrant blue oyster with its seafood-like umami, there’s a kit designed for your palate. According to research published in the National Center for Biotechnology Information, oyster mushrooms rank as the second-largest cultivated mushroom type worldwide, and home cultivation is booming.
In this guide, I’m breaking down the seven best options currently dominating Amazon in 2025, plus everything you need to know to turn your kitchen into a mini mushroom farm.
Quick Comparison Table
| Product | Variety | Size | Harvest Time | Price Range | Best For |
|---|---|---|---|---|---|
| Back to the Roots Mini Kit | Pearl Oyster | Compact | 10 days | $15-$20 | Beginners |
| North Spore Pink Oyster | Pink Oyster | 4 lbs | 14-21 days | $30-$35 | Flavor enthusiasts |
| BloomBox Blue Oyster | Blue Oyster | 2 lbs | 7-10 days | $25-$30 | Fast harvests |
| North Spore Golden Oyster | Golden Oyster | 4 lbs | 14-21 days | $30-$35 | Gourmet cooking |
| Root Mushroom Farm King Oyster | King Oyster | 3 lbs | 7+ days | $28-$32 | Meaty texture lovers |
| Forest Origins Pink Oyster | Pink Oyster | Standard | 14 days | $22-$28 | Gift-giving |
| Garden City Fungi Gray Oyster | Gray Oyster | Large | 10-14 days | $35-$40 | High yields |
💬 Just one click – help others make better buying decisions too! 😊
Top 7 Oyster Mushroom Growing Kits: Expert Analysis
1. Back to the Roots Organic Mini Mushroom Grow Kit
The Back to the Roots Organic Mini Mushroom Grow Kit is the gateway drug to mushroom cultivation—and I mean that in the best way possible. This compact powerhouse delivers pearl oyster mushrooms within 10 days, making it perfect for impatient beginners like myself when I first started.
What sets this kit apart is its foolproof design. You literally open the box, cut an X in the pre-colonized block, and spray it twice daily with the included mister. The mycelium does all the heavy lifting. Each kit produces 3-4 servings across two harvests, which isn’t massive, but it’s enough to enhance pasta dishes, stir-fries, or your morning omelet. Customers rave about the “Grow One Give One” campaign—share your harvest on social media with their hashtag, and they’ll donate a kit to a classroom.
Key Specs: USDA Organic certified, made in USA, includes spray bottle
Price: $15-$20
Customer Feedback: “Super easy even for my kids,” though some note yields can vary with humidity levels.
✅ Compact and apartment-friendly
✅ 100% organic and non-GMO
✅ Perfect for kids and educational purposes
❌ Smaller yields than larger kits
❌ Two harvest maximum typically
2. North Spore Organic Pink Oyster Mushroom Spray & Grow Kit
If you want mushrooms that make people stop mid-bite and say “wait, what is this?”—the North Spore Organic Pink Oyster is your answer. These salmon-colored beauties aren’t just Instagram-worthy; they deliver a succulent, almost bacon-like flavor when sautéed to crispy perfection.
North Spore’s 4-pound kit is handmade in Maine from locally-sourced, USDA-certified organic ingredients. The company’s reputation among serious cultivators is well-earned—their quality control is obsessive. Pink oysters thrive in warmer temperatures (65-75°F), making them ideal for most indoor environments. Expect your first harvest in 14-21 days, with potential for multiple flushes yielding 0.5-1.5 pounds total.
One clever hack from experienced growers: after your indoor harvests slow down, move the spent block outdoors. North Spore includes instructions for this, and many users report surprise bonus harvests months later.
Key Specs: 4 lbs substrate, Pleurotus djamor species, includes spritzer
Price: $30-$35
Customer Feedback: High praise for vibrant color and flavor, though warm storage can trigger premature pinning.
✅ Stunning visual appeal
✅ Exceptional flavor profile
✅ USDA organic certification
❌ Requires warmer temps than other varieties
❌ Shorter shelf life after harvest
3. BloomBox Blue Oyster Mushroom Grow Kit
The BloomBox Blue Oyster kit by Nublume is what happens when mushroom cultivation meets modern design sensibility. This isn’t just a grow kit—it’s a conversation starter wrapped in premium packaging with a humidity tent and professional-grade misting bottle included.
Blue oysters (Pleurotus ostreatus var. columbinus) offer that classic oyster mushroom experience: velvety texture, rich umami, and a satisfying heft that sears beautifully. What impressed me most was the “First Flush Promise”—if your kit doesn’t produce, they replace it immediately. That’s confidence. The pre-colonized organic substrate log is compact enough for windowsill cultivation but robust enough to produce 6-8 ounces on the first flush.
The included QR code links to their grower support team, which is clutch for troubleshooting. Some users report mushrooms doubling in size daily once pinning begins—watching them grow becomes oddly addictive.
Key Specs: Ready to fruit in 7 days, humidity tent included, California-made
Price: $25-$30
Customer Feedback: “Exploded with growth,” though dry climates require extra vigilance with misting.
✅ Fast harvest timeline
✅ Excellent customer support
✅ Premium presentation for gifting
❌ Higher price per pound than competitors
❌ Single primary harvest typical
4. North Spore Organic Golden Oyster Mushroom Spray & Grow Kit
The North Spore Golden Oyster brings a nutty, cashew-like flavor that chefs absolutely love. These bright yellow clusters add both visual pop and culinary sophistication to any dish. I’ve sautéed them with garlic butter, tossed them into creamy risottos, and even experimented with golden oyster tacos—all winners.
Like its pink cousin, this 4-pound kit showcases North Spore’s commitment to quality. The golden variety (Pleurotus citrinopileatus) prefers slightly cooler temps (55-65°F), making it ideal for basements or cooler rooms. The longer colonization period (14-21 days) tests your patience, but the payoff is substantial—up to 1.5 pounds of delicate, aromatic mushrooms.
One pro tip from the community: golden oysters are more delicate than blues or pearls. Handle them gently during harvest and use them within 3-5 days for peak flavor and texture.
Key Specs: 4 lbs, handmade in Maine, can be stored up to 3 months before activation
Price: $30-$35
Customer Feedback: “Restaurant-quality flavor,” with notes that cooler growing temps produce better results.
✅ Unique gourmet flavor
✅ Extended storage before use
✅ High yield potential
❌ Requires cooler conditions
❌ More delicate handling needed
5. Root Mushroom Farm King Oyster Mushroom Grow Kit
King oysters are the ribeye steaks of the mushroom world, and the Root Mushroom Farm King Oyster kit delivers them in all their meaty glory. Unlike other oyster varieties that grow in clusters, king oysters (Pleurotus eryngii) produce thick, individual stems with small caps—perfect for slicing into medallions and grilling.
This kit includes everything: ready-to-fruit log, humidity tent, spray bottle, and detailed instructions. What’s brilliant is the unique design that facilitates multiple harvests—some growers report three or even four flushes with proper care between cycles. The king oyster variety is particularly forgiving of temperature fluctuations, thriving anywhere from 50-70°F.
The texture is what converts people. When cooked, king oysters have a firm, almost scallop-like bite that holds up to aggressive cooking methods. I’ve seen people marinate sliced king oysters in teriyaki sauce and grill them—absolute game-changer for plant-based diets.
Key Specs: 3 lbs, includes humidity tent, can last months unopened
Price: $28-$32
Customer Feedback: Mixed reviews on yield consistency, but texture praised universally.
✅ Exceptional meaty texture
✅ Multiple harvest potential
✅ Versatile in cooking methods
❌ Slower growth than other varieties
❌ Customer service feedback varies
6. Forest Origins Pink Oyster Mushroom Grow Kit
The Forest Origins Pink Oyster kit represents excellent middle-ground value—handmade in California with all-natural, organic ingredients, it’s positioned between budget and premium options. These pink oysters (Pleurotus djamor) deliver that signature bacon-like flavor when crisped, making them a hit with vegetarians exploring meat alternatives.
What I appreciate about Forest Origins is their straightforward approach. The kit arrives ready to activate, with clear instructions that even mushroom newbies can follow. Start pinning typically begins within 7-14 days, and the vibrant pink color makes it nearly impossible to mess up the harvest timing—when they’re bright pink, they’re ready.
The company backs their product with responsive customer service, which matters when you’re troubleshooting your first grow. Some users recommend keeping the kit in a dark closet before activation if you’re not ready immediately, extending viability up to a few weeks.
Key Specs: Handmade in California, Pleurotus djamor species, beginner-friendly
Price: $22-$28
Customer Feedback: “Beautiful and delicious,” though some note smaller yields than expected.
✅ Made in USA
✅ Gift-ready packaging
✅ Responsive customer service
❌ Smaller substrate size
❌ Limited to 1-2 harvests typically
7. Garden City Fungi Gray Oyster Mushroom Kit
For serious growers who want volume, the Garden City Fungi Gray Oyster kit is the heavy hitter. Made in Montana with premium substrate formulation, this kit is designed for year-round cultivation and substantial yields. Gray oysters are the classic variety—mild, versatile, and reliable.
What sets this apart is the grow bag design, which is ideal for those with grow tents or dedicated mushroom spaces. The substrate is specially curated with growth-catalyzing nutrients that accelerate colonization. I’ve seen growers report harvests exceeding two pounds from a single bag, especially when environmental conditions are dialed in perfectly.
The downside? This isn’t your countertop-friendly option. It requires more space and attention to humidity/air flow. But for anyone wanting to scale beyond hobby growing or those in cooler climates where outdoor mushroom patches thrive, this kit delivers professional-grade results.
Key Specs: Large grow bag, 100% natural substrate, Montana-made
Price: $35-$40
Customer Feedback: “Substantial yield,” with notes that it’s better suited for experienced growers.
✅ High-volume production
✅ Year-round growing capability
✅ Professional-quality substrate
❌ Requires dedicated growing space
❌ Not beginner-friendly
✨ Don’t Miss These Exclusive Deals!
🔍 Take your mushroom cultivation to the next level with these carefully selected products. Click on any highlighted item to check current pricing and availability. These kits will help you create authentic gourmet meals your family will love!
Understanding Oyster Mushroom Varieties: Which Type Should You Choose?
Not all oyster mushrooms are created equal, and choosing the right variety can make or break your growing experience. Let me break down the major types you’ll encounter in these kits.
Pearl Oyster (Pleurotus ostreatus): This is your standard-issue oyster—the gateway variety. Mild flavor, reliable growth, and incredibly forgiving of temperature swings. If you’re brand new to mushroom cultivation, start here. They grow in beautiful shelf-like clusters and work in virtually any recipe.
Pink Oyster (Pleurotus djamor): The showstopper. Bright salmon-pink color that fades slightly when cooked, with a distinct meaty flavor that intensifies with heat. These love warmth (70-85°F), making them perfect for summer growing or heated homes. The texture gets crispy like bacon when pan-fried—seriously.
Blue Oyster (Pleurotus ostreatus var. columbinus): Despite the name, they’re more gray-blue and lose color when cooked. What they lack in visual staying power, they make up for in flavor—deep umami, seafood-like notes. They prefer cooler temps (45-65°F), making them ideal for basements or winter growing.
Golden Oyster (Pleurotus citrinopileatus): Bright yellow clusters with a delicate, almost nutty flavor reminiscent of cashews. These are gourmet territory—chefs love them for both presentation and taste. They’re slightly more fragile than other varieties, so handle with care.
King Oyster (Pleurotus eryngii): The odd one out. Instead of clusters, you get thick individual stems with small caps. The texture is meaty, dense, almost scallop-like. Perfect for grilling, roasting, or any cooking method that benefits from structure. According to research on Pleurotus species cultivation, king oysters have exceptional nutritional profiles with high protein content.
Your choice should balance your climate, cooking preferences, and experience level. Warm apartment? Pink oysters. Cool basement? Blue or golden. Want versatility? Start with pearls. Craving that meat substitute texture? King oysters all the way.
The Science Behind Oyster Mushroom Cultivation Success
Here’s what most kit manufacturers won’t tell you: the mushroom fruiting you see is just the tip of the iceberg—literally. The real magic happens in the mycelium network colonizing the substrate before you ever open the box.
When you receive an oyster mushroom grow kit, you’re getting a fully colonized substrate block. This means the mushroom mycelium—the vegetative part of the fungus—has already spread throughout the growing medium, digesting the nutrients and preparing to fruit. Think of it like a plant that’s already established its root system; all it needs is the right trigger to bloom.
The triggers are environmental: fresh air exchange (which is why you cut an opening), high humidity (hence the daily misting), and indirect light (mushrooms use light to orient their growth direction, not for photosynthesis). Temperature plays a supporting role—different species have evolved to fruit at different temperature ranges.
What’s fascinating is how oyster mushrooms in cultivation utilize agricultural waste as their growing medium. According to comprehensive research on oyster mushroom species, oyster mushrooms can break down lignocellulosic materials from coffee grounds to straw to sawdust, converting waste into nutritious food. This makes them incredibly sustainable.
The pleurotus ostreatus cultivation process in commercial kits typically involves hardwood sawdust or soy hulls mixed with supplemental nutrients, all sterilized and then inoculated with mushroom spawn. By the time it reaches you, the substrate is white with mycelium and ready to fruit.
Understanding this biology helps you troubleshoot. Mushrooms not pinning? They might need more fresh air or a temperature shock. Growing slow? Humidity could be too low. Growing too fast with thin stems? They need more air circulation. It’s all connected to how mushrooms have evolved to reproduce in the wild.
Nutritional Powerhouse: What You’re Actually Growing
Let’s talk about why growing your own oyster mushrooms is more than just a cool hobby—it’s a nutritional investment. These fungi pack serious health benefits into a low-calorie package.
Oyster mushrooms are protein-rich for a non-animal source, containing all nine essential amino acids. A 100-gram serving delivers about 3-4 grams of protein, which might not sound impressive until you remember they’re only about 30 calories. The protein quality is surprisingly good for a fungus.
The fiber content is where things get interesting. Research on nutritional quality of oyster mushrooms shows they contain significant amounts of beta-glucans—a type of soluble fiber linked to immune system support and cholesterol reduction. These same beta-glucans have been studied for their potential anti-tumor properties.
Vitamin-wise, oyster mushrooms are exceptional sources of B-complex vitamins, particularly niacin (B3) and riboflavin (B2), which are crucial for energy metabolism. They also contain vitamin D2 when exposed to light—which your mushrooms will naturally accumulate as they grow near your window. Some growers even give their harvested mushrooms a few hours in indirect sunlight to boost vitamin D content before cooking.
The mineral profile includes potassium (important for blood pressure regulation), selenium (a powerful antioxidant), phosphorus, and zinc. Pink oysters, specifically, have been noted for their higher antioxidant content compared to other varieties.
What impresses me most is the cholesterol-lowering compound lovastatin found naturally in oyster mushrooms. Multiple studies have demonstrated that regular consumption can help manage blood cholesterol levels—your home-grown mushrooms are basically edible medicine.
Plus, at only about 10% of the cost of store-bought organic oyster mushrooms, you’re getting premium nutrition at garage sale prices.
Common Mistakes Every First-Time Grower Makes (And How to Avoid Them)
I’m going to save you from the heartbreak I experienced with my first kit: watching beautiful mushroom pins abort and shrivel because I didn’t know what I was doing. Here are the mistakes everyone makes—and how to dodge them.
Mistake #1: Inconsistent Misting
You get excited for the first three days, misting religiously. Then life happens, and you forget for 36 hours. Mushrooms are unforgiving about moisture. They need consistent high humidity, especially during pinning. Solution: Set phone alarms for morning and evening misting. Seriously. Or invest in a small humidifier nearby.
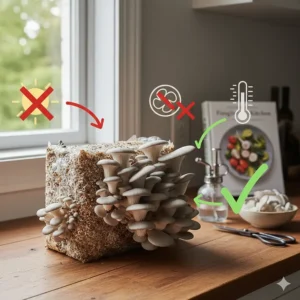
Mistake #2: Direct Sunlight Exposure
Someone told you mushrooms need light, so you put the kit in a sunny window. Now your substrate is dried out and hot. Mushrooms use light only for directional growth—they don’t photosynthesize. Direct sun will cook your kit faster than you can say “shiitake.” Solution: Bright, indirect light. Think “you could comfortably read a book here” levels, not “I need sunglasses.”
Mistake #3: Over-handling During Pinning
Those tiny mushroom babies emerging are adorable, and you want to check them every hour, maybe poke them gently. Don’t. Mushroom pins are fragile, and excess handling can damage them or introduce contaminants. Solution: Resist the urge. Mist, admire from a distance, and let them do their thing.
Mistake #4: Waiting Too Long to Harvest
You want maximum size, so you wait an extra few days. Now your oyster caps have flattened completely, edges are turning up, and they’re starting to drop spores everywhere. Oysters are best harvested just as the cap edges start to flatten—before they’re fully inverted. Solution: Harvest when caps are still slightly cupped but growth has slowed.
Mistake #5: Poor Air Circulation
You seal the kit in a closed terrarium or plastic bag to maintain humidity. Now you’ve created a CO2 trap. Mushrooms need fresh air exchange to fruit properly—without it, you’ll get long skinny stems and tiny caps. Solution: Tent your kit loosely or ensure the growing area has passive air flow, not stagnant air.
Mistake #6: Giving Up After First Harvest
The first flush produces nicely, you harvest, and then… nothing for two weeks. You assume it’s done and toss it. Many kits will produce 2-4 flushes if you’re patient. After harvest, let the block rest for 7-10 days with occasional misting, and new pins will often emerge. Solution: Keep faith. Second and third flushes exist.
The common thread in all these mistakes? Impatience and inconsistency. Mushroom cultivation rewards steady, patient care over enthusiastic chaos.
Step-by-Step Guide: From Box to Harvest in 10 Days
Alright, you’ve got your kit. Box is sitting on your counter. Now what? Here’s the exact process I use for foolproof results.
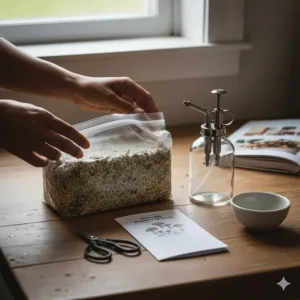
Day 1: Activation
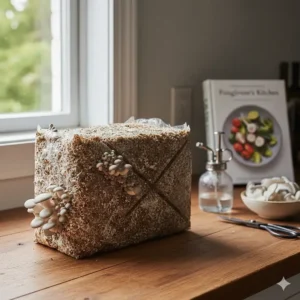
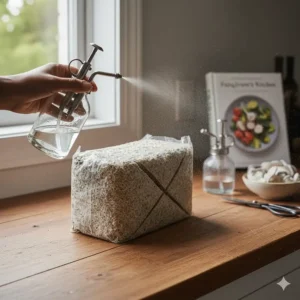
Open the box and locate the growing instructions—don’t skip reading them, each variety has quirks. Find the pre-colonized substrate block and identify the fruiting area (usually marked or indicated in instructions). Using a sharp, clean knife, cut a 2-3 inch X or vertical slit through the plastic covering the substrate. This is your mushroom window.
Fill the included spray bottle with clean water—tap is fine unless yours is heavily chlorinated. Position the kit in your chosen spot: bright indirect light, room temperature (60-75°F for most varieties), and accessible for daily misting. Give the exposed substrate a thorough misting—not soaking, but definitely damp.
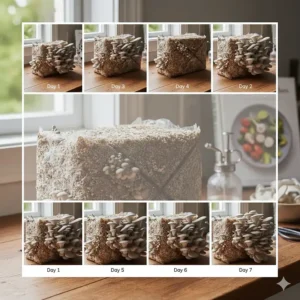
Days 2-6: The Waiting Game
Mist twice daily—morning and evening works well. You’re aiming to keep the exposed substrate surface looking moist and shiny. The mycelium will start reacting to the fresh air and light by forming pins (baby mushrooms). These look like tiny white bumps at first, then quickly develop into recognizable mushroom shapes.
Temperature stability matters here. Avoid placing near heating vents, AC units, or anywhere with significant temperature fluctuations. Consistency is your friend.
Days 7-10: Explosive Growth
Once pinning starts, growth accelerates dramatically. You’ll notice visible size increases daily—sometimes your mushrooms will literally double overnight. Continue misting, but be careful not to directly blast the developing mushrooms, which can damage them. Mist around them, letting the humidity settle on them naturally.
Watch the caps. You’re looking for them to start flattening from their initial curved shape. Most oyster varieties are ready when caps are 2-4 inches across and just beginning to flatten, but before they’re completely inverted.
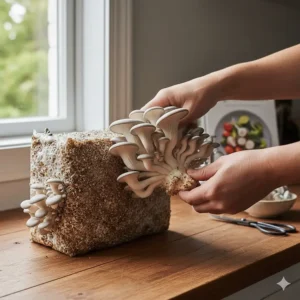
Harvest Time
Here’s the right way to harvest: grasp the entire cluster at the base, close to the substrate block. Twist gently and pull—the whole cluster should come away cleanly. Don’t pick individual mushrooms; take the whole cluster. Use a knife if it’s stubborn.
Trim the base where it was attached to the substrate, removing any substrate material still clinging. Rinse briefly under cool water only if necessary—mushrooms are like sponges and will absorb water. Most of the time, a gentle brush or damp cloth is sufficient.
Post-Harvest Rest
Leave the kit in place, continue light misting every couple days, and watch for the second flush. It typically takes 7-14 days for new pins to form. Some kits produce 3-4 flushes before exhausting the substrate nutrients.
The whole process—from box opening to first harvest—averages 10-14 days for oyster varieties, with king oysters sometimes taking longer. It’s faster than growing literally anything else edible from seed to harvest.
Maximizing Your Mushroom Yield: Pro Tips from Experienced Cultivators
Want to squeeze every possible gram of mushrooms from your kit? Here are the advanced techniques that separate hobbyists from home mycologists.
Temperature Shocking
If your kit isn’t pinning after 7-10 days, try a cold shock. Move it to a refrigerator (35-40°F) for 12-24 hours, then return to room temp. The temperature drop signals winter, and the return to warmth signals spring—nature’s cue for fruiting. This works especially well with blue and king oyster varieties.
Strategic Fruiting Location
Not all spots in your home are equal for mushroom growing. Based on my experiments and community feedback, here’s the hierarchy: bathrooms with windows (high natural humidity), kitchens near sinks, basements with dehumidifier set to medium, bedrooms, living rooms (driest, hardest). The ambient humidity of your growing space makes a bigger difference than most people realize.
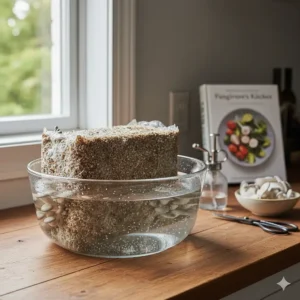
Dunk Between Flushes
Here’s a commercial grower trick: after harvesting your first flush, submerge the entire block in clean water for 4-6 hours. This rehydrates the substrate, giving the mycelium moisture for the next round. Drain thoroughly, return to growing location, and resume misting. Many growers report second flushes rivaling or exceeding the first flush after dunking.
Proper Harvest Technique
Harvest your entire cluster in the morning before the mushrooms have a chance to dry out from daily activities. The moisture content affects both yield and shelf life. Cut the cluster at the base with a clean knife, making your cut close to the block but not gouging into the substrate—you want to preserve the mycelium for future flushes.
Light Exposure Manipulation
While oysters don’t need light for energy, they use it for direction. Growers manipulating light source position can control mushroom cluster shape and direction. Want perfectly vertical stems? Light from directly above. Want artistic sideways clusters? Light from the side. It sounds minor, but it affects both aesthetics and cooking performance.
Substrate Recycling
Once your kit stops producing (typically after 3-4 harvests), don’t trash it. The spent substrate is excellent garden amendment—break it up and mix it into compost or directly into garden beds. It’s rich in nutrients and beneficial microorganisms. In temperate climates, bury spent blocks in shaded garden areas for surprise outdoor mushroom flushes months later.
Sterile Technique for Extended Life
Every time you touch the kit, handle the growing area, or make adjustments, you risk introducing competing microorganisms. Wash hands before misting, keep pets away, and avoid opening the kit in dusty environments. While oyster mycelium is aggressive and competitive, maintaining cleanliness extends productive life.
The difference between a kit producing one modest harvest versus four abundant harvests often comes down to these details.
Oyster Mushroom Growing Kit vs Traditional Mushroom Farming
| Aspect | Growing Kits | Traditional Farming |
|---|---|---|
| Initial Cost | $15-$40 per kit | $200-$500 startup (substrate materials, spawn, equipment) |
| Space Requirements | Countertop (1-2 sq ft) | Dedicated grow room or outdoor space (50+ sq ft) |
| Time to First Harvest | 7-21 days | 6-8 weeks from inoculation |
| Skill Level | Absolute beginner | Intermediate to advanced |
| Yield per Cycle | 0.5-2 lbs | 5-50 lbs depending on scale |
| Contamination Risk | Low (pre-colonized) | Moderate to high (requires sterile technique) |
| Sustainability | Single-use with compostable waste | Ongoing, reusable systems |
| Learning Curve | Minimal (follow instructions) | Steep (substrate preparation, spawn production) |
The verdict? Kits are perfect for beginners, renters, or anyone wanting fresh mushrooms without commitment. Traditional methods are for serious cultivators planning to scale or make this a consistent food source. Many people start with kits to learn the mushroom growth cycle, then graduate to DIY cultivation as confidence builds.
Best Practices for Storing and Cooking Your Homegrown Mushrooms
You’ve harvested your first flush—now comes the equally important part: not wasting your hard work through poor storage or cooking techniques.
Immediate Storage
Fresh oyster mushrooms are 90% water, making them highly perishable. Do NOT wash them before storing—moisture is the enemy of shelf life. Instead, place them in a paper bag (not plastic, which traps moisture) and refrigerate. Paper bags allow the mushrooms to breathe while absorbing excess moisture.
If you must clean them, wait until just before cooking. Use a damp cloth or soft brush to remove substrate debris. A quick rinse under cool water is acceptable only if they’re visibly dirty, but pat dry immediately.
Properly stored, fresh oysters last 5-7 days refrigerated. You’ll notice the edges starting to dry or turn slightly yellow when they’re past prime. Use your nose—fresh oysters have a mild, pleasant aroma. Any ammonia or sour smell means they’re done.
Extending Shelf Life Through Preservation
Cooking: Sauté your entire harvest in butter or olive oil with a bit of salt. Once cooled, these keep refrigerated for 10 days and freeze beautifully for up to 6 months. The pre-cooking prevents the mushy texture frozen raw mushrooms develop.
Dehydrating: Slice your oysters and dehydrate at 110-130°F until completely crisp (usually 6-12 hours depending on thickness). Store in airtight containers with dessicant packets. Rehydrate in warm water for 20 minutes before use, or grind into powder for instant umami boost in soups and sauces. Dehydrated oysters last 12+ months.
Freezing: Only freeze cooked mushrooms. Raw frozen mushrooms become watery and texturally unpleasant when thawed. Sauté, cool, portion into freezer bags, and freeze for up to 6 months.
Cooking Techniques That Maximize Flavor
Oyster mushrooms have high water content, which means the #1 mistake is overcrowding the pan. When mushrooms are piled together, they steam rather than sear, becoming soggy and bland. Always cook in single layers with space between pieces.
High heat is your friend. Get your pan blazing hot, add fat (butter, oil, or animal fat), then add mushrooms in a single layer. Don’t move them—let them sear for 2-3 minutes until golden brown on one side, flip, repeat. This drives out moisture while developing flavor.
For king oysters specifically: slice them into 1/2-inch medallions, score the surface in a crosshatch pattern, and sear like scallops. The texture is uncanny. For pink oysters: crisp them in a very hot pan until the edges caramelize—they’ll develop that bacon-like flavor. Blue and golden oysters: treat like delicate seafood, don’t overcook.
Season simply. Salt, pepper, maybe garlic or thyme. Oyster mushrooms have subtle flavor that heavy seasoning will mask. Let their natural umami shine.
According to culinary experts, oyster mushrooms should never be eaten raw—cooking breaks down the chitin in their cell walls, making nutrients more bioavailable and improving digestibility.
Price vs Value: Are Premium Kits Worth the Extra Cost?
You’re staring at Amazon listings ranging from $15 budget kits to $40 premium options. Is that extra $25 buying you anything meaningful, or just fancy packaging?
Let’s break down the math. A budget kit ($15-$20) typically contains 2-3 lbs of substrate and might yield 0.5-1 lb of mushrooms total across all harvests. That’s about $15-$30 per pound of mushrooms when you factor in the kit cost. Organic oyster mushrooms at farmer’s markets run $15-$25 per pound, so you’re roughly breaking even on cost—but gaining the experience and freshness advantage.
Premium kits ($30-$40) usually offer 4-5 lbs of substrate and can yield 1-2.5 lbs of mushrooms. The cost per pound drops to around $12-$20, and the quality tends to be noticeably higher. What are you actually paying extra for?
Substrate Quality: Premium kits use organic, non-GMO substrates with optimal supplementation. The mycelium is healthier, more aggressive, and less prone to stalling. I’ve grown budget and premium kits side-by-side—the premium version consistently produces larger, healthier mushrooms faster.
Packaging and Tools: Better spray bottles that actually mist rather than squirt, humidity tents that fit properly, clearer instructions with troubleshooting guides. These aren’t game-changers, but they reduce frustration for beginners.
Support: Premium brands typically offer better customer service and grow guarantees. North Spore, for example, will replace kits that don’t fruit. Budget brands often have vaguer return policies.
Genetics: This is huge but often overlooked. Premium producers maintain proprietary mushroom strains selected for high yield, disease resistance, and flavor. It’s like comparing heirloom tomatoes to standard grocery varieties—genetics matter.
My recommendation? Start with one budget kit to learn the process and see if you enjoy it. If mushroom growing hooks you, upgrade to premium kits for your main production. The improved yield and quality justify the cost difference for regular cultivators.
For gifting purposes, premium kits are worth it—the presentation and success rate matter more when someone’s first impression is on the line. For personal experimentation, budget kits are perfectly adequate.
✨ Level Up Your Mushroom Growing Game!
🌿 Ready to become a mushroom cultivation expert? These premium kits make growing gourmet fungi as easy as watering a houseplant. Click to discover current deals and start your journey to sustainable, delicious home harvests!
Sustainability and Environmental Impact of Home Mushroom Cultivation
Here’s something that doesn’t get talked about enough: growing oyster mushrooms at home is one of the most environmentally friendly food production methods available to regular people.
The substrate in most quality kits consists of agricultural waste—sawdust, straw, coffee grounds, soy hulls—materials that would otherwise decompose unused or end up in landfills. Oyster mushrooms are nature’s recyclers, breaking down these lignocellulosic materials through their mycelium and converting them into nutritious food. According to research on mushroom cultivation and environmental benefits, this process actually helps with organic waste management and nutrient cycling.
Let’s compare the environmental footprint of your homegrown oysters versus store-bought options:
Water Usage: Growing a pound of oyster mushrooms uses approximately 2-3 gallons of water (mostly for misting). Growing a pound of beef requires 1,800 gallons. Even compared to vegetables, mushrooms are remarkably water-efficient.
Transportation: Your mushrooms travel from your counter to your plate—zero food miles. Commercial mushrooms average 1,500 miles from farm to grocery store, requiring refrigerated transport and generating significant carbon emissions.
Packaging: Most commercial mushrooms come in plastic containers or wrapped in plastic film. Your home harvest needs only a paper bag for short-term storage—dramatically less plastic waste.
Pesticides and Chemicals: Commercial mushroom operations often use fungicides to prevent contamination and extend shelf life. Your home kit? Nothing but substrate, spawn, and water. Truly organic, whether certified or not.
The spent substrate from your finished kit is 100% compostable. You can break it apart and add it directly to garden beds as nutrient-rich soil amendment, completing the cycle. Some gardeners report improved soil structure and plant health in beds amended with mushroom substrate.
Even better: that substrate continues working. Bury spent oyster blocks in shaded, moist garden areas, and they often fruit again outdoors when conditions align. I’ve had surprise mushroom flushes appear months after burying “finished” blocks—free food from waste material.
The carbon sequestration aspect is worth mentioning too. As mushrooms grow, they incorporate atmospheric carbon into their fruiting bodies. It’s a tiny amount per kit, but it’s still carbon-negative food production happening on your windowsill.
For anyone concerned about food security, climate change, or reducing their environmental impact, home mushroom cultivation checks every box.
Troubleshooting Guide: When Things Don’t Go as Planned
Even with foolproof kits, sometimes nature throws curveballs. Here’s your emergency troubleshooting manual for the most common issues.
Problem: No Pins After 14 Days
Possible causes: Insufficient fresh air exchange, wrong temperature, or kit received too old. Solutions: Try a cold shock (refrigerate 24 hours, then return to room temp), increase air flow around the kit, check temperature against variety requirements. Some kits just need patience—wait up to 21 days before giving up.
Problem: Pins Form But Abort (Turn Brown and Die)
This is heartbreaking but common. Cause: Humidity dropped during critical early pinning stage. The tiny mushrooms dried out before they could establish. Solution: Increase misting frequency to 3-4 times daily during pinning, consider using a humidity tent or clear storage tote over the kit, place a small container of water near the kit for passive humidity.
Problem: Long Skinny Stems, Tiny Caps
You’re seeing mushrooms that look like they’ve been stretched—all stem, no substance. Cause: Insufficient fresh air. High CO2 levels (which mushrooms produce) cause this etiolated growth. Solution: Improve ventilation. Move kit to area with better air circulation, or fan the kit gently once or twice daily to exchange air.
Problem: White Fuzzy Growth on Mushrooms
Don’t panic—this is usually just aerial mycelium, not mold. The mushroom mycelium is growing over the fruiting bodies, usually in response to high CO2. Solution: Increase air flow, reduce misting frequency slightly. Fuzzy white growth on mushrooms themselves is harmless and disappears with cooking.
Problem: Green, Black, or Pink Spots on Substrate
This is actual contamination—mold competing with your mushroom mycelium. Green is typically Trichoderma, black is often Aspergillus, pink can be bacterial. Solution: If contamination is small (under 1 inch), you might cut it out with a clean knife and increase air flow. If widespread, the kit is lost. Prevent this by maintaining sterile technique and avoiding overwatering.
Problem: Mushrooms Growing Slow or Not at All After First Harvest
Substrate is exhausted of either nutrients or water. Solution: Try the dunking method—submerge the entire block in clean water for 4-6 hours, drain completely, and resume normal misting. This often jumpstarts second flushes.
Problem: Weird Smells
Fresh mushrooms smell mildly earthy and pleasant. Ammonia, sour, or rotten smells indicate contamination or over-watering. Solution: Increase air flow, reduce misting, and inspect for visible contamination. If smell persists, the kit has failed.
Problem: Mushrooms Maturing Too Fast
You went to work, came home, and your mushrooms went from babies to fully opened and sporing. Cause: Temperature too warm for the variety. Solution: Harvest immediately even if smaller than expected. Move kit to cooler location for subsequent flushes. Different oyster varieties have different temperature preferences—check your specific variety’s requirements.
Most problems trace back to the three critical factors: humidity, air exchange, and temperature. Master those, and success becomes almost guaranteed.
FAQ: Your Oyster Mushroom Growing Kit Questions Answered
❓ How long does an oyster mushroom growing kit last before expiring?
❓ Can you reuse a mushroom growing kit after the first harvest?
❓ What temperature is best for growing oyster mushroom kits indoors?
❓ Do oyster mushroom growing kits need special lighting?
❓ How much does a king oyster mushroom growing kit yield compared to regular oyster varieties?
Conclusion: Start Your Mushroom Growing Journey Today
After growing dozens of kits and talking with hundreds of home cultivators, here’s what I know for sure: oyster mushroom growing kits have evolved from novelty items into legitimate food production tools. They’re no longer just for curious hobbyists—they’re for anyone who values fresh, organic food, sustainable living, or simply wants the satisfaction of growing something delicious with minimal effort.
The barrier to entry has never been lower. For less than the cost of a nice dinner out, you can have fresh gourmet mushrooms fruiting on your counter within two weeks. The varieties available now—pink, blue, golden, king, pearl—offer something for every palate and cooking style. The kit quality from top manufacturers like North Spore, Back to the Roots, and BloomBox has reached a point where success is almost guaranteed if you follow basic care instructions.
Yes, you’ll make mistakes on your first kit. You might mist too much or not enough, harvest too early or too late. But mushrooms are forgiving teachers, and the learning curve is gentle. By your second or third kit, you’ll have the rhythm down, and growing mushrooms will feel as natural as watering houseplants.
The environmental benefits alone justify the practice. You’re converting agricultural waste into nutritious food, eliminating transportation emissions, reducing plastic packaging, and potentially improving your health through nutrient-dense, chemical-free produce. It’s one of the few consumer actions that’s unambiguously good for both you and the planet.
My advice? Start with a beginner-friendly variety like the Back to the Roots Organic Mini Kit or BloomBox Blue Oyster if you want something foolproof. Once you’re hooked (and you will be), explore the specialty varieties—pink oysters for that bacon-like flavor, golden oysters for gourmet cooking, king oysters for meat substitutes. Build a rotation where you always have one kit at various stages of production.
The future of food includes more people growing at least some of their own. Mushroom kits make that accessible even in tiny apartments with zero outdoor space. You don’t need a garden, special equipment, or expertise—just a countertop, a spray bottle, and ten minutes of daily attention.
Start today. Your future self (and your taste buds) will thank you.
✨ Ready to Grow Your Own Gourmet Mushrooms?
🍄 Join thousands of successful home cultivators who’ve discovered the joy of fresh, homegrown oyster mushrooms. Click on any highlighted kit above to check pricing, read detailed reviews, and start your culinary mushroom adventure. From beginner-friendly options to premium varieties, there’s a perfect kit waiting for you!
Recommended for You
- 7 Best Lion’s Mane Mushroom Grow Kit 2025 (Expert Tested)
- 7 Best 2×4 Grow Tents for Maximum Yields | Updated 2025
- 7 Best Grow Tent 5 x 5 2025 – Expert Tested Reviews
Disclaimer: This article contains affiliate links. If you purchase products through these links, we may earn a small commission at no additional cost to you.
✨ Found this helpful? Share it with your friends! 💬🤗