
In This Article
Here’s something most indoor gardening guides won’t tell you: while everyone’s jumping on the LED bandwagon, savvy growers are quietly thriving with fluorescent grow lights. I’ve watched countless beginners waste hundreds on high-end equipment when a simple T5 fluorescent setup would’ve crusked it for their needs.
Let me paint you a picture. Last winter, I helped my neighbor Sarah transform her spare bedroom into a seedling sanctuary using nothing but fluorescent grow lights. The results? Her tomato seedlings were stockier and healthier than anything she’d grown under expensive LEDs the previous year. The secret? Understanding what fluorescent grow lights actually excel at—and I’m about to share everything with you.
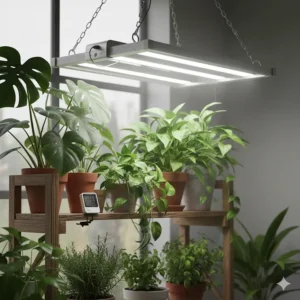
Fluorescent grow lights remain the go-to choice for indoor gardening enthusiasts who value efficiency, affordability, and proven results. Whether you’re starting seeds, maintaining houseplants, or running a small-scale hydroponic operation, these lights deliver consistent performance without draining your wallet. With energy consumption typically 75% lower than incandescent alternatives and a cooler operating temperature than HID systems, fluorescent lights for growing plants offer a practical solution that won’t overheat your growing space or spike your electricity bill.
What is fluorescent grow lights? Fluorescent grow lights are specialized lighting systems that use fluorescent tubes or compact fluorescent lamps (CFL) to provide the specific light spectrum plants need for photosynthesis, typically ranging from 6400K to 6500K for vegetative growth and 2700K to 3000K for flowering stages.
In this comprehensive guide, I’ll walk you through the seven best fluorescent grow light options available in 2025, comparing specs, prices, and real-world performance. You’ll discover which systems work best for different applications, how to maximize your investment, and insider tips that’ll save you both money and headaches.
✨Was this helpful? Spread the word! 🚀
Quick Comparison Table: Top 7 Fluorescent Grow Lights at a Glance
| Product | Size/Wattage | Lumens | Price Range | Best For | Rating |
|---|---|---|---|---|---|
| SunBlaster T5HO 24″ | 24W / 2ft | 2,000 | $35-45 | Small spaces, seedlings | 4.3/5 ⭐ |
| Hydrofarm Agrobrite FLT48 | 432W / 4ft (8-tube) | 40,000 | $180-220 | Professional growers | 4.5/5 ⭐ |
| iPower T5 with Stand | 24W / 2ft | 1,500 | $40-55 | Beginners, herbs | 4.2/5 ⭐ |
| VIVOSUN T5 4-Tube | 216W / 4ft (4-tube) | 20,000 | $75-95 | Mid-range setups | 4.4/5 ⭐ |
| Hydrofarm FLT46 | 324W / 4ft (6-tube) | 30,000 | $140-170 | Medium operations | 4.3/5 ⭐ |
| SunBlaster T5HO 48″ | 54W / 4ft | 5,000 | $55-70 | Home gardeners | 4.4/5 ⭐ |
| Compact CFL 45W Bulb | 45W / standard socket | 3,400 | $12-20 | Budget option, single plants | 4.0/5 ⭐ |
💬 Just one click – help others make better buying decisions too! 😊
🛒 Ready to Upgrade Your Indoor Garden?
✨ These carefully selected fluorescent grow lights represent the best value in 2025. Click any highlighted product name to check current Amazon pricing and read verified customer reviews. Whether you’re starting seeds or maintaining a full greenhouse, you’ll find the perfect lighting solution here! 🌱
Top 7 Fluorescent Grow Lights: Expert Analysis 🔍
1. SunBlaster T5HO 24 Inch – The Compact Champion
If you’re working with limited space, the SunBlaster T5HO 24 Inch is basically the Swiss Army knife of grow lights for indoor plants. This 24-watt powerhouse punches well above its weight class.
Key Specifications:
- 24W T5HO fluorescent tube (6400K full spectrum)
- 2,000 lumens output
- Built-in electronic ballast with instant starting
- Includes 6ft power cord, link cord, mounting clips
- 10,000-hour rated lifespan
What makes this fixture stand out? The integrated electronic ballast eliminates that annoying flickering you get with older fluorescent systems. I’ve used these for everything from African violets to starting pepper seeds, and they’ve never disappointed. The slim aluminum housing is barely noticeable when mounted under shelves, making it perfect for apartment dwellers.
Pros:
✅ Extremely energy-efficient for continuous operation
✅ No heat issues—you can position it 6-8 inches from plants
✅ Daisy-chain capability (link up to 8 fixtures)
Cons:
❌ Limited coverage area (best for 18-24 inch width)
❌ Replacement bulbs can be tricky to source locally
Price: $35-45 | Customer Verdict: Users consistently praise the low profile design and reliability, though some mention the bulbs don’t quite reach the advertised 10,000-hour lifespan in heavy-use scenarios.
2. Hydrofarm Agrobrite FLT48 – The Professional’s Choice
When hobbyists graduate to serious indoor growing, they usually land on the Hydrofarm Agrobrite FLT48. This beast features eight 54W T5 tubes delivering a staggering 40,000 lumens—enough to cover a 4×2 foot growing area with authority.
Key Specifications:
- 432W total (8 x 54W T5 bulbs)
- 40,000 lumens total output
- 6500K full daylight spectrum
- German specular aluminum reflector
- 10ft power cord with hanging hardware
I’ve seen commercial growers use these for propagation rooms, and the results speak volumes. The German aluminum reflector isn’t marketing fluff—it genuinely distributes light more evenly than cheaper fixtures. You can hang this vertically, horizontally, or overhead, which is crucial when you’re optimizing a tight space.
Pros:
✅ Commercial-grade construction and components
✅ Exceptional light distribution across entire coverage area
✅ Separate switches for different tube banks (energy management)
Cons:
❌ Higher upfront investment ($180-220 range)
❌ Replacement bulbs add up for all eight tubes
Price: $180-220 | Customer Verdict: Professional growers swear by these, noting the fixtures easily last 5+ years with proper maintenance. The aluminum housing stays cool even after 12-hour photoperiods.
3. iPower 24W 2 Feet T5 with Stand Rack – Best Starter Kit
The iPower 24W 2 Feet T5 system removes all the guesswork for beginners. You get the light, a height-adjustable stand, and everything you need in one box. No drilling, no complicated setup—just unbox and grow.
Key Specifications:
- 24W T5 fixture with 6400K bulb
- Adjustable stand (up to 30 inches high)
- Metal frame construction
- Feather-touch height adjustment
- Compatible with heat mats for seedlings
Think of this as the “training wheels” setup that you won’t actually outgrow. The stand quality surprised me—it’s genuinely sturdy metal, not the flimsy wire racks you see elsewhere. I’ve recommended this to three friends starting their seed-starting journey, and all three are still using them years later.
Pros:
✅ Complete all-in-one solution (no additional purchases needed)
✅ Tool-free height adjustments as plants grow
✅ Stable base prevents tipping accidents
Cons:
❌ Stand footprint requires dedicated space (25″ x 18.5″ x 30″)
❌ Single tube limits coverage compared to multi-tube systems
Price: $40-55 | Customer Verdict: Perfect ratings from seed-starting enthusiasts. Parents love it for educational projects with kids, while serious gardeners appreciate it as a supplemental system.

4. VIVOSUN T5 4-Tube Fluorescent Fixture – The Sweet Spot
For growers who need more than a single-tube setup but aren’t ready for commercial-grade equipment, VIVOSUN T5 4-Tube hits the Goldilocks zone. It’s powerful enough for serious growing while remaining affordable and manageable.
Key Specifications:
- 216W total (4 x 54W tubes)
- 20,000 lumens (5,000 per 4ft tube)
- 6500K cool white spectrum
- Dual on/off switches for flexibility
- UL certified with 2-year fixture warranty
The dual switch design is cleverer than it sounds. During early seedling stages, you run just two tubes to save electricity. As plants mature and demand more light, flip on all four. This flexibility has saved me about 30% on electricity compared to running all tubes constantly. Plus, the 20,000-hour bulb rating means you’re replacing tubes once every 2-3 years with typical use.
Pros:
✅ Balanced power-to-price ratio
✅ Energy management through dual switch control
✅ Pre-assembled and plug-ready (15-minute setup)
Cons:
❌ Heavier than single-tube systems (requires sturdy mounting)
❌ Replacement bulbs sold separately (factor this into long-term costs)
Price: $75-95 | Customer Verdict: The 4.4-star rating across 2,000+ reviews speaks to consistent quality. Users particularly appreciate the robust packaging that prevents shipping damage.
5. Hydrofarm Agrobrite FLT46 – The Balanced Performer
Think of the Hydrofarm FLT46 as the middle child that actually lives up to expectations. Six 54W tubes deliver 30,000 lumens—enough for vegetables, herbs, and even low-light flowering plants. It’s essentially 75% of the power of the 8-tube system at 60% of the cost.
Key Specifications:
- 324W total (6 x 54W tubes)
- 30,000 lumens output
- 6400K spectrum for vegetative growth
- Powder-coated steel housing
- Daisy-chain compatible (link up to 3 units)
I helped a friend set up his basement microgreens operation with three of these fixtures, and he’s been harvesting commercially for two years now. The key advantage? The 6-tube configuration provides professional-quality light coverage without requiring 240V circuits that 8-tube systems sometimes demand.
Pros:
✅ Professional results without commercial electricity requirements
✅ Modular—start with one, expand as needed
✅ Sturdy construction withstands humid growing environments
Cons:
❌ Limited to residential 120V outlets (can’t run many other devices on same circuit)
❌ Requires proper ventilation in enclosed spaces
Price: $140-170 | Customer Verdict: Hydroponic growers rate this 4.3/5, with most praise directed at the reliable ballasts that outlast cheaper alternatives. Some users report 7+ years of service.
6. SunBlaster T5HO 48 Inch – The Space Maximizer
When you need to cover a 4-foot shelf efficiently, the SunBlaster 48 Inch model delivers surprising intensity from a single tube. The optional NanoTech reflector (often included) increases usable light by up to 48% compared to bare-bulb fixtures.
Key Specifications:
- 54W T5HO tube (6400K)
- 5,000 lumens base output
- NanoTech reflector technology
- 120V with built-in ballast
- Compatible with various mounting options
The NanoTech reflector deserves special mention—it’s not your grandmother’s aluminum foil. This engineered surface redirects photons that would normally scatter upward, focusing them down toward your plants. In practical terms, you get the coverage of a 75-80W fixture while consuming just 54W. The University of Guelph actually studied this technology and confirmed the efficiency gains.
Pros:
✅ Maximum light efficiency per watt consumed
✅ Single-tube simplicity means minimal maintenance
✅ Whisper-quiet operation (no ballast hum)
Cons:
❌ Single tube coverage less uniform than multi-tube systems
❌ Higher per-lumen cost than bulk multi-tube fixtures
Price: $55-70 | Customer Verdict: Orchid growers and reptile keepers both love these for supplemental lighting. The slim profile makes it the go-to choice for under-cabinet herb gardens.
7. Compact CFL 45W Grow Light Bulb – Budget Versatility
Sometimes you need grow lighting in a standard E26 socket, and that’s where the 45W CFL grow bulb shines (pun intended). These screw-in fluorescent lamps fit any regular lamp fixture, making them incredibly versatile for spot-lighting individual plants.
Key Specifications:
- 45W actual power draw
- 3,400 lumens output (equivalent to 200W incandescent)
- Available in 6500K (vegetative) or 2700K (flowering)
- Standard E26 medium base
- 8,000-10,000 hour lifespan
I keep two of these in desk lamps for my African violets, and they’re absolutely thriving. The real advantage? You probably already own compatible fixtures. Need to light a specific plant in a dark corner? Screw one into that old floor lamp. Want to extend day length for your citrus tree? Pop one in a clamp light. The flexibility is unmatched.
Pros:
✅ Works with existing lamp fixtures (zero additional investment)
✅ Lowest entry cost ($12-20 per bulb)
✅ Easy to experiment with placement and positioning
Cons:
❌ Heat output higher than tube fluorescents (keep 12+ inches from foliage)
❌ Not ideal as primary light source for intensive growing
Price: $12-20 | Customer Verdict: These earn solid 4.0/5 ratings, with most criticism focused on shorter-than-advertised lifespans. Users recommend buying name brands (GE, Feit, Sylvania) over generic imports for reliability.
Understanding Fluorescent Technology: T5, T8, T12, and CFL Explained 💡
Let’s demystify the alphabet soup of fluorescent lighting. The “T” stands for tubular, and the number indicates the diameter in eighths of an inch. So a T5 tube measures 5/8 inch (about 16mm) in diameter, while a T8 is a full inch across.
The T5 Revolution
T5 fluorescent tubes represent the current pinnacle of fluorescent technology. Compared to older T8 and T12 systems, T5 fluorescents offer:
- Higher lumens per watt efficiency – You get more light from less electricity
- Cooler operation – T5 lamps run at optimal performance even when cool, unlike T12s that need warmth
- Smaller diameter – Easier to create compact, space-efficient fixtures
- Better color spectrum control – More accurate targeting of the photosynthetic active radiation (PAR) spectrum
According to the U.S. Department of Energy, T5 systems can reduce energy consumption by 40% compared to T8 fluorescent tubes while providing equivalent or better light output.
CFL Grow Lights: The Flexible Alternative
Compact fluorescent lamps (CFL) essentially fold a long fluorescent tube into a spiral or folded configuration, allowing it to fit standard light sockets. For grow lighting, CFLs shine (sorry, couldn’t resist) when you need:
- Supplemental lighting for individual plants
- Flexibility to use existing fixtures and lamps
- Quick setup without drilling or permanent installation
- Lower initial investment for small-scale growing
The trade-off? CFL fluorescent lighting tends to produce more heat per lumen than tube fluorescents, and the light distribution isn’t as uniform. For serious growing operations, dedicated T5 fixtures typically outperform CFLs, but for hobbyists and supplemental use, CFLs remain a cost-effective choice.
High Output (HO) vs. Normal Output
You’ll often see “T5HO” designations, which stands for high output. These fluorescent grow light bulbs produce roughly 90-100 lumens per watt compared to 60-70 for standard output tubes. The increased intensity comes at the cost of slightly higher power consumption and heat generation, but for most indoor gardening applications, the trade-off heavily favors HO systems.
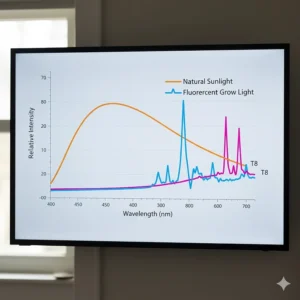
How Light Spectrum Affects Plant Growth 🌈
Here’s where things get interesting. Not all light is created equal in the plant world. Understanding spectrum helps you choose the right fluorescent light for plants at different growth stages.
The Kelvin Scale Decoded
Light color temperature is measured in Kelvin (K). For fluorescent grow lights, you’ll typically encounter these options:
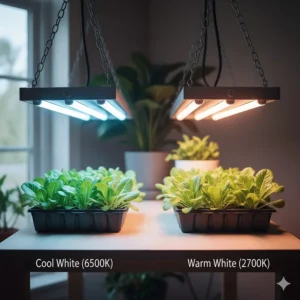
6400K-6500K (Cool White/Daylight):
- Mimics bright midday sun
- Heavy in blue spectrum wavelengths
- Ideal for vegetative growth, foliage development, and seedlings
- Prevents “stretching” (excessive stem elongation)
- Best for herbs, leafy greens, and maintaining houseplants
2700K-3000K (Warm White):
- Mimics evening/morning light
- Rich in red spectrum wavelengths
- Promotes flowering and fruiting responses
- Encourages compact, bushy growth
- Useful for extending growing seasons for fruiting plants
For most indoor gardening with fluorescent lights, the 6400-6500K cool spectrum dominates because it excels at the tasks fluorescent setups handle best: seedlings, cuttings, herbs, and houseplant maintenance.
PAR and PPF: The Metrics That Matter
Lumens measure light as humans perceive it, but plants don’t see the world like we do. Photosynthetically Active Radiation (PAR) measures light in the 400-700nm wavelength range that plants actually use. When comparing fluorescent grow light systems, look for:
- PAR ratings – How much usable light reaches your plants
- PPF (Photosynthetic Photon Flux) – Total amount of PAR light produced per second
- PPFD (PPF Density) – How much PAR reaches a specific area
A quality 4-tube T5 system typically delivers 200-300 μmol/m²/s PPFD at 12 inches, which comfortably supports seedlings, propagation, and low-to-medium light plants. For reference, the NASA Growing Beyond Earth initiative found that leafy greens thrive with 200-400 μmol/m²/s PPFD.
Setting Up Your Fluorescent Growing System: A Step-by-Step Guide 🔧
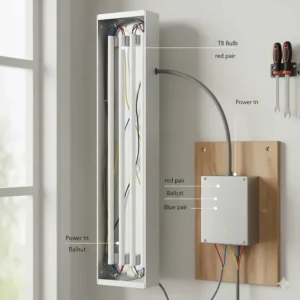
Installation Best Practices
Step 1: Calculate Your Coverage Area Measure your growing space and apply the “80% rule”—effective coverage is typically 80% of the fixture length and width. A 4-foot fixture effectively covers about 40 inches of shelf space.
Step 2: Determine Proper Height For T5 fluorescent tubes:
- Seedlings: 2-4 inches
- Young plants: 4-8 inches
- Mature foliage plants: 8-12 inches
- Light-hungry plants: 4-6 inches
CFL grow light bulbs run hotter, so maintain 12-18 inches minimum clearance.
Step 3: Mounting Options Chain hanging provides the most flexibility for height adjustments as plants grow. Alternatively, use:
- Under-shelf mounting for permanent installations
- Adjustable stands for portability
- Clamp fixtures for CFLs in experimental setups
Step 4: Optimize Light Spread Add reflective materials to growing areas. Mylar reflects up to 95% of light, flat white paint reflects about 85%, and even aluminum foil (dull side out) reflects 70-75%. These simple additions can boost effective light intensity by 30-40%.
Daily Light Integral (DLI) Requirements
Different plants need different amounts of total daily light. DLI measures this as moles of light per square meter per day (mol/m²/day). Here’s what you need:
- Low-light plants (pothos, snake plants): 5-10 mol/m²/day = 12-16 hours fluorescent light
- Medium-light plants (herbs, lettuce): 10-15 mol/m²/day = 14-18 hours
- High-light plants (tomatoes, peppers): 15-20 mol/m²/day = 16-20 hours
Most indoor gardeners use timer switches to maintain consistent photoperiods, which is critical for plant health and flowering triggers.
Comparing Fluorescent vs. LED and HID Grow Lights ⚖️
Let’s address the elephant in the grow room: how do fluorescent lights stack up against the competition?
| Factor | Fluorescent | LED | HID (HPS/MH) |
|---|---|---|---|
| Initial Cost | $ (Lowest) | $$$ (Highest) | $$ (Medium) |
| Operating Cost | Medium | Lowest | Highest |
| Heat Output | Low | Very Low | Very High |
| Lifespan | 10,000-20,000 hrs | 50,000-100,000 hrs | 10,000-15,000 hrs |
| Light Intensity | Low-Medium | High | Very High |
| Spectrum Control | Limited | Excellent | Good |
| Best For | Seedlings, herbs, houseplants | All stages | Fruiting, flowering |
When Fluorescent Wins
Fluorescent lighting remains the champion for:
- Seed Starting Operations – The gentle, cool light won’t scorch delicate seedlings, and the even distribution promotes uniform growth
- Herb Gardens – Perfect intensity for basil, cilantro, parsley, and other culinary herbs
- Propagation Stations – Cuttings root better under the mild intensity of fluorescent systems
- Supplemental Lighting – Extending day length for houseplants or windowsill gardens
- Budget-Conscious Setups – Best bang-per-buck for hobbyists and beginners
According to research from Cornell University’s Controlled Environment Agriculture program, fluorescent systems offer the lowest barrier to entry for indoor growing while delivering professional-grade results for appropriate applications.
When to Consider Alternatives
If you’re growing fruiting vegetables (tomatoes, peppers) to maturity, flowering ornamentals, or operating a large-scale commercial setup, modern LEDs or HID systems often provide better long-term value despite higher upfront costs. However, many successful growers use a hybrid approach: fluorescents for seedlings and early growth, then transition plants to higher-intensity lighting for flowering and fruiting.
Maximizing Efficiency: Pro Tips for Fluorescent Growing 🎯
Energy Management Strategies
1. Utilize Dual-Switch Systems If your fixture has multiple switches (like the VIVOSUN 4-tube model), you’re sitting on hidden savings. Run half your tubes during early growth stages, then fire up all tubes as plants mature and demand more light. This approach can cut electricity costs by 25-40% over a growing season.
2. Implement Reflector Technology Bare fluorescent tubes waste 40-50% of their light upward and sideways. Quality reflectors (like SunBlaster’s NanoTech system) redirect this wasted light down toward plants. In practical terms, a reflectored fixture performs like a system with 1.5x more tubes.
3. Clean Your Tubes Monthly Dust accumulation reduces light transmission by 10-15% within just a few months. A quick wipe with a dry microfiber cloth once monthly maintains peak output. Mark it on your calendar—this five-minute task pays serious dividends.
4. Position Strategically Light intensity follows the inverse square law: double the distance, and you get just one-quarter the intensity. Keeping your fluorescent fixture at optimal distance (typically 4-8 inches) dramatically improves efficiency versus hanging it at a convenient height.
Extending Bulb Lifespan
Fluorescent tubes don’t die suddenly—they gradually dim. Most manufacturers rate tubes for 10,000-20,000 hours, but effective growing lifespan is shorter. Replace tubes when:
- Light output drops below 70% of initial brightness (usually 8,000-12,000 hours)
- Ends show significant darkening or discoloration
- You notice uneven lighting or dead spots
- Tubes require multiple attempts to ignite
Professional growers mark installation dates on each tube and track hours using simple outlet timers with hour meters (around $15 on Amazon).
Seasonal Strategies
Spring (Seed Starting): Position lights 2-4 inches above seed trays. Run 14-16 hours daily. Once seedlings develop true leaves, raise lights to 4-6 inches.
Summer (Maintenance): Reduce photoperiod to 10-12 hours for most plants unless supplementing natural light. Focus fluorescent systems on areas natural light doesn’t reach.
Fall (Extended Growing): Increase photoperiod back to 14-16 hours to simulate longer summer days. This tricks plants into continuing vegetative growth.
Winter (Indoor Operations): Run lights during coldest hours (night) to use waste heat productively. The modest warmth from fluorescent fixtures can reduce heating costs in growing areas.
Troubleshooting Common Fluorescent Growing Issues 🔍
Problem: Plants Stretching (Leggy Growth)
Symptoms: Tall, weak stems with widely spaced leaves
Cause: Insufficient light intensity or improper distance
Solution: Lower fixture to 2-4 inches for seedlings, 4-6 inches for mature plants. Verify you’re using 6500K cool white spectrum, not warm white. If problem persists, add a second fixture or upgrade to higher-output tubes.
Problem: Slow Growth or Pale Leaves
Symptoms: Yellowing foliage, stunted development
Cause: Inadequate photoperiod or aging tubes
Solution: Increase daily light exposure to 14-16 hours for most plants. Check tube age—tubes over 12,000 hours may appear bright to human eyes but lack intensity for plant growth. Replace with fresh tubes and note immediate improvement.
Problem: Uneven Growth Patterns
Symptoms: Plants growing sideways or one-sided
Cause: Light distribution issues
Solution: Rotate plants 180° every 3-4 days. Add reflective material to growing area walls. If using single-tube fixtures, consider upgrading to multi-tube systems for more uniform coverage.
Problem: Flowering Issues
Symptoms: Plants won’t flower or produce fruit
Cause: Wrong light spectrum or intensity
Solution: Fluorescent systems alone rarely provide sufficient intensity for heavy flowering/fruiting. Switch to 2700-3000K warm white tubes, increase photoperiod to 12-14 hours, and position lights closer (6 inches). For intensive flowering, consider supplementing with LED or transitioning to HID lighting.
Problem: Algae Growth in Hydroponic Systems
Symptoms: Green slime on growing media or reservoirs
Cause: Light penetration to nutrient-rich areas
Solution: Shield nutrient solutions from direct light. Use opaque containers or wrap clear vessels with reflective material. Adjust light angle to eliminate direct exposure to water surfaces while maintaining adequate plant coverage.
DIY vs. Commercial Fluorescent Systems: Making the Right Choice 🛠️
When to Build Your Own
The DIY route appeals to budget-conscious growers and tinkerers. You can assemble a basic 4-foot dual-tube T8 system for under $50 using:
- Standard 4ft shop light fixture ($25-35)
- High-output 6500K T8 tubes ($8-12 each)
- Chain and S-hooks for hanging ($5-8)
- Power strip with timer ($12-15)
Advantages of DIY:
- Lower initial investment (40-50% savings)
- Easy to repair and replace components
- Customizable to odd spaces and configurations
- Learning experience builds electrical competence
Disadvantages:
- No pre-engineered reflectors (reduced efficiency)
- Potentially less uniform light distribution
- Assembly time and tool requirements
- May void manufacturer warranties on components
When to Buy Complete Systems
Commercial fluorescent grow light fixtures like those from SunBlaster, Hydrofarm, or VIVOSUN offer plug-and-play convenience. You’re paying a premium for:
- Engineered reflectors – Professionally designed light distribution
- Integrated ballasts – Optimized for grow light performance
- Quality assurance – Testing and warranties
- Proper mounting hardware – Everything needed for installation
- Customer support – Troubleshooting and replacement assistance
For serious growing operations or those lacking DIY experience, the 20-30% premium for commercial systems pays dividends through superior performance, reliability, and time savings.
How to Choose Fluorescent Grow Lights: 7-Step Decision Framework 📋
Step 1: Assess Your Growing Space Measure length, width, and available mounting height. Note any obstacles (shelving supports, pipes, etc.) that might interfere with light placement. Calculate square footage to determine total fixture coverage needed.
Step 2: Define Your Growing Goals Different applications demand different specs:
- Seed starting: 2-4ft single or dual-tube fixtures
- Herb gardens: 2-4ft 2-4 tube systems
- Houseplant maintenance: CFL bulbs or single-tube fixtures
- Small vegetables: 4ft 4-6 tube systems
- Microgreens production: 4-8ft multi-tube fixtures
Step 3: Calculate Light Requirements Total your plant needs. One 4-foot T5HO tube effectively supports 3-4 square feet for low-light plants, 2-3 square feet for medium-light plants, or 1-2 square feet for light-hungry species.
Step 4: Budget for Complete System Don’t forget:
- Initial fixture cost
- Replacement bulbs (budget $40-80 annually)
- Timer and hanging hardware ($15-30)
- Reflective materials ($10-50)
- Electricity (estimate $5-15 monthly per 4-tube fixture)
Step 5: Evaluate Physical Constraints Consider:
- Available electrical outlets and circuit capacity
- Weight capacity of mounting surface
- Ventilation and air circulation
- Accessibility for maintenance
- Noise tolerance (some older ballasts hum)
Step 6: Plan for Expansion Will your growing operation expand? Daisy-chain-capable fixtures (like SunBlaster and Hydrofarm models) allow easy expansion without rewiring. Start with one fixture, add more as your plant collection grows.
Step 7: Verify Compatibility For replacement bulbs and parts, verify:
- Tube length matches fixture exactly
- Wattage matches ballast rating
- Base type (G5 for T5, G13 for T8)
- Color temperature suits your growing stage
- Brand availability in your region
Maintenance and Longevity: Getting the Most from Your Investment 🔧
Monthly Maintenance Checklist
Week 1: Visual Inspection
- Check tubes for darkening at ends
- Test on/off switches for proper operation
- Verify timer accuracy
- Inspect power cords for wear or damage
Week 2: Cleaning
- Wipe tubes with dry microfiber cloth (never use liquids on hot tubes)
- Clean reflector surfaces with damp cloth
- Remove dust from ballast vents
- Tidy wiring and secure any loose connections
Week 3: Performance Check
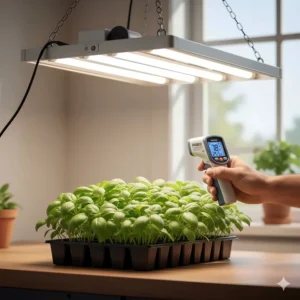
- Measure light levels with smartphone app (free PAR meter apps available)
- Compare readings to baseline measurements
- Adjust fixture height as plants grow
- Rotate fixtures 180° if you notice uneven tube wear
Week 4: Record Keeping
- Log tube hours (many timers include hour meters)
- Note any performance issues or unusual observations
- Update replacement tube shopping list
- Review electricity usage if utility provides detailed breakdowns
Replacement Strategies
Proactive Tube Replacement Rather than waiting for complete failure, replace tubes strategically:
- Option 1: Rotate Method – Replace one tube every 6 months, ensuring you always have mostly fresh tubes running
- Option 2: Bank Method – Replace entire set annually, keeping old tubes as emergency backups
- Option 3: Performance Method – Test output regularly, replace individual tubes when they drop below 75% brightness
According to research from the University of Arizona Controlled Environment Agriculture Center, proactive replacement at 70-75% brightness maintains consistent plant performance and can actually cost less long-term than running dimmer tubes that require longer photoperiods.
Proper Disposal
Fluorescent tubes contain small amounts of mercury and require responsible disposal. Never throw fluorescent bulbs in regular trash. Options include:
- Hardware stores with recycling programs (Home Depot, Lowe’s accept CFLs for free)
- Municipal hazardous waste collection events
- Mail-back programs from retailers
- Commercial recycling services for large operations
Real-World Applications: Success Stories and Case Studies 🌱
Case Study 1: Urban Microgreens Operation
Grower: Marcus T., Brooklyn, NY
Setup: Six Hydrofarm FLT46 fixtures in basement
Results: $2,400 monthly revenue from restaurant sales
Marcus started with a single 4-tube fixture, experimenting with sunflower and pea shoots. After mastering the basics, he invested in six 6-tube commercial fixtures. “The fluorescent lights let me keep electricity costs under $120 monthly while producing 40-50 pounds of microgreens weekly,” he explains. “LEDs would’ve saved maybe $30-40 in electricity, but the upfront cost difference was $1,200. The fluorescent systems paid for themselves in saved capital within the first two months.”
Key Takeaway: For high-turnover crops like microgreens, fluorescent systems’ low entry cost accelerates profitability despite slightly higher operating costs.
Case Study 2: Year-Round Herb Garden
Grower: Jennifer K., Seattle, WA
Setup: Three SunBlaster T5HO 24″ fixtures under kitchen cabinets
Results: $800+ annual savings on grocery herbs
Jennifer mounted three fixtures under upper cabinets, creating continuous production of basil, cilantro, parsley, and thyme. “I calculated we spent about $15-20 weekly on fresh herbs before the grow light setup,” she shares. “Now my electricity cost is maybe $6 monthly, and we harvest $20-25 worth of herbs weekly. The system paid for itself in six weeks.”
Key Takeaway: For household-scale applications, compact fluorescent fixtures integrate seamlessly into existing spaces, providing immediate returns on investment.
Case Study 3: Seed Starting for Market Garden
Grower: David and Sarah M., Vermont
Setup: Custom shelving with eight VIVOSUN 4-tube fixtures
Results: 12,000+ seedlings annually, $15,000 plant sale revenue
This couple transformed their garage into a seedling production facility, supplying their 2-acre market garden and selling surplus starts. “We evaluated LEDs but couldn’t justify the $3,000+ investment for the coverage we needed,” David explains. “The VIVOSUN fluorescent systems cost us $650 total and produce professional-quality seedlings identical to what we saw in commercial greenhouses.”
Key Takeaway: When properly implemented, fluorescent systems deliver commercial results at hobby-scale pricing.
Frequently Asked Questions (FAQs) ❓
❓ Can fluorescent grow lights support fruiting vegetables like tomatoes to harvest?
❓ How close can I position fluorescent tubes to plant foliage without burning?
❓ Do I need to replace all fluorescent tubes simultaneously or individually?
❓ Which is more economical long-term: fluorescent or LED grow lights?
❓ Can fluorescent grow lights work for orchids and other flowering houseplants?
Conclusion: Making Your Fluorescent Growing Decision 🎯
After diving deep into specifications, comparing prices, and analyzing real-world performance, here’s the bottom line: fluorescent grow lights remain the smart choice for specific applications in 2025. They’re not dinosaurs—they’re specialized tools that excel in their niche.
If you’re starting seeds, maintaining houseplants, growing herbs, propagating cuttings, or running microgreens operations, fluorescent systems deliver professional results at accessible prices. The combination of low heat output, even light distribution, modest electricity consumption, and affordable entry costs creates a compelling value proposition that LED systems struggle to match at the hobbyist level.
However, be realistic about limitations. Fluorescent systems aren’t ideal for fruiting vegetables to maturity, high-PPFD demanding plants, or large-scale commercial operations where long-term electricity savings justify LED premiums. Understanding where fluorescents shine—and where they don’t—ensures you make informed investments.
My Personal Recommendation
For most readers, I’d suggest starting with either the SunBlaster T5HO 24″ for compact setups or the VIVOSUN 4-tube for more substantial operations. Both offer excellent performance, reasonable pricing, and upgradability as your growing ambitions expand. Once you’ve mastered the basics with fluorescent systems, you’ll have the knowledge to evaluate whether advancing to LEDs makes sense for your specific situation.
Final Thoughts
The indoor growing journey begins with a single seed and a simple light. Don’t let analysis paralysis prevent you from getting started. Fluorescent grow lights provide a forgiving, affordable entry point that’s launched thousands of successful growing operations. Your plants don’t care about cutting-edge technology—they care about consistent, appropriate-spectrum light at the right intensity. Fluorescent systems deliver exactly that.
🛒 Start Growing Today!
✨ The products featured in this guide represent the best fluorescent grow light options available in 2025. Click through to Amazon, read additional customer reviews, and choose the system that matches your space and goals. Your future garden (and your seedlings) will thank you! 🌿💚
Whether you’re germinating your first tomato seeds or scaling up a microgreens business, the right fluorescent lighting system is waiting. Make your choice, get growing, and join the thriving community of indoor gardeners who’ve discovered that sometimes the best technology is the one that simply works.
Recommended for You
- 7 Best 1000 Watt Grow Light Picks for Indoor Growing 2025
- Full Spectrum LED Grow Light: 7 Top Picks for Indoor Growing in 2025
Disclaimer: This article contains affiliate links. If you purchase products through these links, we may earn a small commission at no additional cost to you.
✨ Found this helpful? Share it with your friends! 💬🤗