
In This Article
Here’s the thing about greenhouse grow lights—they’re not just fancy bulbs that make your plants look pretty. They’re the difference between a thriving indoor garden and a collection of sad, leggy seedlings reaching desperately toward your windows. I’ve been there, watching my tomato starts stretch like they’re auditioning for a yoga class, and trust me, it’s not fun.
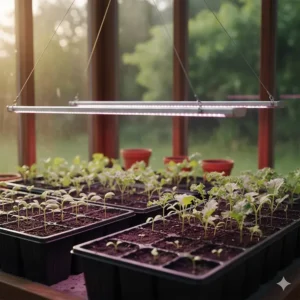
Greenhouse grow lights simulate natural sunlight, providing the specific light spectrum plants need for photosynthesis, growth, and fruit production. Whether you’re dealing with cloudy winter days, supplementing natural light in your greenhouse, or growing indoors year-round, the right lighting system transforms your growing experience. Modern options range from energy-efficient LED panels to traditional grow light fluorescent tubes, each offering unique advantages for different growing situations.
The market has exploded with options lately. You’ve got full-spectrum LEDs that claim to replace the sun, T5 and T8 fluorescent tube systems that your grandma might’ve used, and everything in between. Some cost less than your weekly coffee budget, while others rival a month’s mortgage payment. The trick is finding what actually works for your space, your plants, and your wallet—not just what looks impressive in marketing photos.
Quick Comparison Table
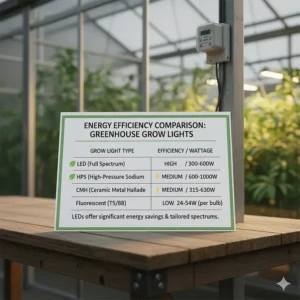
| Product | Type | Wattage | Coverage | Price Range | Best For |
|---|---|---|---|---|---|
| BESTVA DC1000 | LED Panel | 100W | 2×2 to 3×3 ft | $70-90 | Budget LED option |
| Spider Farmer SF1000 | LED Panel | 100W | 2×2 to 3×3 ft | $110-130 | Premium quality |
| VIVOSUN VS1000E | LED Panel | 100W | 2×2 to 3×3 ft | $60-80 | Value pick |
| Barrina T8 LED Strips | LED Tube | 252W (6x42W) | 4 ft shelving | $80-100 | Seed starting |
| VIVOSUN T5 Fluorescent | T5 Tube | 216W (4x54W) | 4 ft coverage | $90-120 | Traditional growers |
| EVERYGROW Outdoor String | LED String | 288 chips | 21.3 ft | $100-130 | Greenhouse use |
| Active Grow T8 Bulbs | LED Tube | 22W each | 4 ft | $50-70 (4-pack) | Retrofitting |
💬 Just one click – help others make better buying decisions too!😊
Top 7 Greenhouse Grow Lights: Expert Analysis
1. BESTVA 2025 Upgrade DC1000 LED Grow Light
Right out of the gate, the BESTVA DC1000 catches your eye with its updated diode configuration and surprisingly affordable price point. This full-spectrum panel packs high-yield diodes that deliver consistent performance across vegetative and bloom stages, making it a versatile workhorse for greenhouse supplementation.
Key Specifications:
- 100W actual power consumption
- Full spectrum coverage (3000K-6500K + 660nm red)
- Veg coverage: 3×3 ft | Bloom: 2×2 ft
- Dimmable ballast function
Price Range: $70-90
Customer Feedback: Users consistently praise the DC1000’s plug-and-play simplicity and impressive light penetration for the price. Several greenhouse growers reported noticeably faster vegetative growth compared to their previous fluorescent setups, with one noting that seedlings developed 30% more robust stems within three weeks.
✅ Pros:
- Exceptional value for money
- True full-spectrum output
- Low heat generation with passive cooling
❌ Cons:
- Basic dimming (no smart features)
- Slightly heavier than competitors
2. Spider Farmer SF1000 LED Grow Light
If BESTVA is the budget champion, Spider Farmer SF1000 represents what happens when you don’t compromise. This unit uses Samsung LM301H EVO diodes—basically the gold standard in LED grow technology—delivering superior efficiency and longevity that justifies its premium pricing.
Key Specifications:
- Samsung LM301H EVO chip technology
- 100W with 2.75 μmol/J efficiency
- Dimming knob plus daisy-chain capability
- Fanless design for silent operation
Price Range: $110-130
Customer Feedback: Greenhouse operators appreciate the SF1000’s professional build quality and consistent output. Multiple reviews mention the fanless design as a game-changer for quiet growing environments, while commercial growers note the daisy-chain feature allows easy expansion without complicated wiring.
✅ Pros:
- Industry-leading diode technology
- Whisper-quiet operation
- Excellent warranty and customer support
❌ Cons:
- Premium pricing
- No built-in timer
3. VIVOSUN VS1000E Full Spectrum LED
The VIVOSUN VS1000E strikes a sweet spot between BESTVA’s affordability and Spider Farmer’s premium features. With 238 diodes spread across a slim panel, it delivers surprisingly even light distribution that prevents the hot spots and dead zones plaguing cheaper alternatives.
Key Specifications:
- 238 premium LED diodes
- ETL-certified isolated driver for safety
- IP65 waterproof rating
- 2.5 μmol/J efficiency
Price Range: $60-80
Customer Feedback: The waterproof rating wins praise from humid greenhouse environments where moisture is a constant concern. Users report the isolated driver design significantly reduces electrical concerns, making it particularly popular among cautious beginners. The included rope hangers, while simple, work reliably according to hundreds of reviews.
✅ Pros:
- Best price-to-performance ratio
- Moisture-resistant design
- Safe isolated driver system
❌ Cons:
- Basic features only
- Slightly lower efficiency than premium models
4. Barrina T8 LED Grow Light Strips (6-Pack)
For those who prefer linear lighting over panel-style units, the Barrina T8 strips offer flexible installation options perfect for greenhouse shelving systems or vertical growing setups. These aren’t your grandpa’s fluorescent tubes—they’re modern LEDs in a familiar form factor.
Key Specifications:
- 252W total (6 tubes × 42W each)
- Full spectrum 5000K daylight
- Linkable design up to 8 units
- V-shaped reflector design
Price Range: $80-100
Customer Feedback: Seed-starting operations love these for their even coverage across wide shelves. Multiple greenhouse owners report using 2-3 packs to outfit entire propagation areas, appreciating the modular nature that lets them customize layouts. The reflector design reportedly increases usable light by about 25% compared to standard tube configurations.
✅ Pros:
- Flexible modular design
- Excellent for shelving systems
- Easy plug-and-play installation
❌ Cons:
- Requires multiple units for large areas
- Cables can look messy without planning
5. VIVOSUN T5 Fluorescent Grow Light System
Sometimes the old ways still work best. The VIVOSUN T5 fluorescent system appeals to traditionalists and those with existing T5 infrastructure who want reliable performance without the LED learning curve. These high-output tubes deliver the cool, blue-spectrum light that young plants absolutely crave.
Key Specifications:
- 216W (4 tubes × 54W each)
- 6500K cool white spectrum
- 20,000-hour bulb lifespan
- 95% reflective surface
Price Range: $90-120
Customer Feedback: Veteran growers who’ve used T5s for decades appreciate VIVOSUN’s solid construction and true high-output performance. Several reviews mention the fixture’s aluminum body dissipates heat effectively without fans, while the reflector design concentrates light precisely where needed. Replacement bulbs remain readily available and affordable.
✅ Pros:
- Proven technology with decades of track record
- Excellent for seedlings and propagation
- Cool operation temperature
❌ Cons:
- Higher energy consumption than LEDs
- Bulbs eventually need replacement
6. EVERYGROW Outdoor Greenhouse String Lights
Here’s where things get interesting for actual greenhouse applications. The EVERYGROW Outdoor string system features weatherproof bulbs designed specifically for humid, temperature-variable greenhouse environments where standard lights fail. The daisy-chain capability means you can light extensive greenhouse runs with a single power source.
Key Specifications:
- 288 total LED chips (48 per bulb)
- IP65 waterproof rating
- UL certified for safety
- 23.5 μmol/s photosynthetic flux
Price Range: $100-130
Customer Feedback: Commercial greenhouse operators highlight the genuine waterproof performance—these actually survive daily misting and humid conditions that kill standard lights. The ability to connect up to 120 bulbs on one switch simplifies large installations dramatically. Users report consistent performance through temperature swings from 40°F to 95°F.
✅ Pros:
- True greenhouse-rated waterproofing
- Scalable to large operations
- Full-spectrum coverage
❌ Cons:
- Higher initial investment
- String format doesn’t suit all layouts
7. Active Grow T8 LED Replacement Bulbs
The Active Grow T8 bulbs represent the perfect retrofit solution—LED efficiency in a familiar T8 form factor that works with existing fixtures after a simple ballast bypass. These Seattle-based bulbs deliver sun-white spectrum that appears natural to human eyes while providing everything plants need.
Key Specifications:
- 22W per bulb (4 ft length)
- 4000K sun-white spectrum
- High CRI 95 for natural appearance
- 30,000-hour lifespan
Price Range: $50-70 (4-pack)
Customer Feedback: Growers converting old fluorescent greenhouse setups love the dramatic energy savings—45% less consumption than traditional T8 fluorescents. The natural white appearance (rather than purple grow lights) makes these suitable for retail greenhouses and home setups where aesthetics matter. Many reviews mention the clear protective film that prevents glass shattering if bulbs break.
✅ Pros:
- Retrofits existing fixtures
- Natural white appearance
- Exceptional 30,000-hour lifespan
❌ Cons:
- Requires ballast bypass (some wiring knowledge)
- Not plug-and-play like integrated fixtures
🌱 Ready to Transform Your Greenhouse?
These carefully selected lighting systems offer proven performance backed by thousands of satisfied growers. Click any highlighted product to check current pricing and availability on Amazon. Your plants will thank you with explosive growth! 🚀✨
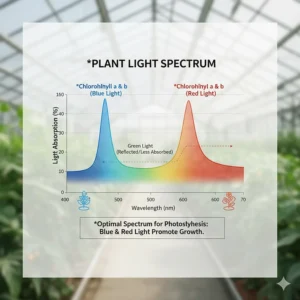
Understanding Full Spectrum Technology
Let’s demystify this “full spectrum” buzzword that every manufacturer slaps on their packaging. Real full-spectrum lighting mimics natural sunlight by providing wavelengths across the entire photosynthetically active radiation (PAR) range—roughly 400 to 700 nanometers. Think of it as a complete buffet for your plants rather than just serving them bread.
Plants don’t use light the same way our eyes do. While we perceive brightness, plants absorb specific wavelengths for different processes. Blue light (400-500nm) drives vegetative growth, promoting compact, bushy plants with thick stems. Red light (600-700nm) triggers flowering and fruiting responses. Green and yellow wavelengths, often dismissed as “useless” by older grow light designs, actually penetrate deeper into the canopy and support overall plant metabolism.
Modern full-spectrum greenhouse grow lights blend these wavelengths intelligently. Quality units include:
- Cool white LEDs (5000-6500K) for vegetative stages
- Warm white LEDs (3000-3500K) for flowering support
- Deep red (660nm) for enhanced photosynthesis
- Far-red (730nm) for stem elongation control
The advantage becomes obvious in practice. Plants under true full-spectrum lighting develop naturally—no weird stretching, no pale leaves, no mysteriously absent flowers. I’ve seen side-by-side comparisons where full-spectrum results looked virtually identical to sun-grown plants, while blue-only or red-only lighting produced obvious deficiencies.
For greenhouse applications, full spectrum proves especially valuable during cloudy periods or winter months when you’re supplementing natural light rather than replacing it entirely. The balanced output blends seamlessly with available sunlight, preventing the spectrum gaps that can occur with narrow-band lighting systems.
LED vs Fluorescent: The Real Comparison
The LED versus fluorescent debate feels like it should be settled by now, but both technologies have legitimate places in modern greenhouses. Let me break down what actually matters instead of repeating manufacturer marketing nonsense.
Energy Efficiency & Operating Costs
LEDs dominate efficiency metrics, converting roughly 40-50% of electricity into usable plant light compared to fluorescent’s 20-30%. For a typical 100W LED versus a comparable 200W fluorescent setup running 16 hours daily, you’re looking at $50-70 annual savings at average electricity rates. Over a 5-year LED lifespan, that’s $250-350 in your pocket.
However—and this matters—initial LED costs run 50-100% higher than fluorescent equivalents. Your break-even point typically arrives around year two or three, meaning fluorescents make financial sense for short-term projects or if you’re unsure about committing to indoor growing long-term.
Heat Management
LEDs generate significantly less infrared radiation per lumen, which sounds great until you realize some greenhouses actually benefit from that warmth during cold months. I know growers running fluorescent tubes specifically because the modest heat output reduces their supplemental heating costs. Meanwhile, commercial operations in warm climates swear by LEDs because every watt of heat reduction means lower air conditioning expenses.
The practical takeaway? Consider your climate and season. Cool-climate winter growing might actually favor the “inefficiency” of grow light fluorescent tubes, while year-round tropical or summer operations benefit dramatically from LED’s cool operation.
Spectrum Quality & Flexibility
Modern LEDs offer unprecedented spectrum customization. You can mix diode types to create precisely the light recipe your crops prefer—more blue for compact basil, extra red for prolific tomatoes. Fluorescent tubes, conversely, lock you into whatever phosphor coating the manufacturer applied. You can’t adjust a T5 tube’s spectrum; you either buy different tubes or live with what you have.
That flexibility extends to intensity control. Most quality LEDs include dimming capabilities, letting you reduce light levels for seedlings or ramp up intensity for flowering crops. Fluorescent systems typically operate at fixed output or require purchasing separate ballasts with dimming capability—adding cost and complexity.
Longevity & Replacement Considerations
LEDs claim 50,000-hour lifespans, but real-world performance varies wildly. Quality units with proper thermal management genuinely last 5-7 years of continuous operation. Cheap Amazon specials might fail within 18 months. Fluorescent tubes reliably deliver 10,000-20,000 hours but require eventual replacement—a recurring expense LEDs avoid.
Factor in disposal too. Fluorescent tubes contain trace mercury requiring special recycling procedures. LEDs contain no hazardous materials and dispose like standard electronics. If environmental responsibility matters to your operation, this tips the scale toward LED technology.
Calculating Your Lighting Needs
Here’s where most beginners go wrong—they either under-light their space (ending up with etiolated, weak plants) or massively over-light (wasting money and potentially stressing vegetation). Let’s do this properly.
Coverage Area Basics
Manufacturers love advertising generous coverage numbers—”3×3 feet!” “4×4 flowering footprint!”—but those figures assume ideal conditions that rarely exist in real greenhouses. Actual effective coverage depends on mounting height, reflective surfaces, and your specific crops’ light requirements.
For leafy greens and herbs, you can push those advertised numbers because these crops tolerate lower light intensities (150-300 μmol/m²/s). Fruiting crops like tomatoes, peppers, and cannabis demand 600-1000+ μmol/m²/s for optimal production. That same “3×3” light now realistically covers maybe 2×2 feet for high-light crops.
My rule of thumb: Take the manufacturer’s flowering coverage claim and reduce it by 25% for realistic high-performance growing. For vegetative growth of low-to-medium light plants, the advertised coverage usually holds true.
Intensity Requirements by Crop Type
Different plants have wildly different lighting needs:
Low Light Plants (100-200 μmol/m²/s):
- Lettuce varieties 🥬
- Spinach and arugula
- Many herbs (cilantro, parsley)
Medium Light Plants (200-400 μmol/m²/s):
- Basil and mint
- Seedling propagation
- Ornamental houseplants
High Light Plants (400-800 μmol/m²/s):
- Tomatoes and peppers 🍅
- Cucumbers and beans
- Flowering tropicals
Very High Light Plants (800-1200 μmol/m²/s):
- Full-season fruiting crops
- Dense flowering varieties
- Maximum production scenarios
Most greenhouse grow lights in the 100-200W range deliver 300-600 μmol/m²/s at 12-18 inches mounting height, making them suitable for medium-to-high light crops when properly positioned.
Daily Light Integral (DLI) Math
DLI measures total photons delivered over 24 hours, expressed in mol/m²/day. It’s arguably more important than instantaneous intensity because plants respond to cumulative light exposure, not just peak brightness.
Basic DLI calculation: DLI = (PPFD × photoperiod hours × 3600) / 1,000,000
For example, 400 μmol/m²/s for 16 hours: (400 × 16 × 3600) / 1,000,000 = 23 mol/m²/day
Target DLI ranges:
- Leafy greens: 12-17 mol/m²/day
- Herbs: 15-22 mol/m²/day
- Fruiting vegetables: 20-40 mol/m²/day
This explains why longer photoperiods can compensate for less intense lights. Running fixtures 18 hours daily at moderate intensity often works better than 12 hours at maximum power.
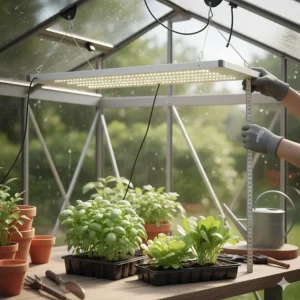
Installation Best Practices
Even the best greenhouse grow lights perform poorly if installed incorrectly. These practical tips come from personal experience and numerous costly mistakes I’ve watched others make (and okay, a few of my own).
Mounting Height Guidelines
The eternal question: How high should I hang these lights? Too close burns leaves and bleaches growth points. Too far wastes intensity and creates uneven coverage.
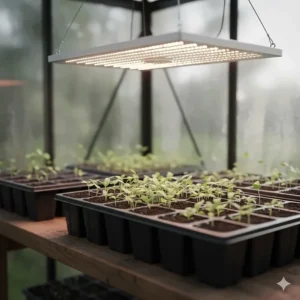
LED Panels: Start at 24-30 inches for seedlings, gradually lowering to 12-18 inches as plants mature. Watch for light stress indicators—bleached or tacky leaves mean you’re too close.
Fluorescent Tubes: These run cooler, allowing closer placement. Mount T5 and T8 tubes 6-12 inches above seedlings, 8-18 inches for established plants.
String Lights: Manufacturer recommendations vary widely, but 30-50 inches works for most greenhouse supplementation applications.
The “hand test” still works great—hold your hand at canopy level for 30 seconds. If it feels uncomfortably warm, you’re too close. This low-tech method prevents many burned crops.
Electrical Considerations ⚡
Most residential greenhouse operations run on standard 120V circuits, which handle multiple LED or fluorescent fixtures easily. A typical 15-amp circuit supports roughly 1500 watts total load—that’s fifteen 100W LEDs if absolutely nothing else plugs into that circuit.
Reality check: Factor in fans, heaters, pumps, and other equipment. Realistically, dedicate 50-60% of circuit capacity to lighting (750-900 watts per 15-amp circuit). Need more? Run additional dedicated circuits or upgrade to 20-amp service.
Use grounded outlets exclusively, especially in humid greenhouse environments. Consider GFCI protection for safety—moisture and electricity make dangerous partners. If you’re daisy-chaining multiple units, verify the manufacturer’s maximum connection limits before adding “just one more” light to the string.
Reflective Surfaces & Light Management
Raw light output matters less than usable light hitting your plants. Smart reflective strategies increase effective intensity by 20-40% without buying additional fixtures.
White Paint: Flat white paint reflects 80-90% of light efficiently and costs pennies per square foot. Skip “grow room white” premium products—regular titanium dioxide-based white paint performs identically.
Mylar Sheeting: Reflects 90-95% of light but tears easily and creates annoying hot spots if not installed smoothly. Better for grow tents than greenhouses.
Panda Film: Black-and-white plastic sheeting offering 90% reflectivity on the white side with total light blocking on the black side. Excellent for creating light isolation zones in multi-crop greenhouses.
Don’t overlook simple adjustments. Positioning fixtures to bounce light off white walls or ceilings before hitting plants can improve canopy penetration and reduce harsh shadows.
Seasonal Supplementation Strategies
Greenhouses aren’t grow tents—you’re working with natural light as your foundation, supplementing strategically rather than replacing sunlight entirely. This changes how you approach artificial lighting dramatically.
Winter Light Extension 🌨️
Winter supplementation addresses two challenges: shorter days and lower-angle sunlight with reduced intensity. Your goal isn’t replacing the sun but extending the effective photoperiod and boosting weak afternoon light.
Run greenhouse grow lights during marginal light periods—early morning and late afternoon—when natural sunlight provides minimal photosynthetic benefit. A typical winter schedule might activate lights from 6-9 AM and 3-7 PM, letting strong midday sun carry the load.
This approach dramatically reduces energy costs compared to all-day supplementation. In my northern greenhouse, this strategy cuts winter lighting electricity from $200 monthly (running 16 hours daily) to $75-90 monthly (running 7-8 hours during weak light periods).
Position lights to fill shadows created by low-angle winter sun. South-facing greenhouse benches receive adequate natural light, while north sides sit in perpetual shade—perfect candidates for targeted supplemental lighting.
Cloud Cover Compensation ☁️
Cloudy days reduce available light by 70-90%, turning a bright greenhouse into a dim cave. Rather than running lights continuously “just in case,” implement smart automation responding to actual conditions.
Photoresistors (light sensors) cost $15-30 and automatically activate supplemental lighting when natural light falls below preset thresholds. This eliminates wasted electricity on clear days while ensuring plants receive adequate light during overcast periods.
For manual operation, watch your plants’ behavior. Light-starved vegetation shows obvious symptoms within days: excessive stem elongation, pale new growth, and leaf orientation shifting to maximize light capture. If you notice these signs during cloudy stretches, increase supplemental lighting duration or intensity.
Summer Balance & Heat Management 🌞
Summer supplementation sounds counterintuitive—why add light during the longest, brightest days? Yet specific scenarios benefit from strategic summer lighting.
Shade House Operations: If you’re growing under shade cloth to manage temperature, supplemental lighting can boost intensity in heavily shaded areas while maintaining the cooling benefits of overhead screening.
Dense Canopy Penetration: Mature plants with thick canopies create internal shading. LED strips positioned for side-lighting or lower canopy illumination improve production on fruiting crops like tomatoes.
Evening Extension: Stretching photomorphic responses in certain ornamental crops benefits from far-red evening treatments. Brief exposure to specific light wavelengths after sunset influences flowering timing and stem elongation—techniques professional growers use to time crops for specific markets.
Summer supplementation emphasizes heat management. Run lights during cooler morning or evening hours, avoiding midday heat that compounds solar gain. Water-cooled LED systems, while expensive, prove worthwhile for commercial operations where summer heat limits production.
Troubleshooting Common Issues
Even with proper equipment and installation, problems arise. Here’s how to diagnose and fix the most frequent lighting-related growing issues I encounter.
Light Burn & Bleaching
Symptoms: Bleached white or yellow patches on leaves nearest the lights, crispy brown leaf edges, or tacky resin on leaf surfaces (for certain plants).
Causes: Excessive light intensity, mounting lights too close, or inadequate heat dissipation.
Solutions:
- Raise lights 3-6 inches immediately
- Reduce intensity via dimming if available
- Improve air circulation around canopy
- Consider whether your plants actually need maximum intensity—many crops thrive at 60-80% of maximum light capacity
Stretching & Etiolation
Symptoms: Abnormally elongated stems, excessive distance between leaf nodes, weak stem structure unable to support plant weight.
Causes: Insufficient light intensity, incorrect spectrum (too much far-red), or inadequate photoperiod.
Solutions:
- Lower lights closer to canopy (gradually, 2 inches per day)
- Increase photoperiod by 2-4 hours
- Switch to fixtures with stronger blue spectrum for vegetative growth
- Verify your lights actually deliver claimed intensity—some budget units underperform specifications significantly
Uneven Growth Patterns
Symptoms: Plants nearest the light center grow vigorously while those at edges remain stunted; one side of plants grows faster than the other.
Causes: Poor light distribution, insufficient fixtures for coverage area, or lack of reflective surfaces.
Solutions:
- Add supplemental lights to fill coverage gaps
- Rotate plants regularly (every 2-3 days)
- Install reflective materials on walls and benches
- Consider switching to linear fixtures (tubes/strips) for more even distribution over rectangular spaces
Unexpected Flowering or Bolting
Symptoms: Lettuce suddenly flowers, herbs bolt to seed, or photoperiod-sensitive plants flower at wrong times.
Causes: Incorrect photoperiod triggering reproductive responses, or spectrum imbalances shifting plant behavior.
Solutions:
- Verify photoperiod matches crop requirements (lettuce needs <14 hours to prevent bolting)
- Eliminate light leaks during “dark” periods for photoperiod-sensitive crops
- Check that fixtures don’t include excessive far-red wavelengths triggering flowering responses
- Consider whether natural seasonal cues conflict with your supplemental lighting schedule
Energy Efficiency & Cost Analysis 💰
Let’s talk money—because “efficient” grow lights that break your budget aren’t actually efficient at all.
Operating Cost Calculations
Understanding true operating costs prevents expensive surprises and helps justify upfront investment in quality equipment.
Basic Formula:
(Watts ÷ 1000) × Hours per Day × Days per Month × Electricity Rate = Monthly Cost
Example calculation for a 100W LED running 16 hours daily at $0.12/kWh:
(100 ÷ 1000) × 16 × 30 × $0.12 = $5.76/month
Seem cheap? Now multiply by your total fixture count. Ten fixtures suddenly cost $57.60 monthly, or $691.20 annually. This adds up fast in commercial operations running 50-100+ fixtures.
Compare this to an equivalent fluorescent setup drawing 200W for similar coverage:
(200 ÷ 1000) × 16 × 30 × $0.12 = $11.52/month per fixture
The annual difference ($69.12 per fixture) justifies LED’s higher initial cost within 2-3 years for most operations.
Peak vs Off-Peak Optimization
If your utility offers time-of-use rates, strategic scheduling slashes costs dramatically. Many regions charge 50-70% less for off-peak electricity (typically 9 PM – 6 AM).
For crops tolerating flexible photoperiods, running lights primarily during off-peak hours can cut electricity costs by one-third to one-half. A greenhouse operation spending $800 monthly on peak-rate electricity might reduce costs to $500-600 monthly through schedule optimization—savings of $2,400-3,600 annually without changing a single fixture.
Even if you can’t shift entirely to off-peak periods, partial optimization helps. Run 12 hours during cheap overnight electricity and only 4-6 hours during expensive daytime rates, letting natural sunlight handle midday needs.
Maintenance Costs & Longevity
Hidden maintenance costs differentiate bargain fixtures from truly economical long-term solutions.
LED Maintenance:
- Typically zero maintenance until failure
- Quality units last 50,000+ hours (5-7 years continuous operation)
- Cheap units may fail at 10,000-20,000 hours
- Failed LEDs usually require complete fixture replacement
Fluorescent Maintenance:
- Bulb replacement every 10,000-20,000 hours ($8-15 per bulb)
- Ballast replacement every 30,000-50,000 hours ($25-50)
- Cleaning reflectors annually for optimal performance
For a 20-fixture operation over 5 years:
LEDs: $2,600 upfront (quality units @ $130 each), ~$300 total electricity, minimal maintenance = $2,900 total
Fluorescents: $1,800 upfront (T5 systems @ $90 each), ~$600 electricity, ~$400 replacement bulbs = $2,800 total
The numbers get closer than LED marketing suggests. Fluorescents actually win short-term (1-2 years), while LEDs pull ahead for operations committed to 3+ years of continuous growing.
Smart Controls & Automation
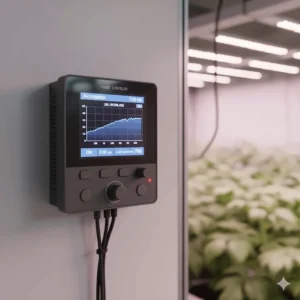
The difference between good lighting and great lighting often comes down to control systems that optimize delivery based on actual conditions rather than fixed schedules.
Timer Types & Features
Mechanical Timers ($8-15): Simple, reliable, foolproof. Perfect for basic on/off scheduling with 15-30 minute resolution. Drawbacks include no battery backup (losing program during power outages) and limited flexibility.
Digital Timers ($15-35): Programmable to the minute with multiple on/off cycles daily. Battery backup maintains programming through outages. Ideal for complex photoperiod schedules or staggered lighting zones.
Smart Controllers ($50-150): WiFi-connected units offering remote control, sunrise/sunset simulation, and integration with environmental sensors. Worth the investment for serious operations wanting data-driven optimization.
I run different timer types for different applications. Mechanical timers handle my seed-starting racks (simple 16-hour photoperiods), while smart controllers manage my fruiting crops (dynamic schedules responding to outdoor light conditions).
Light Sensors & Adaptive Control
Light sensors revolutionize greenhouse supplementation by activating lights only when natural light falls below optimal levels. This prevents running expensive lights during sunny periods while ensuring crops never experience deficiency.
Quality photosensors cost $25-75 and integrate with most digital timer systems or smart controllers. Set your target threshold (typically 200-400 μmol/m²/s depending on crops), and the system automatically compensates for cloudy days, seasonal changes, and even passing storms.
Advanced systems log light exposure data, letting you analyze whether plants receive adequate DLI over time. This troubleshooting capability alone justifies the modest investment for operations experiencing unexplained growth issues.
Integration with Climate Control
Professional greenhouse operations integrate lighting with temperature, humidity, and CO₂ management for synergistic benefits. Plants utilize increased light intensity more effectively in optimal temperature/humidity ranges with elevated CO₂ levels.
Modern controllers from Spider Farmer, VIVOSUN, and other manufacturers offer unified ecosystem management. When lights ramp up for morning activation, the system simultaneously adjusts exhaust fans, activates supplemental heating, and releases CO₂ bursts—creating coordinated conditions that maximize photosynthetic efficiency.
While this represents the cutting edge of greenhouse technology, even simple timer coordination helps. Schedule lights to activate 30 minutes after your heating system warms the greenhouse to target temperature, ensuring plants wake up to both light and warmth simultaneously.
Sustainability & Environmental Impact 🌍
Growing under artificial lights carries environmental responsibility beyond just your electricity bill. Let’s examine the broader sustainability picture honestly.
Energy Consumption Reality Check
According to research from Cornell University, artificial lighting represents 20-40% of total energy consumption in controlled environment agriculture. For perspective, a modest 500-square-foot greenhouse running 2000W of supplemental lighting consumes roughly 960 kWh monthly—equivalent to an average American household’s total electricity use.
This doesn’t mean artificial lighting is environmentally destructive, but it demands conscious decision-making. Strategies to minimize impact:
Maximize Natural Light First: Design greenhouse orientation and glazing to capture maximum available sunlight, supplementing artificially only when natural light proves insufficient. Even a 20% reduction in supplemental lighting needs multiplies across seasons into significant energy savings.
Right-Size Your System: Over-lighting wastes electricity without improving yields. Calculate actual crop requirements and provide that—not arbitrary excess that marketers claim is “better.”
Renewable Energy Integration: Greenhouse operations are ideal candidates for solar panel installation. Daytime electricity production coincides with lighting needs, and many regions offer agricultural renewable energy incentives covering 30-50% of installation costs.
End-of-Life Disposal Considerations
Responsible fixture disposal matters increasingly as regulations tighten around electronic waste.
LED Fixtures: Contain no hazardous materials but qualify as e-waste requiring proper recycling. Many jurisdictions prohibit landfill disposal of LED fixtures. Check with local waste management for electronics recycling programs—most accept grow lights alongside computers and appliances.
Fluorescent Tubes: Contain mercury (3-5mg per tube) requiring specialized handling. Many hardware stores and waste facilities offer free fluorescent recycling. Never break tubes or dispose of them in regular trash—mercury contamination persists in landfills for decades.
Packaging & Accessories: Most modern fixtures ship with recyclable cardboard packaging. Hangars, cables, and accessories often use recyclable metals and plastics—separate components for appropriate recycling streams rather than trashing everything together.
Carbon Footprint Analysis
The greenhouse industry has developed carbon accounting tools to assess lighting’s total environmental impact. Beyond operational electricity, consider manufacturing emissions, shipping, and disposal.
Current data suggests quality LED fixtures “pay back” their manufacturing carbon footprint within 6-18 months of operation compared to fluorescent alternatives, assuming grid electricity with average carbon intensity. Operations powered by renewable energy sources achieve carbon neutrality even faster.
For perspective, a 100W LED operated 16 hours daily for one year produces approximately 140 kg CO₂ equivalent emissions (assuming U.S. average grid electricity). That same fixture, if powered by solar/wind, drops to essentially zero operational emissions after accounting for renewable infrastructure manufacturing.
Advanced Techniques for Maximum Yield
Once you’ve mastered basic supplemental lighting, these advanced techniques squeeze additional productivity from your investment.
Light Cycling & Photoperiod Manipulation
Strategic photoperiod adjustment influences more than just daily growth rates—it triggers specific developmental responses that commercial growers exploit for competitive advantages.
DIF (Day-Night Temperature Differential) Lighting: Coordinating light schedules with temperature differentials controls stem elongation without plant growth regulators. Running lights during cooler periods (creating negative DIF) promotes compact, stocky growth in ornamentals and vegetable transplants.
Night Interruption Lighting: Brief light exposure during mid-dark period (typically 4-hour interruption) prevents flowering in short-day plants or promotes flowering in long-day species. This technique uses as little as 10 μmol/m²/s for 10-30 minutes—negligible electricity cost for powerful developmental control.
Photoperiodic Induction: Gradually shifting photoperiod by 15-30 minutes daily mimics natural seasonal transitions, triggering smooth flowering/fruiting responses without the shock of abrupt schedule changes.
Spectrum Manipulation Strategies
Different growth stages respond to different light spectrums. Dynamic spectrum adjustment optimizes development across the crop cycle.
Blue-Heavy Vegetative Phase: Running 5000-6500K cool white spectrum during early growth promotes compact structure, thick stems, and maximum leaf area development. Ratios of 3:1 blue:red work well for most crops.
Red-Enhanced Flowering Phase: Shifting to warmer 3000-3500K spectrum with supplemental 660nm deep red triggers reproductive responses and maximizes flower/fruit set. Ratios shifting to 1:3 or 1:4 blue:red support prolific flowering.
UV Supplementation: Brief morning UV-B exposure (280-315nm) increases secondary metabolite production—compounds responsible for flavor, aroma, and stress resistance. Specialized UV fixtures add this enhancement without affecting primary growing lights.
Multi-Level Lighting Design
Vertical light positioning maximizes space efficiency in commercial operations while improving light penetration in dense canopies.
Interlighting: Positioning supplemental fixtures within the canopy rather than exclusively overhead illuminates lower leaves that normally sit in shade. Tomato growers using interlighting report 15-25% yield increases as lower trusses receive adequate light for fruit development.
Side Lighting: Horizontal lighting fixtures positioned alongside plants dramatically reduce shadows and improve overall light uniformity. Particularly effective for tall crops (tomatoes, cucumbers) where overhead lighting alone creates significant top-to-bottom light gradients.
Multilayer Growing Systems: Stacking growing platforms with dedicated lighting for each level quadruples growing density in limited space. Leafy greens and herb production achieves exceptional space efficiency with this approach.
Frequently Asked Questions
❓ How long do greenhouse grow lights need to run daily?
❓ Can I use regular LED bulbs instead of specialized greenhouse grow lights?
❓ What's better for greenhouses: panel LEDs or tube fluorescents?
❓ How close should greenhouse grow lights hang above plants?
❓ Do greenhouse grow lights increase heat significantly?
Conclusion: Making Your Choice
Choosing the right greenhouse grow lights ultimately comes down to matching technology to your specific situation—not just buying whatever topped some random “best of” list. I’ve seen too many growers burn money on inappropriate systems because they looked impressive or came highly rated by operations with completely different needs.
Your decision matrix should prioritize these factors in order:
Growing Space: Small hobbyist greenhouses (under 100 sq ft) thrive with 2-4 quality LED panels or a simple T5 fluorescent system. Mid-size operations (100-500 sq ft) benefit from modular LED strips or multiple panel arrays. Large commercial greenhouses (500+ sq ft) demand scalable systems with professional-grade components and smart controllers.
Budget Reality: If upfront cost matters more than long-term efficiency, quality fluorescent systems deliver reliable performance at lower initial investment. If total cost-of-ownership drives decisions, premium LEDs justify their price through energy savings and longevity—but only if you’re committed for 3+ years.
Crop Requirements: Delicate seedlings and leafy greens need gentle, uniform illumination from fluorescent tubes or low-intensity LED strips. Heavy-feeding fruiting crops demand the penetrating intensity of quality LED panels with proper spectrum control.
Technical Comfort: Plug-and-play simplicity? Stick with integrated fixtures from VIVOSUN or BESTVA. Want optimization and data logging? Invest in Spider Farmer’s smart ecosystem. Prefer time-tested reliability? T5 fluorescent systems have decades of proven performance.
The products I’ve detailed represent legitimate options across this spectrum, but they’re starting points—not the only choices. Your greenhouse, climate, crops, and goals differ from everyone else’s. Use this guide to ask better questions, evaluate options critically, and ultimately select lighting that serves your specific situation rather than someone else’s idea of “best.”
Start modest if you’re unsure. A couple of quality fixtures teaching you how supplemental lighting affects your crops provides more value than a massive system you can’t optimize properly. You can always expand as experience clarifies what works in your unique conditions.
Recommended for You
- Grow Light Heat Light Combo: 7 Best Picks for 2025
- Pendant Grow Light: 7 Best Picks Transform Indoor Gardens
- Top 7 Grow Light Shelves for Thriving Indoor Plants in 2025 | Expert Guide
Disclaimer: This article contains affiliate links. If you purchase products through these links, we may earn a small commission at no additional cost to you.
✨ Found this helpful? Share it with your friends! 💬🤗