In This Article
I remember staring at the $8 clamshell of wilted arugula microgreens at my local grocery store, thinking there had to be a better way. Fast forward three years, and my kitchen counter has transformed into a year-round indoor growing paradise that produces more nutrient-dense greens than I could ever buy from a store.
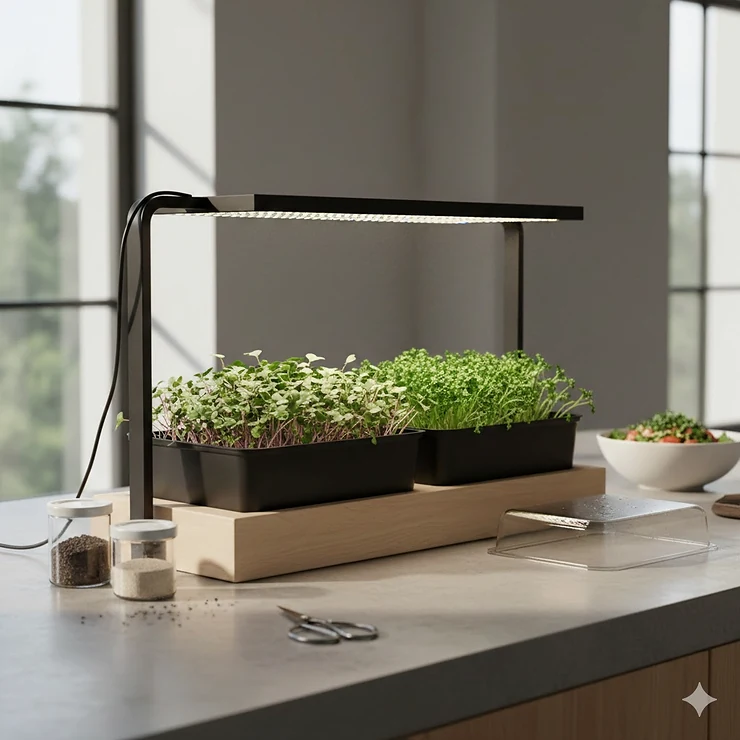
Here’s the thing about growing your own greens: once you taste microgreens harvested seconds before adding them to your morning smoothie, there’s simply no going back to store-bought. The flavor is more vibrant, the nutrients are off the charts, and honestly? Watching those tiny seeds transform into lush green carpets is oddly therapeutic after a long day.
But not all microgreens growing kit with light systems are created equal. I’ve tested dozens over the years, from budget-friendly options that barely sprouted a single seed to premium setups that could rival a commercial operation. What I’ve learned is that the right kit makes all the difference between soggy, moldy disappointments and thriving harvests that’ll make your friends jealous.
Research shows that microgreens can contain up to 40 times more nutrients than their mature counterparts, packed with vitamins, minerals, and powerful antioxidants. With a quality microgreen kit with LED light, you’re not just growing food—you’re cultivating a daily source of nutritional insurance your body will thank you for.
Whether you’re a complete beginner who’s never grown anything besides doubt, or an experienced gardener looking to maximize your indoor space, this guide breaks down everything you need to know about choosing the perfect lighted microgreens system for your lifestyle and budget.
Quick Comparison Table
| Product | Light Type | Growing Space | Price Range | Best For |
|---|---|---|---|---|
| ingarden | 15W Auto LED (4-stage) | 3 seed pads | $150-$180 | Premium users, minimal effort |
| AeroGarden Harvest Elite | 20W Full Spectrum LED | 6 pods | $130-$160 | Versatility, larger yields |
| Click & Grow Smart Garden 3 | 8W LED | 3 pods | $70-$90 | Beginners, tight budgets |
| MicroFarm Professional | Full Spectrum LED Bar | 10×20 tray | $50-$70 | Serious growers, maximum output |
| ZestiGreens Self-Watering Kit | Optional (windowsill) | 12×6 tray | $30-$45 | Natural light preference |
| ALPAS LIFE Complete Kit | None (window/lamp) | 8.8×5.5 trays (2) | $25-$35 | Budget-conscious, natural light |
| GARDYN Microgreens Nursery | Compatible w/ Gardyn LED | 20 seed pads | $40-$60 | Existing Gardyn owners |
💬 Just one click – help others make better buying decisions too!😊
✨ Don’t Miss These Exclusive Deals!
🔍 Take your microgreens growing to the next level with these carefully selected products. Click on any highlighted item to check current pricing and availability. These tools will help you create authentic nutrient-packed harvests your family will love!
Top 7 Microgreens Growing Kit With Light: Expert Analysis
1. ingarden Microgreens Growing Kit – The Premium Choice
If you want the absolute best microgreens grow light kit money can buy, the ingarden system is in a league of its own. I’ve had mine for over two years, and it still impresses visitors who stop by my apartment.
This automated hydroponic powerhouse features a patent-pending watering system and 15-watt, energy-efficient LED lights that emit specific wavelengths to activate phytochemical development. The result? Your greens grow up to 4 times faster than soil-based methods, with harvests ready in just 7 days.
The chic ceramic base comes in four gorgeous colors (beige, black, rose, or mint), paired with a durable stainless steel frame that’s completely plastic-free. It’s beautiful enough to display proudly on your countertop, unlike those clunky systems that scream “science experiment.”
Specifications:
- Automatic 4-stage LED grow light system
- Self-watering hydroponic design
- Includes 3 pre-seeded organic pads (kale, arugula, broccoli)
- Energy consumption: 15 watts
Price: $150-$180
Customer Feedback: Users consistently praise the foolproof setup and stunning design, though some mention the subscription model for seed pads can add up over time. The carbon-neutral certification and meal-sharing partnership with ShareTheMeal also appeal to eco-conscious buyers.
✅ Pros:
- Completely automated growing process
- Premium, plastic-free materials
- Stunning aesthetic design
- 90% less water than conventional farming
❌ Cons:
- Higher upfront investment
- Subscription required for seed refills
Best for: Design-conscious urbanites who want the best results with minimal effort and don’t mind paying premium prices for quality.
2. AeroGarden Harvest Elite MicroGreens Bundle – Best Overall Value
The AeroGarden Harvest Elite represents the sweet spot between performance and price. This versatile system isn’t just for microgreens—it’s a complete indoor garden that can grow herbs, vegetables, and more.
The 20-watt LED grow light is more powerful than most competitors, providing optimal spectrum lighting with adjustable height up to 12 inches. The system grows plants up to 5 times faster than soil, with convenient water and nutrient reminders displayed on the control panel.
What sets this apart is the flexibility. You can grow six different varieties simultaneously, rotating crops for continuous harvests. The included microgreens kit features an irrigation deck, two trays, domes, and AeroFelt media.
Specifications:
- 20W full spectrum LED with adjustable height
- 6-pod capacity
- Automatic light timer (16 hours on/8 off)
- Digital control panel with reminders
Price: $130-$160 (bundle)
Customer Feedback: Gardeners love the versatility and robust growth, though the water pump can be slightly audible. The ability to transition from microgreens to full herbs makes it worth every penny for multi-purpose growers.
✅ Pros:
- Powerful 20W LED lighting
- Grows multiple crop types
- Adjustable height for various plants
- Well-established brand with strong support
❌ Cons:
- Water pump creates minimal noise
- Slightly larger footprint
Best for: Home cooks who want fresh microgreens, herbs, and vegetables from a single versatile system.
3. Click & Grow Smart Garden 3 – Budget-Friendly Smart Solution
Don’t let the affordable price fool you—the Click & Grow Smart Garden 3 packs impressive technology into a compact, beginner-friendly package. Inspired by NASA research on space gardening, this lighted microgreens system uses patented Smart Soil that provides perfect pH balance, oxygen, and nutrients automatically.
The 8-watt LED grow light runs on a 16-hour cycle, mimicking summer sun patterns. Simply insert the pre-seeded pods, add water to the reservoir, plug it in, and watch the magic happen. The system is completely silent, making it perfect for any room including bedrooms.
With access to over 50 different plant pod varieties, you can experiment with everything from traditional basil to exotic microgreens. The streamlined design looks modern and unobtrusive on any countertop.
Specifications:
- 8W energy-efficient LED lights
- Patented Smart Soil technology
- 3-pod capacity
- Silent operation (no pumps)
Price: $70-$90
Customer Feedback: First-time growers appreciate how foolproof this system is, with germination happening within a week. Some users wish the LED was brighter for faster growth, but the trade-off is minimal electricity cost—about $5-6 per year.
✅ Pros:
- Extremely beginner-friendly
- Completely silent operation
- Very low energy consumption
- Compact footprint
❌ Cons:
- Smaller 8W light (slower growth)
- Only 3 growing spots
- Proprietary pods (less flexible)
Best for: Apartment dwellers and beginners who want a simple, quiet system that just works without fuss.
4. MicroFarm Professional Microgreen Kit – Serious Grower’s Dream
If you’re ready to get serious about microgreens, the MicroFarm Professional delivers commercial-quality results at a fraction of the cost. This isn’t your typical hobby kit—it’s designed for maximum production in minimal space.
The full spectrum LED grow bar provides optimal light coverage for a standard 10×20 growing tray. The sleek, professional design fits under kitchen cabinets, and the dishwasher-safe trays make cleanup a breeze. One user reported spending $40 weekly on farmers market sprouts before this kit paid for itself in just over a month.
The beauty of this system is its flexibility. You can use coconut coir, soil, or even simple paper towels as your growing medium. This freedom means lower ongoing costs and the ability to experiment with different methods.
Specifications:
- Full spectrum LED grow bar
- Fits standard 10×20 trays
- Adjustable light height
- Two-screw assembly
Price: $50-$70
Customer Feedback: Users rave about the professional results and space efficiency. One grandmother mentioned her grandson loved watching the growth process and eating the final product. The main note is that instructions could be more detailed for absolute beginners.
✅ Pros:
- Professional-grade output
- Compact design fits under cabinets
- Works with any growing medium
- Dishwasher-safe components
❌ Cons:
- Requires separate growing supplies
- Minimal instructions included
- Smaller than commercial 10×20 trays
Best for: Cost-conscious foodies who want restaurant-quality microgreens and don’t mind a bit of DIY.
5. ZestiGreens Self-Watering Microgreens Kit – Hybrid Approach
The ZestiGreens kit offers an interesting middle ground between fully automated systems and traditional growing methods. While it doesn’t include built-in LED lights, it’s designed to work beautifully on sunny windowsills or under any desk lamp—making it incredibly versatile for year-round indoor growing.
The kit includes a stylish bamboo frame, reusable 12×6 tray with hydroponic insert, blackout felt lid, hemp grow mats, and two varieties of certified organic seeds. The self-watering design means you only add water once and forget about it until harvest.
What’s clever about this system is the removable hydroponic insert. For larger seed varieties like sunflower or pea shoots, you can swap in soil instead, giving you complete flexibility.
Specifications:
- Self-watering hydroponic system
- 12×6 inch growing tray
- Bamboo surround frame
- Includes organic seed packets and grow mats
Price: $30-$45
Customer Feedback: Home gardeners love the zero-risk germination guarantee and responsive US-based customer support. The bamboo aesthetic gets compliments, and the dual soil/hydroponic capability sets it apart from competitors.
✅ Pros:
- Beautiful bamboo design
- Dual growing methods (hydro/soil)
- Excellent germination rates
- Great customer support
❌ Cons:
- No built-in grow light
- Requires window or supplemental light
- Smaller growing area
Best for: People with bright windows who prefer natural light and want a beautiful countertop display.
6. ALPAS LIFE Complete Home Microgreens Kit – Best Budget Option
Sometimes simple is better, and the ALPAS LIFE kit proves that you don’t need fancy technology to grow incredible microgreens. This complete starter kit includes everything except the light source, making it perfect for sunny spots or pairing with an inexpensive desk lamp.
You get two sets of reusable growing trays (8.8×5.5 inches), a premium spray mister, pre-measured coco coir growing medium, and two packs of organic radish and broccoli seeds. The family-owned Wisconsin company focuses on sustainable living with recyclable materials throughout.
The coco coir discs are genius—they expand when hydrated to the perfect consistency for optimal microgreens growth. Each kit is verified with a unique transparency code, ensuring quality control.
Specifications:
- Two complete tray sets
- Organic USDA seeds (radish, broccoli)
- Pre-measured coco coir medium
- Premium spray mister included
Price: $25-$35
Customer Feedback: Beginners appreciate the clear picture instructions and pre-measured components. The compact 8.8×5.5 tray size works perfectly for apartments and small kitchens. Users note harvests in 7-10 days consistently.
✅ Pros:
- Extremely affordable entry point
- Complete kit (except light)
- Two separate growing trays
- Supports family-owned business
❌ Cons:
- No grow light included
- Smaller tray size
- Requires sunny window or lamp
Best for: Budget-conscious beginners who want to test the microgreens waters before investing in expensive equipment.
7. GARDYN Complete Microgreens Growing Kit – Ecosystem Integration
If you already own a Gardyn hydroponic system, this microgreens nursery is a no-brainer add-on. But even standalone, it’s an impressive option that takes advantage of full spectrum grow lights kit technology if you place it on the Gardyn lid.
The complete system includes the nursery, 20 seed pads (5 each of arugula, mild blend, spicy blend, and red mustard), bamboo wicks, and 10 reusable grow plates. The seed pads are incredibly convenient—just pop them in, add water, and you’re done.
Microgreens at the seedling stage have nutrient levels that are extremely concentrated, often up to 40% greater than their mature counterparts. This kit makes harvesting those nutrients simple and repeatable.
Specifications:
- Compatible with Gardyn LED system
- 20 pre-seeded organic pads included
- 10 reusable grow plates
- Bamboo wick watering system
Price: $40-$60
Customer Feedback: Gardyn users love the seamless integration and convenience of pre-seeded pads. The system works well in bright windows too, though growth is noticeably faster under the Gardyn’s LED lights. Some wish the seed variety options were broader.
✅ Pros:
- Perfect Gardyn ecosystem integration
- Pre-seeded convenience
- Four tasty varieties included
- Reusable components
❌ Cons:
- Optimized for Gardyn owners
- Pre-seeded pads limit variety
- More expensive without Gardyn system
Best for: Existing Gardyn users or anyone who wants the convenience of pre-seeded pods without complex setup.
Understanding Microgreens: More Than Just Baby Plants
Let me clear up some confusion I see all the time. Microgreens aren’t the same as sprouts, and they’re definitely not just tiny versions of regular vegetables that haven’t grown up yet.
Microgreens are harvested when they develop their first set of true leaves, typically 7-21 days after germination depending on the variety. You eat the stem and leaves, leaving the roots and growing medium behind. Sprouts, on the other hand, are germinated seeds eaten whole—root, seed coat, and all—usually within 2-5 days.
This distinction matters because microgreens require exposure to light for photosynthesis, developing chlorophyll and all those incredible phytonutrients we’re after. That’s why a quality microgreens grow light kit is essential if you don’t have access to strong natural sunlight.
The Nutritional Powerhouse in Your Kitchen
According to research published by the U.S. Department of Agriculture, microgreens contain significantly greater amounts of nutrients and health-promoting micronutrients than their mature counterparts. We’re talking serious nutritional density here.
Red cabbage microgreens pack 6 times more vitamin C than mature cabbage. Cilantro microgreens have three times the beta-carotene of mature cilantro. The concentrated nutrients mean you need smaller portions to get the same nutritional benefits—perfect for picky eaters or anyone struggling to meet their daily vegetable intake.
The antioxidant content is equally impressive. Studies show microgreens exhibit strong antioxidant capacity across species, with black radish showing DPPH scavenging activity over 83%. These antioxidants help combat cellular damage and may reduce the risk of chronic diseases.
Light: The Secret Ingredient
Here’s what most beginners don’t realize: light quality matters just as much as light quantity when growing microgreens. Your standard household LED bulb won’t cut it for optimal growth.
Plants need specific light wavelengths for photosynthesis—primarily blue light (400-500nm) for vegetative growth and red light (600-700nm) for flowering and fruiting. A proper full spectrum grow lights system provides both, along with smaller amounts of green, UV, and infrared light.
The best microgreen kit with LED light options typically use 6500K color temperature, which mimics bright daylight. This “cool white” spectrum promotes compact, sturdy growth with rich green coloration. Cheaper systems might use basic purple lights (just red and blue), which work but create that harsh purple glow nobody wants in their kitchen.
Intensity matters too. Most microgreens thrive with 12-16 hours of light daily at intensities between 200-400 µmol/m²/s. Don’t worry if those numbers make your eyes glaze over—quality systems have this dialed in already.
How to Choose Your Perfect Microgreens Growing Kit With Light
Space Considerations: Where Will It Live?
Before you fall in love with a massive 10-tray system, measure your actual available space. I learned this lesson the hard way when I ordered what I thought was a “compact” setup that barely fit on my countertop.
Consider vertical space too, especially for systems with adjustable lights. That AeroGarden might sit nicely on your counter now, but can the light pole extend fully without hitting your cabinets? Will the glow from LED lights bother you if it’s in your bedroom?
Counter space is precious real estate. If you’re tight on room, wall-mounted or under-cabinet options like the MicroFarm make sense. For those with generous counter space, larger systems like the ingarden become statement pieces that spark conversations.
Light Requirements: Built-In vs. Separate
This choice fundamentally shapes your growing experience. Built-in lights offer convenience and optimized positioning but limit where you can place the system. They need to be near an outlet and might create unwanted brightness in certain rooms.
Separate light setups give you flexibility. Grow near windows and supplement with a clip-on LED bar. Move your trays around as needed. But you’ll need to manage light schedules manually or invest in timers, adding complexity and potential points of failure.
My recommendation? If you’re new to this, start with integrated lighting. The automation removes variables and increases success rates. As you gain experience, you can always expand to more flexible setups.
Automation Level: Set It and Forget It or Hands-On?
How much involvement do you want in the growing process? There’s no wrong answer, but be honest about your lifestyle.
Fully automated systems like ingarden or Click & Grow handle everything—light schedules, watering reminders, even nutrient dosing. They’re perfect for busy professionals or anyone who’s proven they can kill a cactus. The trade-off is less control and typically higher costs.
Semi-automated options require some input. Maybe you set the light timer and check water levels, but the system handles the rest. These strike a nice balance for most growers.
Manual systems put you in complete control. You decide when to water, how much light to provide, and what growing medium to use. The learning curve is steeper, but costs stay lower and you develop actual growing skills.
Growing Capacity: How Much Do You Actually Need?
Here’s a reality check: most people overestimate how many microgreens they’ll actually eat. A single 10×20 tray of dense microgreens yields about 8-12 ounces fresh weight—that’s roughly 4-6 salad servings.
Start smaller than you think you need. One or two growing spots let you experiment with varieties and establish a rhythm. You can always scale up later once you’re hooked (and trust me, you will be).
Consider your harvest schedule too. Microgreens don’t regrow after cutting, so you need continuous planting for continuous harvests. A system with multiple trays or zones lets you stagger plantings for regular fresh greens.
Budget Reality Check: Initial Cost vs. Ongoing Expenses
That $30 budget kit looks tempting, but factor in ongoing costs before deciding. Seed refills, growing medium, nutrients if needed, electricity for lights—it all adds up.
Premium systems often have lower per-harvest costs long-term. The ingarden’s reusable design and efficient LED means your main expense is seed pads. Budget kits might need frequent replacement of growing medium and have higher electricity costs from less efficient lights.
Calculate your break-even point. If you’re spending $8 per week on store-bought microgreens ($416 yearly), even a $150 system pays for itself in 4-5 months. After that, you’re growing for pennies per harvest.
Setting Up Your Lighted Microgreens System for Success
Location, Location, Location
Temperature stability matters more than most people realize. Microgreens grow optimally between 65-75°F, with consistent temperatures producing more uniform germination and growth. Avoid spots near heating vents, drafty windows, or appliances that generate heat.
Humidity plays a supporting role. Most microgreens prefer 40-60% relative humidity. Too dry and you’ll battle with seeds that won’t germinate. Too moist and you’re inviting mold and fungal issues. A simple hygrometer helps monitor conditions.
Air circulation prevents problems before they start. Gentle airflow from a small fan (not pointed directly at seedlings) reduces mold risk and strengthens stems. I run a clip-on fan on low for 2-3 hours daily with great results.
The First Planting: What to Expect
Your first tray probably won’t be perfect, and that’s completely okay. Expect some trial and error as you dial in watering amounts, light positioning, and harvest timing for your specific setup and environment.
Most systems include starter seeds, but I recommend ordering a variety pack separately. Radish microgreens grow incredibly fast (5-7 days) and are nearly foolproof—perfect for building confidence. Broccoli is similarly reliable and packed with nutrients.
Avoid these common beginner mistakes: overwatering (leading cause of failure), harvesting too early (wait for true leaves to develop), and crowding seeds (proper spacing prevents mold). Less is more with seed density, especially when starting out.
Daily Care Routine: Less Than You Think
One of the beautiful things about modern self-watering microgreens systems is how little daily attention they need. Here’s my actual routine with the ingarden:
Days 1-3 (Germination Phase): Check once daily to ensure the water level is adequate. The system handles everything else automatically. Seeds stay covered and dark during this period.
Days 4-7 (Growth Phase): Remove the cover, ensure lights are functioning, and monitor growth. Top off water if the indicator shows low. That’s literally it—maybe 2 minutes per day.
Day 7-10 (Harvest Window): Taste-test leaves starting day 7. Harvest when flavor peaks, which varies by variety. Most microgreens taste best when leaves are vibrant green and stems are crisp.
For non-automated systems, add light timer management and manual watering to the routine. Still incredibly manageable, just requires slightly more attention.
Maximizing Nutrition: Growing Methods That Make a Difference
Hydroponic vs. Soil: The Real Differences
The hydroponic vs. soil debate gets heated in microgreens circles, but here’s the practical truth: both work excellently when done properly.
Hydroponic systems (like ingarden and ZestiGreens) offer faster growth, cleaner harvesting, and easier cleanup. You’re growing in inert medium or water-based systems, eliminating soil-borne pests and diseases. Nutrient uptake is more efficient since roots access dissolved minerals directly.
Soil-based growing (traditional method) provides a broader spectrum of minerals and microbial benefits. Some growers swear their soil-grown greens taste more complex. The downside is messier harvesting and potential for fungus gnats if you’re not careful.
For beginners, I lean toward hydroponic systems. The reduced variables mean higher success rates, and modern hydroponic nutrients provide everything plants need. As you gain experience, experimenting with quality organic soil becomes fun and educational.
Seed Selection: Organic Matters (Here’s Why)
This is where I’m going to be blunt: spend the extra dollar or two on certified organic, non-GMO seeds specifically labeled for microgreens. Regular garden seeds are often treated with fungicides and pesticides you definitely don’t want to consume, especially with microgreens where you’re eating the plant so young.
Microgreens are rich in potassium, calcium, nitrogen, phosphorus, manganese, selenium, and molybdenum, along with high levels of alpha-tocopherol, beta carotene, and ascorbic acid. But these nutritional benefits can be compromised by chemical residues from treated seeds.
Look for suppliers that provide germination rate guarantees (typically 85% or higher). Poor germination wastes time and money. Reputable brands like Mumm’s, Johnny’s Selected Seeds, and True Leaf Market consistently deliver quality.
Light Spectrum Optimization
Not all LED grow lights are created equal, even if they look similar. The spectrum profile makes a huge difference in your final product’s nutrition and flavor.
Full spectrum LED lights (like those in AeroGarden and MicroFarm) provide wavelengths spanning 400-700nm, closely mimicking natural sunlight. This promotes balanced growth, strong stems, and optimal nutrient synthesis.
Blue-heavy spectrums (5000-6500K) produce compact, leafy growth—ideal for microgreens. They also enhance production of certain antioxidants and vitamins. Red wavelengths encourage stem elongation, which you generally want to minimize in microgreens.
Some advanced systems include UV wavelengths, which research suggests may increase production of protective compounds like anthocyanins and glucosinolates. These aren’t necessary for beginners but represent cutting-edge nutrition optimization.
Troubleshooting Common Problems
Mold and Fungal Issues
White fuzz appearing on your seedlings triggers panic in new growers. But hold on—it might not be mold at all. Many microgreen varieties, especially radish and broccoli, develop fuzzy root hairs that look suspiciously like mold.
Real mold appears cottony and spreads across the growing surface rather than along root zones. It smells musty or sour. Root hairs are bright white, don’t spread horizontally, and have no odor.
If you do have genuine mold, it usually stems from these causes: excessive humidity, poor air circulation, overwatering, or contaminated seeds/medium. Increase airflow, reduce watering frequency, and ensure your grow space isn’t too warm. A small fan running a few hours daily works wonders.
Prevention beats cure. Use quality seeds from reputable suppliers, maintain moderate humidity (not a swamp), and never let your growing medium become waterlogged. Those self-watering systems with proper drainage design (like the ones in our top picks) virtually eliminate this issue.
Leggy, Weak Growth
If your microgreens look like they’re reaching desperately for something, they probably are—more light. Leggy growth happens when seedlings stretch toward insufficient light, resulting in long, weak stems that fall over easily.
Solutions are straightforward. Lower your grow light closer to the seedlings (8-12 inches is typical), increase daily light duration (try 14-16 hours instead of 12), or upgrade to a more powerful light source. The 20W AeroGarden light produces noticeably sturdier growth than the 8W Click & Grow specifically because of this power difference.
Some varieties naturally grow taller than others (pea shoots, for example). That’s normal. But if your usually-compact radish or broccoli microgreens suddenly shoot up thin and pale, light deficiency is the culprit.
Poor Germination Rates
Nothing’s more frustrating than planting a tray and getting patchy, sparse growth. Several factors could be responsible.
Old seeds lose viability over time. If you’re using seeds more than a year old, germination drops significantly. Always check packaging dates and store unused seeds in a cool, dry place—or better yet, in the refrigerator.
Temperature extremes kill germination. Too cold (below 60°F) and seeds sit dormant. Too hot (above 85°F) and they cook. Most microgreens germinate best between 65-75°F. If your space runs cool, consider a seedling heat mat for the first few days.
Water quality occasionally causes issues. Heavily chlorinated tap water or water with extreme pH can inhibit germination. Let tap water sit overnight to off-gas chlorine, or use filtered water if problems persist.
Seed depth matters too. Most microgreen seeds should barely be covered or left uncovered entirely. Burying them too deep prevents emergence. Follow specific recommendations for each variety.
Harvest Timing Confusion
Knowing exactly when to harvest comes with experience, but here are reliable indicators that your microgreens have hit their nutritional and flavor peak.
Most varieties are ready when the first true leaves (the ones after the initial cotyledons) fully develop. This typically happens 7-14 days after planting. The leaves should look vibrant and healthy, not yellowing or wilting.
Taste is your best guide. Sample a few leaves starting around day 7. You’re looking for that sweet spot where flavor is concentrated but not overly intense or bitter. Pea shoots taste best younger and sweeter, while radish develops its characteristic spicy punch as it matures.
Don’t wait too long. Once microgreens start developing multiple sets of true leaves, they’re transitioning to the “baby greens” stage. Still edible and nutritious, but the tender texture and concentrated flavor diminish.
Beyond Basic Growing: Advanced Techniques
Blackout Periods for Maximum Flavor
Professional microgreens growers use a technique that most home growers overlook: controlled blackout periods during early growth. Here’s why it works.
The first 2-4 days after planting (depending on variety), keeping seeds in complete darkness encourages strong root development and uniform germination. The seedlings stretch slightly searching for light, creating longer, more elegant stems—exactly what you want for certain varieties like sunflower or pea shoots.
Once you expose them to light, they green up rapidly through chlorophyll production. The contrast between the blackout and light-exposure phases often produces more vibrant color and more concentrated flavor than seedlings grown under lights from day one.
Most systems with domes or covers (like GARDYN and ZestiGreens) make this easy. Simply keep the cover on for the specified blackout period, then remove it when instructed. For open systems, a piece of cardboard or aluminum foil works perfectly.
Variety Rotation for Nutritional Diversity
Different microgreen varieties offer unique nutritional profiles, with red cabbage being rich in vitamin C, broccoli containing sulforaphane for cancer prevention, and spinach providing lutein for eye health. Rotating varieties ensures you’re not missing out on specific nutrients.
I follow a simple rotation system: one tray of brassicas (broccoli, kale, cabbage) for glucosinolates and sulforaphane, one tray of greens (sunflower, pea) for protein and vitamins, and one experimental tray for whatever sounds interesting that week.
This approach prevents boredom and addresses different nutritional needs. When cold and flu season hits, I grow extra broccoli and radish for their immune-supporting compounds. Summer calls for refreshing options like cilantro and basil microgreens.
Companion Planting in Microgreens
Yes, you can apply companion planting principles even at the microgreens scale. Certain varieties grow better together, while others compete or inhibit each other’s growth.
Fast-growing radish pairs well with slower broccoli in the same tray. The radish germinates first, shading the soil and maintaining moisture for the broccoli seeds. Harvest the radish around day 7, then let the broccoli continue growing a few more days.
Avoid mixing varieties with vastly different water needs or harvest times. Pea shoots (14-21 days to maturity) and radish (5-7 days) make poor tray mates since you’d need to harvest the radish long before the peas are ready.
Flavor combinations matter too. Planting mild greens like lettuce or spinach beside spicy mustards creates natural salad mix trays that are ready to harvest and eat together.
Year-Round Indoor Growing Strategies
Winter Challenges and Solutions
Winter presents unique obstacles for microgreens growers, even indoors with artificial lighting. Shorter day lengths affect your mood and might make you forget to check your trays. Heating systems create dry air that stresses seedlings.
Combat low humidity by placing a shallow tray of water near (not touching) your growing system. The evaporation raises local humidity without creating that swampy environment mold loves. A small humidifier works even better if you’re serious about consistent year-round production.
Natural light availability drops during winter, making LED supplementation non-negotiable for windowsill growers. That ZestiGreens kit that performed great on your south-facing window in July might struggle come December without adding a clip-on grow light.
Temperature fluctuations near windows can slow germination. If you notice seeds taking longer to sprout in winter, move the system slightly away from cold glass or add a seedling heat mat underneath trays during the germination phase.
Summer Growing Adjustments
Summer’s heat creates the opposite problem—temperatures that accelerate growth but can push systems into stress territory. Most microgreens tolerate heat reasonably well, but quality suffers above 80°F.
If your growing area gets hot, shift to heat-tolerant varieties like amaranth, basil, or certain lettuce types during peak summer. They’ll handle temperature swings better than cool-season crops like peas or mustards.
Increase watering frequency as heat accelerates evaporation. Self-watering systems like ingarden and AeroGarden handle this automatically, but manual systems need vigilant monitoring. Check morning and evening rather than just once daily.
Light intensity through windows peaks in summer. If using natural light supplemented by LEDs, you might reduce LED hours to avoid light-burning leaves. Watch for bleaching or yellowing tips as warning signs of excessive light exposure.
Creating Your Growing Schedule
Consistency separates successful microgreens growers from those who gave up after one or two trays. Establish a planting schedule that ensures continuous harvests without overwhelming yourself.
For personal consumption (1-2 servings daily), plant one small tray every 4-5 days. This staggers harvests and prevents the feast-or-famine cycle where you’re drowning in greens one week and waiting for sprouts the next.
Families or heavy users might adopt a 7-day rotation: plant 2-3 trays on Mondays, and you’ll have fresh harvests ready the following Monday, with more trays planted that same day to continue the cycle.
Track planting dates, varieties, and performance notes. I use a simple spreadsheet, but even a wall calendar works. Recording what worked (and what didn’t) accelerates your learning curve and helps optimize future plantings.
Comparison: Microgreens vs. Traditional Alternatives
| Factor | Microgreens Growing Kit | Store-Bought Microgreens | Mature Vegetables |
|---|---|---|---|
| Nutrient Density | Highest (40x mature plants) | High (if fresh) | Baseline comparison |
| Cost per Serving | $0.25-$0.75 after initial investment | $4-$8 per 2-4 oz container | $0.50-$2.00 per serving |
| Freshness | Harvest-to-table in seconds | 3-7 days post-harvest | Often 7-14 days old |
| Year-Round Availability | 100% consistent with LED system | Limited by supply chain | Seasonal variations |
| Space Required | 1-2 square feet countertop | None (purchasing) | Garden space or farmers market |
| Time Investment | 5-10 minutes daily | Shopping time | Significant (months of growing) |
| Pesticide Exposure | Zero (you control inputs) | Varies by source | Often treated |
| Flavor Intensity | Maximum concentration | Good when fresh | Milder, more developed |
Price Range & Value Analysis
| Price Tier | Investment | What You Get | Best Value Indicator |
|---|---|---|---|
| Budget ($25-$50) | Basic growing trays, manual watering, separate light needed | ALPAS LIFE, ZestiGreens (no light) | Cost per harvest under $0.50 |
| Mid-Range ($50-$100) | Semi-automated, integrated lights, smaller capacity | Click & Grow, MicroFarm Professional | Balanced features and affordability |
| Premium ($100-$180) | Fully automated, premium materials, optimal light systems | ingarden, AeroGarden Harvest Elite | Time savings and consistent results |
| Professional ($180+) | Multiple trays, commercial capacity, advanced controls | Commercial setups, multiple AeroGarden units | For serious production or small business |
Frequently Asked Questions
❓ Can I grow microgreens without special LED lights if I have a sunny window?
❓ How much electricity does a microgreens growing kit with light actually use per month?
❓ Are microgreens actually healthier than eating full-grown vegetables?
❓ What's the realistic harvest yield from one growing tray?
❓ How long do harvested microgreens stay fresh in the refrigerator?
Conclusion: Your Next Steps to Fresh, Nutritious Greens
Three years ago, I stood in my apartment kitchen questioning whether a microgreens growing kit with light was worth the investment or just another gadget that would collect dust. Today, my countertop garden produces more nutrient-dense greens weekly than I could ever consume from a grocery store, and I’ve saved literally hundreds of dollars in the process.
The truth is, there’s no universal “best” system for everyone. Your perfect microgreens grow light kit depends entirely on your specific situation—budget, available space, time commitment, and nutritional goals.
If you’re still unsure which direction to go, here’s my honest recommendation based on three years of daily growing: start with a mid-range automated system like the Click & Grow Smart Garden 3 or AeroGarden Harvest Elite. These systems remove enough variables to ensure success while teaching you fundamental growing principles. The investment pays for itself within 3-4 months compared to buying store-bought microgreens.
Once you’ve caught the microgreens bug (and you will), you can always expand to larger systems, experiment with specialized varieties, or even transition to more hands-on growing methods. The skills you develop with an automated system transfer perfectly to manual setups if you decide to scale up later.
The microgreen revolution is real, and it’s accessible to anyone willing to invest a small amount of counter space and minimal daily attention. Studies confirm that microgreens possess anti-inflammatory, anti-cancer, anti-bacterial, and anti-hyperglycemia properties, making them functional foods beneficial to human health.
Your body deserves fresh, living nutrition. Your wallet deserves the savings. Your kitchen deserves the vibrant splash of green that transforms cooking from routine to adventure. The only question left is: which system will you start with?
Learn more about microgreens nutrition and health benefits to understand why these tiny greens pack such a powerful nutritional punch.
Recommended for You
- 7 Best Microgreen Growing Kit Picks for 2025
- 7 Best Shiitake Mushroom Growing Kits 2025 (Expert Tested)
- 7 Best Oyster Mushroom Growing Kits That Actually Work 2025
Disclaimer: This article contains affiliate links. If you purchase products through these links, we may earn a small commission at no additional cost to you.
✨ Found this helpful? Share it with your friends! 💬🤗