In This Article
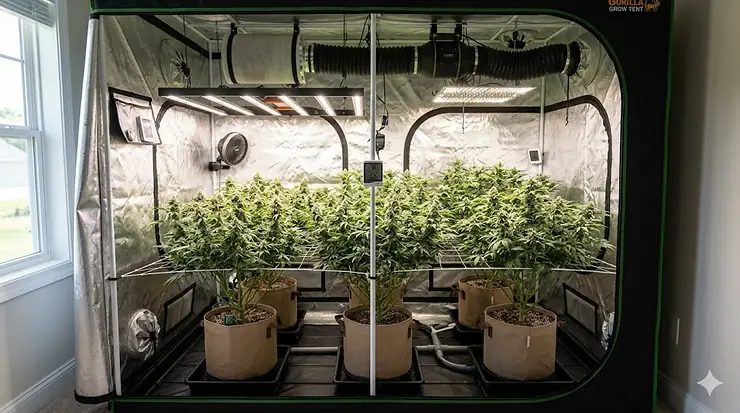
Choosing the right 5×5 grow tent setup can mean the difference between mediocre yields and the kind of harvest that makes your neighbors wonder what you’re up to. After testing dozens of configurations in this sweet-spot size, I’ve learned that a 25-square-foot footprint offers something smaller tents can’t: enough room for 6-9 mature plants without the overwhelming complexity of managing an 8×8 or 10×10 commercial setup. What most buyers overlook about the 5×5 grow tent setup is that it’s not just about square footage — it’s about airflow patterns, light distribution, and the fact that you can actually reach every plant without crawling on your knees like you’re defusing a bomb.
 mk,
mk,
The 5×5 mylar grow tent has exploded in popularity among serious home cultivators because it bridges the gap between hobbyist and pro-level production. Here’s what makes the large-space climate control in a 5×5 configuration uniquely effective: you can run a proper airflow configuration with intake at floor level and exhaust at the ceiling, creating the kind of thermal stratification that smaller tents simply can’t achieve. Most 4×4 setups force you to compromise on fan placement, but a 5×5 indoor grow tent gives you enough vertical and horizontal space to position equipment exactly where physics demands it should go.
Quick Comparison: Top 5×5 Grow Tent Setups at a Glance
| Model | Canvas Density | Frame Strength | Key Feature | Price Range | Best For |
|---|---|---|---|---|---|
| Gorilla Pro 5×5 | 1680D | 22mm steel, 300lb capacity | Height-adjustable 6’11”-8’11” | $400-$550 | Tall plants, long-term use |
| AC Infinity CLOUDLAB 866 | 2000D | 1″ poles | Lab-tested 95% reflectivity | $250-$350 | Tech enthusiasts, smart control |
| MARS HYDRO Smart Kit | 1680D | Standard metal | WiFi-controlled FC6500 EVO | $900-$1,200 | Complete all-in-one |
| VIVOSUN S558 | 340g high-density | 165lb top bar | Large observation window | $150-$220 | Budget-conscious beginners |
| Spider Farmer 5×5 | 1680D | 140lb capacity | Controller mounting hooks | $200-$280 | Spider Farmer ecosystem users |
Looking at this comparison, the Gorilla Pro justifies its premium price with that patented height adjustment — when you’re three weeks into flower and your plants are stretching toward the ceiling, being able to add another foot of vertical space without repotting is worth every penny. The CLOUDLAB 866’s 2000D canvas might sound like overkill until you realize that thicker material also means better insulation, which translates to more stable nighttime temperatures and lower HVAC costs over a year. Budget buyers eyeing the VIVOSUN should note that while you sacrifice some canvas thickness, the 165lb top bar capacity still handles most LED and filter setups without the frame flex you’d see in cheaper alternatives under $150.
💬 Just one click — help others make better buying decisions too! 😊
✨ Don’t Miss These Exclusive Deals!
🔍 Take your indoor growing to the next level with these carefully selected products. Click on any highlighted item to check current pricing and availability. These systems will help you create optimal growing conditions your plants will thrive in!
Top 7 5×5 Grow Tent Setups: Expert Analysis
1. Gorilla Grow Tent Pro 5×5 — The Gold Standard for Serious Cultivators
The Gorilla Grow Tent Pro 5×5 dominates the premium segment for one simple reason: it’s the only tent in this category with patented height-adjustable technology that actually works without turning your setup into a wobbling tower of regret. I’ve watched growers add the 1-foot extension mid-cycle when their genetics ran taller than expected, and the frame stayed rigid enough to support a 750W LED bar light plus carbon filter without even a hint of flex. The 1680D canvas density blocks 100% of light leakage — the kind of complete darkness that prevents hermaphroditic stress in photoperiod plants during their 12-hour dark cycle.
What the spec sheet won’t tell you is that the 22mm cold-rolled steel poles create a frame so sturdy that you can hang equipment from any crossbar without worrying about stress distribution. The diamond reflective mylar interior bounces 95% of photons back onto your canopy, which means the same 650W LED delivers measurably higher PPFD readings compared to cheaper tents with standard mylar. Customer feedback consistently praises the double-cinching duct ports — these aren’t the flimsy sock-style openings you find on budget tents; they’re reinforced flaps that maintain a true light seal even when you’re running 6-inch ducting at full stretch.
For cultivators running perpetual harvests or anyone planning to use this 5×5 grow tent kit for more than a couple cycles, the lifetime warranty isn’t just marketing fluff — Gorilla has honored replacements for torn zippers and split seams years after purchase. This is the tent you buy once and never think about replacing.
Pros:
✅ Height adjusts from 6’11” to 8’11” without compromising stability
✅ 300lb weight capacity handles commercial-grade equipment
✅ Lifetime warranty backed by actual customer service
Cons:
❌ Premium price point in the $400-$550 range
❌ Heavier weight makes solo setup challenging
Price Range: Around $400-$550 depending on extension configuration
Value Verdict: Worth the investment if you’re planning multi-year use or growing tall sativas.
2. VIVOSUN S558 5×5 Grow Tent — Best Budget Option That Doesn’t Feel Cheap
The VIVOSUN S558 proves that proper airflow configuration and solid frame construction don’t require a $500 price tag. What surprised me about this tent is the 340g high-density fabric — technically thinner than premium 1680D canvas, but the PE lining and mylar backing create a light-blocking sandwich that performs better than some 600D competitors I’ve tested. The 165lb top bar capacity is the hidden gem here; most budget tents in this price range max out at 110-120lbs, forcing you to distribute weight across multiple crossbars or risk catastrophic frame failure mid-flower.
The large observation window sits at the perfect height for daily plant checks without disturbing your photoperiod schedule, and unlike the tinted windows on some competitors, this one is genuinely transparent — you can spot nutrient deficiencies or pest pressure without unzipping the main door. The removable floor tray makes cleanup after reservoir spills or soil transplants absurdly easy; just pull it out, hose it down, and slide it back in.
Customer reviews from home cultivators running this as their first 5×5 indoor grow tent consistently mention how the tool-free corner connectors speed up assembly — you can have this standing in about 45 minutes solo, compared to the 90-minute ordeal with cheaper tents using traditional pole-and-sleeve designs. For growers on a tight budget who still want efficient ventilation planning and decent build quality, the VIVOSUN delivers far more than its sub-$250 price suggests.
Pros:
✅ Exceptional value in the $150-$220 range
✅ Removable floor tray simplifies maintenance
✅ Tool-free assembly takes under an hour
Cons:
❌ Thinner canvas (340g vs 1680D) offers less insulation
❌ No height extension option for tall plants
Price Range: Around $150-$220
Value Verdict: Best choice for budget-conscious beginners who don’t want to upgrade in six months.
3. Spider Farmer 5×5 Grow Tent — Seamless Integration with SF Ecosystem
The Spider Farmer 5×5 Grow Tent is the obvious choice if you’re already invested in Spider Farmer LEDs or planning to build around their complete system. What sets this apart from generic 1680D tents is the integrated controller mounting hooks — instead of rigging zip ties or adhesive mounts for your GGS Smart Controller, you’ve got dedicated anchor points built into the frame. The enlarged view window is positioned strategically at the 4-foot height mark, perfect for checking canopy development without opening the main access door and disrupting your carefully maintained VPD.
The 1680D thickened mylar canvas blocks light leakage completely while the double-stitched seams hold up under the stress of repeated door openings — a weak point in many cheaper tents where seam separation starts within the first few months. The frame supports up to 140lbs, which comfortably handles Spider Farmer’s SF7000 or SE7000 bar-style LEDs plus a 6-inch carbon filter without requiring additional support poles. What most buyers discover after setup is that the multiple duct ports are sized perfectly for Spider Farmer’s inline fan systems, eliminating the need for adapter collars or tape to seal gaps.
For anyone planning a matched Spider Farmer build — tent, LED, fan, and controller — this eliminates the guesswork around equipment compatibility. You’re not adapting components from different manufacturers; everything is designed to work together from day one, which translates to faster setup and fewer headaches troubleshooting airflow or light positioning.
Pros:
✅ Purpose-built for Spider Farmer equipment ecosystem
✅ Integrated controller hooks eliminate DIY mounting
✅ Duct port sizing matches SF fan diameters exactly
Cons:
❌ Limited value if not using Spider Farmer lights
❌ Standard 80″ height with no extension option
Price Range: Around $200-$280
Value Verdict: Perfect for SF ecosystem users; consider alternatives if mixing brands.
4. AC Infinity CLOUDLAB 866 — Lab-Grade Precision for Data-Driven Growers
The AC Infinity CLOUDLAB 866 targets the segment of growers who treat indoor cultivation like a science experiment rather than a hobby. The 2000D mylar canvas isn’t just marketing speak — it’s measurably thicker than standard 1680D, which creates superior thermal insulation and reduces temperature swing between lights-on and lights-off cycles. AC Infinity lab-tested this canvas and documented 95% reflectivity, the highest figure I’ve seen backed by actual photometric data rather than manufacturer estimates.
The 1-inch steel poles create a framework stiff enough to mount AC Infinity’s Controller 69 Pro directly to the included mounting plate without worrying about vibration or sag. The largest-in-class zipper window (24″ x 16″) gives you an almost panoramic view of your canopy, which sounds trivial until you’re trying to diagnose leaf issues in the back corner without crawling into the tent. What separates this from cheaper 5×5 mylar grow tent options is the attention to small details: light-blocking fabric behind every zipper, reinforced duct port sleeves that don’t tear after a dozen filter changes, metal corner brackets instead of plastic connectors that crack under load.
Customer feedback from tech-savvy growers running automated systems emphasizes how the controller mount plate integrates seamlessly with AC Infinity’s ecosystem — fan speed, temperature, humidity, and VPD all displayed and adjusted from one central unit. If you’re the type who tracks grow metrics in spreadsheets and optimizes based on data rather than gut feel, the CLOUDLAB 866 gives you a stable, precisely controlled environment to work within.
Pros:
✅ 2000D canvas provides superior insulation and light blocking
✅ Lab-tested 95% reflectivity backed by actual data
✅ Largest observation window in this category
Cons:
❌ Higher price point ($250-$350) than basic tents
❌ Requires AC Infinity controller for full smart features
Price Range: Around $250-$350
Value Verdict: Worth it for data-driven growers who demand precision climate control.
5. MARS HYDRO 5×5 Advanced Grow Tent — Proven Reliability at Mid-Tier Pricing
The MARS HYDRO 5×5 Advanced Grow Tent has quietly become one of the most popular choices among intermediate growers who’ve outgrown their starter tents but aren’t ready for premium pricing. The 1680D high-reflective mylar interior delivers consistent light distribution across the full 25 square feet, eliminating the hot spots you get with thinner materials that allow light penetration through the canvas. The observation window and removable floor tray are standard features at this price point, but MARS HYDRO’s smooth zipper design sets this apart — the dual-layer zipper backing creates a complete light seal without the snag-and-tear issues that plague cheaper tents.
What buyers consistently praise in customer reviews is how the stable metal structure handles MARS HYDRO’s FC6500 or FC-E6500 LED lights without requiring additional crossbars. The tent supports these 730W bar-style lights plus a carbon filter and inline fan — roughly 80-90lbs of hanging weight — without the pole bowing you’d see in budget frames. The multiple duct ports with double-cinching drawstrings accommodate everything from 4-inch clip fans to 8-inch exhaust systems, giving you flexibility as your ventilation needs evolve.
For cultivators running MARS HYDRO equipment or anyone wanting a solid mid-range 5×5 grow tent kit without overthinking the decision, this offers reliability and performance that scales from beginner to intermediate skill levels. It’s not the fanciest tent you can buy, but it’s the one you’ll still be using three years from now without wishing you’d spent more.
Pros:
✅ Excellent mid-tier value ($180-$250 range)
✅ Smooth double-layer zippers eliminate light leaks
✅ Frame handles MARS HYDRO’s largest LEDs without flex
Cons:
❌ Basic feature set compared to premium options
❌ Standard 80″ height limits tall plant varieties
Price Range: Around $180-$250
Value Verdict: Ideal middle-ground choice for growers who want quality without premium pricing.
6. MARS HYDRO 5×5 Smart Grow Tent Kit with FC6500 EVO — The All-in-One for Tech Enthusiasts
The MARS HYDRO 5×5 Smart Grow Tent Kit bundles everything tech-forward growers need in one package: the 5×5 tent, FC6500 EVO LED with 2040 Samsung LM301H EVO diodes, iFresh 6-inch smart inline fan, clip fan, and ducting. What makes this a game-changer for busy cultivators is the unified control through the MARS HYDRO app — you can adjust light intensity, fan speed, and monitor temperature/humidity from your phone, whether you’re in the room or halfway across town. The FC6500 EVO delivers a remarkable 3.14 μmol/J efficiency, which translates to measurably lower electricity costs and less heat generation compared to older-gen LEDs.
The 730W LED output covers the full 5×5 footprint with even PPFD distribution — no dead zones in the corners where plants stretch or show deficiency symptoms. The iFresh smart ventilation system runs at 2800 RPM with 402 CFM airflow, which is properly sized for a 5×5 tent that requires approximately 240-300 CFM after accounting for carbon filter and ducting resistance. What most buyers discover after running this system for a month is how the WiFi automation eliminates the daily climate checks; the system ramps fan speed up during lights-on to manage LED heat, then dials back at night to maintain stable humidity.
For growers who want a 5×5 grow tent kit that works out of the box with zero equipment compatibility research, this is the most expensive option on this list — but it’s also the only one where every component is pre-matched and app-controllable. If you value convenience and modern tech integration over budget optimization, this setup delivers professional results with hobbyist-level effort.
Pros:
✅ Complete WiFi-controlled system eliminates guesswork
✅ Samsung LM301H EVO LEDs offer industry-leading efficiency
✅ Pre-matched components guarantee compatibility
Cons:
❌ Premium all-in-one pricing ($900-$1,200)
❌ Less flexibility if you want to mix equipment brands
Price Range: Around $900-$1,200 for complete kit
Value Verdict: Best for tech enthusiasts who want turnkey automation and don’t mind the investment.
7. AC Infinity AI Grow Tent System PRO 5×5 — Next-Generation Autonomous Growing
The AC Infinity AI Grow Tent System PRO 5×5 represents the cutting edge of what’s possible when you combine grow tent hardware with intelligent environmental control. This system doesn’t just respond to temperature and humidity thresholds like traditional controllers; it uses AI algorithms to predict and prevent environmental issues before they affect plant health. The CONTROLLER AI+ observes your grow space patterns and makes proactive adjustments — if it detects that temperatures consistently spike 30 minutes after lights-on, it pre-emptively ramps fan speed to prevent the spike rather than reacting after it happens.
The complete system includes the CLOUDLAB 866 tent with 2000D canvas, a 5×5 full-spectrum bar LED with Samsung LM301H EVO diodes, EC inline fan, oscillating clip fan, and the refillable carbon filter with AC Infinity’s patented reusable design. What sets the LED apart is the algorithmically arranged diode layout that delivers broader, more uniform coverage than simple grid-pattern arrangements — this eliminates the center-heavy PPFD maps that cause uneven canopy development. The oscillating clip fan features range control that adapts airflow based on plant size and density throughout the grow cycle.
Customer feedback from early adopters emphasizes how the autonomous management reduces the learning curve for beginners while giving experienced growers the data and control they want. If you’re willing to invest in the future of indoor cultivation and want a system that learns your preferences over time, this is as close to set-it-and-forget-it as current technology allows.
Pros:
✅ AI-powered autonomous environmental management
✅ Samsung LM301H EVO LEDs with algorithmic diode layout
✅ Refillable carbon filter reduces long-term costs
Cons:
❌ Premium pricing for complete AI-enabled system
❌ Maximum performance requires AC Infinity ecosystem
Price Range: Around $1,300-$1,600 for complete AI system
Value Verdict: Future-proof choice for growers who want autonomous climate control and don’t mind premium pricing.
Setting Up Your 5×5 Grow Tent: A Step-by-Step Guide
Most growers waste an entire weekend fumbling through 5×5 grow tent setup because they skip the planning phase and jump straight into unboxing. Here’s the workflow that turns a potentially frustrating assembly into a Saturday afternoon project: clear your space completely (measure twice, assemble once), lay out every component and verify you have all poles and connectors before starting, and position the frame where it will stay — moving a fully assembled tent through doorways after the fact is a nightmare you only experience once.
Step 1: Frame Assembly and Positioning
Start with the base frame lying flat on the ground, connecting the bottom poles to create a 60″ x 60″ square. The key here is finger-tight only — don’t fully tighten corner connectors until the entire frame is erected. Stand the frame vertically and add the top crossbars, working systematically from one corner around the perimeter. Only after the complete skeleton stands stable should you go back and fully tighten every connection. What most first-timers don’t realize is that leaving slight play in the joints during assembly makes it infinitely easier to align components; trying to force pre-tightened poles into connectors will have you questioning your life choices.
Step 2: Canvas Installation and Light Sealing
Drape the canvas over the frame starting from the top, letting gravity do most of the work as the material settles into place. Zip the main door closed temporarily to tension the fabric, then work around securing the velcro straps that attach the canvas to the poles. Check every corner for light leaks by turning off room lights and using a flashlight inside the tent — any visible light points need attention before you proceed. The most common leak spots are where zippers meet canvas; ensure the dual-layer backing sits flat against the fabric without bunching. A truly light-sealed 5×5 mylar grow tent requires obsessive attention at this stage because fixing leaks after equipment installation means partially disassembling your setup.
Step 3: Ventilation and Climate Control Installation
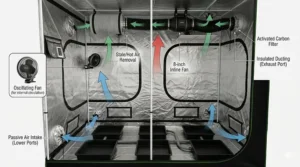
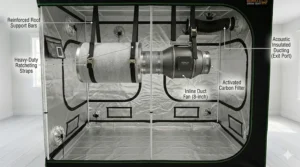
Position your inline fan at the highest point inside the tent — typically on a top crossbar near the back — because heat rises and you want to exhaust the warmest air first. Connect carbon filter to fan input, then run flexible ducting from the fan output through the top duct port to exhaust outside the tent (or into the surrounding room if that’s your plan). The ducting should be as straight as possible with minimal bends; every 90-degree turn reduces airflow by approximately 20%, which means that serpentine duct routing can cut your effective CFM by half. Install passive intake ports at floor level on the opposite side of the tent to create proper cross-ventilation, and position an oscillating clip fan to blow across the canopy from the side.
Step 4: Lighting Installation and PPFD Verification
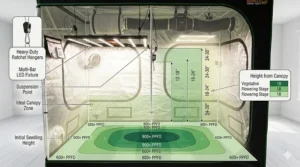
Hang your LED using adjustable ratchet hangers that allow precise height adjustment without removing the light from the frame. For a 5×5 grow tent setup with 650-750W bar-style LEDs, initial hang height should be 30-36 inches above where your canopy will be, then adjust based on plant response. Use a PPFD meter if you have one (or a free phone app for ballpark figures) to verify uniform light distribution — readings should vary by less than 15% between center and corners. What separates professional setups from amateur ones is this verification step; most growers hang the light, eyeball it, and wonder why their corner plants always lag behind.
Step 5: Final Equipment Placement and Testing
Install temperature/humidity sensors at canopy height (not at the top of the tent where readings will be artificially high), position your controller where it’s visible but protected from water splashes, and run a 24-hour test cycle with all equipment operating. Monitor temperature rise during lights-on and verify that your exhaust fan maintains acceptable ranges (ideally 75-82°F during veg, 68-78°F during flower). If temperatures climb more than 8-10 degrees above ambient, you need more exhaust capacity or need to address heat sources. This test run before introducing plants saves you from discovering ventilation inadequacies when you’ve got a tent full of stressed seedlings.
Understanding Airflow Dynamics in a 5×5 Space
Proper airflow configuration in a 5×5 tent isn’t about moving air randomly; it’s about creating intentional circulation patterns that distribute fresh CO2, moderate temperature gradients, and prevent stagnant pockets where mold and pests thrive. The physics are straightforward: cool, CO2-rich air enters low, warms as it passes through the canopy (where plants consume CO2 and release heat/moisture), then exits at the top. This convective flow happens naturally, but without forced ventilation, it moves too slowly to prevent hot spots and humidity spikes.
CFM Calculations That Actually Work
The standard “exchange your tent volume every minute” rule suggests you need roughly 200 CFM for a 5x5x6.6 tent (200 cubic feet volume). This baseline works for a bare tent with nothing in it, but the reality is that carbon filters reduce airflow by 40-60%, ducting bends add another 15-25% loss, and LED heat generation requires 25-50% additional capacity depending on wattage. After accounting for these factors, a 5×5 tent running a 650W LED with 6-inch carbon filter needs an inline fan rated at 350-450 CFM to achieve the actual 200 CFM you’re targeting at canopy level.
What most beginners miss is that oversized fans aren’t a problem if you’re running a variable-speed controller — a 450 CFM fan dialed down to 60% runs quieter, cooler, and more efficiently than a 300 CFM fan at full blast struggling to keep up. The AC Infinity and MARS HYDRO smart controllers adjust fan speed dynamically based on temperature and humidity targets, which means you’re not wasting electricity pushing more air than necessary during lights-off periods when heat generation drops.
Preventing Dead Zones and Optimizing Circulation
Position oscillating clip fans to create horizontal airflow across the canopy rather than blowing straight down onto plants. This horizontal sweep accomplishes two critical functions: it agitates the boundary layer of still air clinging to leaf surfaces (improving transpiration and nutrient uptake) and prevents the top-to-bottom stratification where the upper canopy stays too warm while lower branches sit in cooler, stagnant air. A properly configured 5×5 indoor grow tent uses one 6-inch oscillating fan on each side wall, aimed across the canopy at roughly 45-degree angles that intersect in the center.
The mistake I see most often is growers positioning a single fan to blow directly from one end of the tent to the other. This creates a wind tunnel effect where plants in the direct path experience excessive transpiration and wind stress, while plants outside the airstream get insufficient circulation. The 45-degree crossing pattern distributes airflow evenly across all plants while maintaining gentle movement rather than destructive blasting. For efficient ventilation planning, think of your fans as choreographing a dance rather than powering a leaf blower.
Climate Control Mastery: Temperature, Humidity, and VPD
Large-space climate control in a 5×5 configuration offers more stability than smaller tents but requires understanding the relationship between temperature, humidity, and Vapor Pressure Deficit (VPD). VPD is the measurement of how aggressively plants can transpire based on the difference between moisture in the air and moisture at the leaf surface — it’s the single most important metric for optimizing growth rates and nutrient uptake, yet most hobbyist growers have never heard of it.
Temperature Management Without Breaking the Bank
Maintaining 75-82°F during lights-on in a 5×5 tent requires balancing LED heat output with exhaust capacity and, in extreme climates, supplemental cooling. The first rule: LED choice matters enormously. A 750W quantum board LED running at 2.8 μmol/J efficiency produces roughly 30% less heat than an equivalent HPS setup, which translates directly to reduced cooling costs. If you’re battling high temperatures, verify that your exhaust fan is actually moving the rated CFM by checking static pressure with a manometer — many growers discover their “400 CFM” setup is only moving 250 CFM because of undersized ducting or severe bends.
For growers in hot climates, the temperature control strategies recommended by AC Infinity include running lights during cooler nighttime hours, insulating duct runs that pass through warm spaces, and positioning the tent in the coolest room of your home. What many don’t realize is that a basement location can reduce cooling requirements by 20-30% compared to an upstairs bedroom simply due to ambient temperature differences. If these passive strategies aren’t sufficient, a portable AC unit ducted directly into the tent’s intake provides precise temperature control without wasting energy cooling your entire room.
Humidity Control Across Growth Stages
Seedlings thrive at 65-75% RH, vegetative plants prefer 55-65% RH, and flowering plants need 40-50% RH to prevent bud rot. Maintaining these targets in a 5×5 grow tent setup requires both humidification and dehumidification capacity depending on your ambient climate. Small humidifiers (4-6 liter capacity) positioned inside the tent work well for dry climates, but be careful about placing them directly under leaves where water droplets can cause burn spots under LED light. For dehumidification, most growers find that a 30-50 pint dehumidifier in the lung room (the room containing the tent) is more effective than trying to fit a unit inside the tent.
The advanced strategy is programming your environmental controller to adjust humidity targets based on temperature — as temperature increases, you need to lower humidity to maintain optimal VPD. The Spider Farmer and AC Infinity controllers can automate this relationship, but even manual adjustments based on a VPD chart will dramatically improve your results compared to ignoring this relationship entirely. According to climate management research, maintaining VPD in the 0.8-1.2 kPa range during vegetation and 1.0-1.4 kPa during flower maximizes growth rates while preventing stress-related issues.
Common Mistakes When Buying 5×5 Grow Tent Setups
Mistake 1: Prioritizing Price Over Long-Term Value
The $130 tent looks tempting compared to the $400 Gorilla, but here’s what that $270 savings actually buys you: thinner canvas that degrades under UV exposure within 18 months, plastic corner connectors that crack under load, zippers that fail after 100 cycles, and mylar that delaminates in high-humidity environments. I’ve watched growers “save money” buying cheap tents twice in the time a single quality tent would have lasted. The proper calculation isn’t purchase price — it’s cost per grow cycle over five years. A $400 tent that lasts 15 cycles costs $26 per cycle; a $130 tent that lasts 5 cycles costs $26 per cycle. You’re not saving money; you’re just paying in installments with the added frustration of repeated setup.
Mistake 2: Undersizing Ventilation Equipment
Buyers consistently underestimate the importance of proper airflow configuration by purchasing the minimum recommended CFM for their tent volume. The problem compounds when they add a carbon filter (40% airflow reduction), run ducting with two 90-degree bends (another 30% reduction), and wonder why their tent runs 10 degrees hotter than ambient. The correct approach: calculate your base CFM requirement, then multiply by 1.8-2.0x to account for real-world restrictions. A 4-inch fan rated at 200 CFM might work mathematically for a 5×5 tent, but a 6-inch fan rated at 400 CFM is what you actually need when all resistance factors are included.
Mistake 3: Ignoring Vertical Space for Tall Genetics
The standard 80-inch tent height seems adequate until you account for equipment overhead: an LED hanging 6 inches below the ceiling, maintaining 18-24 inches between light and canopy, your pot height, and the fact that plants stretch 100-200% during early flower. Suddenly your “plenty of vertical space” shrinks to 40 inches of usable growing height — barely enough for indica-dominant genetics, completely inadequate for sativas. This is why the Gorilla’s height-adjustable design or starting with a 7-foot tent makes sense; the slight price premium buys you flexibility for different genetics rather than forcing you to run nothing but short, bushy strains.
5×5 Tent vs Other Sizes: When Does It Make Sense?
4×4 vs 5×5: The Sweet Spot Decision
A 4×4 offers 16 square feet, a 5×5 offers 25 square feet — that’s a 56% increase in growing area for typically only 25-30% more cost in equipment. The 5×5 grow tent kit gives you room for 6-9 plants in 5-gallon containers with adequate spacing for airflow, versus 4-6 plants maximum in a 4×4. The critical threshold is equipment costs: both sizes need similar fan, filter, and controller systems, but the 5×5 requires about 30% more LED wattage (600-750W vs 450-550W). If you’re running multiple short harvests per year, the increased yield per cycle in a 5×5 typically justifies the higher power consumption within 18 months of operation.
When to Size Up to 8×8 or 10×10
The jump from 5×5 to larger commercial sizes makes sense when you’re consistently maxing out your current space and want to scale production rather than run multiple tents. The challenge is that an 8×8 tent (64 square feet) isn’t just 2.5x bigger than a 5×5 — it requires fundamentally different infrastructure: 8-inch ducting and fans, multiple LED fixtures or 1000W+ commercial bars, and often HVAC supplementation beyond what consumer equipment can provide. Most serious home growers find that running two 5×5 tents offers more flexibility (separate veg/flower spaces, perpetual harvest capability) than a single large tent at comparable total cost.
Maintenance and Troubleshooting Your 5×5 Setup
Monthly Maintenance Checklist
Inspect all duct ports and zipper seams for light leaks monthly — small gaps that develop over time from equipment adjustments or door usage compound into bigger problems. Check that your carbon filter hasn’t saturated; a simple sniff test outside the tent should detect zero odor if filtration is working. Clean your intake screens to prevent dust buildup that restricts passive airflow. Verify that no electrical connections show signs of heat damage or corrosion, especially around humid conditions. Tighten any pole connections that have loosened from vibration or thermal expansion cycles.
Common Problems and Solutions
Problem: Temperature spikes 15°F within 30 minutes of lights-on
Solution: Increase exhaust CFM or adjust controller to ramp fan speed more aggressively during the warm-up period. Verify ducting isn’t kinked or restricted.
Problem: Humidity climbs above 70% during lights-off
Solution: Reduce watering frequency, increase nighttime air exchange by running exhaust fan at higher minimum speed, or add dehumidifier to lung room.
Problem: Uneven plant growth with corners lagging behind center
Solution: Reposition LED for more uniform coverage, add supplemental side lighting, or rotate plant positions every 7-10 days.
Problem: Persistent light leaks no matter how many times you seal zippers
Solution: Check that zipper fabric backing isn’t bunched or folded. Apply blackout tape along seam edges as final measure.
Frequently Asked Questions
❓ How many plants can fit in a 5x5 grow tent setup?
❓ What size LED grow light do I need for a 5x5 tent?
❓ Can I run a 5x5 grow tent in a bedroom without disturbing sleep?
❓ How much does it cost to run a 5x5 grow tent monthly?
❓ Should I buy a complete 5x5 grow tent kit or build my own?
Conclusion: Transform Your Indoor Growing with the Right 5×5 Setup
Choosing among these seven 5×5 grow tent setups comes down to matching your skill level, budget, and long-term growing goals with the right equipment philosophy. If you’re a beginner who wants quality that won’t require immediate upgrades, the VIVOSUN S558 delivers remarkable value at its price point — just understand you’re sacrificing some climate control precision for budget savings. Intermediate growers ready to invest in long-term reliability should seriously consider the Gorilla Pro 5×5; the height adjustability alone has saved countless grows from genetic-specific limitations, and the lifetime warranty means this is genuinely the last tent you’ll buy.
For technology enthusiasts who want the cutting edge of autonomous growing, the AC Infinity AI system represents where the industry is heading — though at a premium price that requires serious commitment to indoor cultivation. What most growers discover after their first harvest in a proper 5×5 grow tent setup is that the difference isn’t just yield quantity; it’s quality, consistency, and the dramatic reduction in daily management stress when your equipment is properly sized and configured.
The 5×5 size hits the sweet spot where you have enough space for serious production without the overwhelming complexity of commercial-scale systems. Whether you choose budget-conscious VIVOSUN, ecosystem-optimized Spider Farmer, data-driven AC Infinity, or premium Gorilla, the key is matching your selection to your actual growing style rather than aspirational fantasies about becoming a master cultivator overnight. Start with a solid tent, properly sized ventilation, and appropriate lighting — you can always upgrade controllers and automation later as your skills develop.
Recommended for You
- 7 Best 4×4 Grow Tent Bundle Systems: Complete Guide 2026
- 7 Best Gorilla Grow Tent 4×4 Reviews – Top Picks 2026
- 7 Best AC Infinity 4×4 CloudLab Tents: 2026
Disclaimer: This article contains affiliate links. As an Amazon Associate, I earn from qualifying purchases. If you purchase products through these links, we may earn a small commission at no additional cost to you.
✨ Found this helpful? Share it with your friends! 💬🤗