In This Article
Let’s be honest: most people have killed more seedlings than they care to admit. You water carefully, you pick the right soil, you set the seeds by a sunny window — and then, nothing. Or worse, they sprout and immediately keel over. The culprit, almost every time, isn’t your technique. It’s your environment.
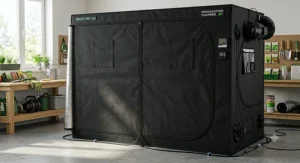
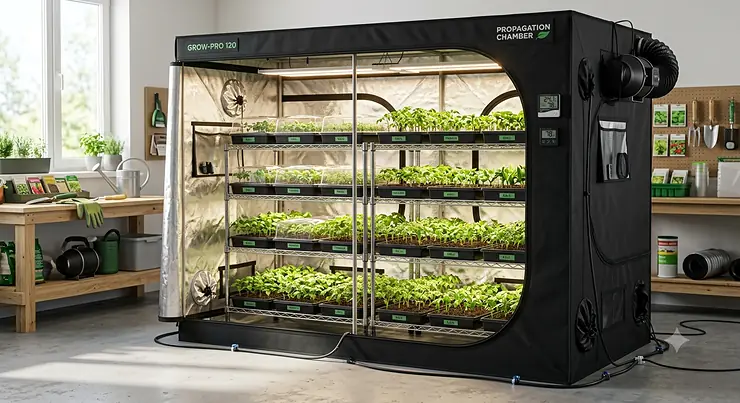
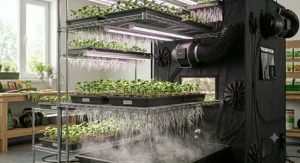
A propagation chamber tent is a compact, enclosed growing structure specifically designed to shelter seeds, cuttings, and young clones through the most vulnerable window of their lives — before they’ve developed a root system strong enough to handle the real world. Think of it as an intensive care unit for plants. Inside one of these germination tents, you control humidity, temperature, and light in ways that a windowsill or open greenhouse bench simply cannot. The result? Germination rates that actually make you feel like you know what you’re doing.
Research from Michigan State University Extension and peer-reviewed horticultural science consistently shows that unrooted cuttings root most reliably when relative humidity stays above 80%, ambient temperatures hold between 72–80°F, and the root zone sits a few degrees warmer than the air above it. A well-built rooting tent creates all three conditions simultaneously — without you standing over the plants with a misting bottle every two hours.
In 2026, the market for nursery grow tents has matured dramatically. You can find simple budget-friendly two-tiered lodge designs, all-in-one kit systems with lights and heat mats included, and premium tensile-steel builds with lab-tested mylar reflectivity. This guide cuts through the marketing noise to give you the seven best options on Amazon right now — with real commentary on who each one suits, and why.
Whether you’re cloning tomato cuttings, starting herb seeds in January, propagating cannabis, or experimenting with mushrooms, there’s a propagation environment control solution on this list for you.
Quick Comparison: Top 7 Propagation Chamber Tents at a Glance
| Product | Size | Canvas | Best For | Price Range |
|---|---|---|---|---|
| AC Infinity CLOUDLAB Propagation Tent | 24″×24″×36″ | 2000D Diamond Mylar | Serious hobbyists & tech enthusiasts | $80–$120 |
| VIVOSUN Clone Tent Kit | 24″×16″×20″ | 600D Oxford | Beginners wanting an all-in-one | $120–$160 |
| Gorilla Clone Tent (GGTCL18) | 18″×13″×25″ | 210D Reflective | Space-constrained growers, desk/shelf setups | $50–$80 |
| VIVOSUN 4×5 2-in-1 Grow Tent | 60″×48″×80″ | 600D Oxford | Multi-stage growers, perpetual harvest | $100–$150 |
| GROWNEER 2-in-1 Lodge Propagation Tent | 36″×24″×53″ | 600D Mylar | Budget-focused mid-size growers | $40–$70 |
| TopoLite 2-in-1 Lodge Propagation Tent | 36″×24″×53″ (+ more sizes) | 600D Diamond Mylar | Flexible size selection, value seekers | $45–$80 |
| MARS HYDRO 2×2 Grow Tent | 24″×24″×55″ | 1680D Oxford | Clone/veg stage enthusiasts, quality hunters | $45–$75 |
Reading this table: Price range alone doesn’t decide the winner. The VIVOSUN Clone Tent Kit costs more upfront because it includes a T5 light, heat mat, and humidifier — gear you’d spend $80+ sourcing separately. Meanwhile, the CLOUDLAB’s premium canvas isn’t vanity; lab-tested 2000D mylar reflects noticeably more light back to seedlings than budget 600D alternatives, which translates to stronger early-stage growth. Always read past the price.
✨ Don’t Miss These Exclusive Deals!
🔍 Click any highlighted product to check current pricing and availability on Amazon. These carefully selected propagation chamber tent options are what serious indoor growers are using in 2026! 😊
Top 7 Propagation Chamber Tents: Expert Analysis
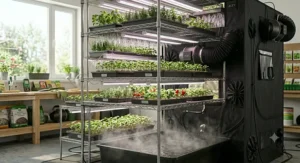
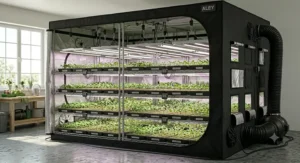
1. AC Infinity CLOUDLAB Advance Propagation Grow Tent — Best Overall Premium Pick
The AC Infinity CLOUDLAB Propagation Tent earns its spot at the top of this list not through flashy marketing, but through engineering decisions that actually matter at the seedling stage.
The 2000D diamond mylar canvas is lab-tested using an Agilent UV-Vis-NIR Spectrophotometer — a piece of equipment most grow tent brands can’t afford to reference, let alone use. What that means practically: more light bounces back to your seedlings instead of being absorbed into the tent walls. For early-stage plants that rely heavily on low-intensity, consistent photons for photosynthesis and root development, this is not a trivial difference. The 1-inch (25mm) steel poles support up to 250 lbs, which sounds like overkill until you’re hanging T5 bars, humidity domes, and a small fan simultaneously. One-inch poles also mean the frame doesn’t sag or shift over time — a common frustration with thinner-pole budget tents.
What makes this propagation chamber tent genuinely special is its dual-orientation design. The tent can stand vertically (standard) or lay horizontally, allowing you to stack multiple levels of seedling trays without fighting tent height constraints. There’s also an integrated controller mounting plate with a lightproof cable passthrough — a detail that makes running your humidity controller or heat mat timer clean and organized. Most propagation tents are an afterthought; this one feels purpose-built.
Who is this for? Growers who’ve graduated past the “plastic humidity dome from the hardware store” phase and want a controlled early-stage cultivation environment that doesn’t require constant babysitting. If you’re propagating expensive clones, rare cultivars, or running a continuous cycle, the CLOUDLAB pays for itself fast.
Customers frequently note how easy the SBS zippers are compared to budget alternatives, and how the observation window lets them check on seedlings without disturbing humidity levels.
✅ Lab-tested 2000D mylar — measurably better reflectivity
✅ Vertical and horizontal orientation options
✅ Clean cable management with controller mount plate
❌ Higher price than most propagation-specific tents
❌ Compact propagation size may feel limiting for large seed batches
Price range: $80–$120 | Verdict: Pay the premium once, grow better every cycle.
2. VIVOSUN Clone Tent Kit (24″×16″×20″) — Best All-in-One Kit for Beginners
The VIVOSUN Clone Tent Kit solves the problem most first-time propagators face: you buy the tent, then spend three weeks sourcing a compatible light, a heat mat that fits, and a fan that doesn’t blow seedlings sideways. VIVOSUN did the work for you.
This kit ships with a 600D reinforced tent (16mm steel poles), a T5 full-spectrum grow light, a 40-cell seed starter tray with rockwool growing medium, a heat mat sized exactly for the tent floor, an AeroStream U075 humidifier, and an AeroWave D4 clip fan. That’s a complete propagation environment control station in one box. The 600D canvas is solidly built — not the thickest on the market, but more than adequate for a propagation tent where light-proofing demands are lower than in a flowering environment.
The T5 light deserves a mention: full-spectrum coverage at the seedling stage means your cuttings and germinating seeds get the blue-spectrum wavelengths that promote compact, strong early growth rather than the leggy stretching you get from inadequate light. The included humidifier is small but effective for the 24″×16″×20″ space — it keeps the interior above 70% RH with minimal effort. The heat mat underneath the tray keeps root-zone temperature 10–15°F warmer than ambient air, which research from Hormex’s propagation blog confirms significantly accelerates callus formation and root initiation.
What most buyers overlook: this kit has 600D fabric with 16mm poles, which means it’s not designed for long-term heavy loads. Don’t try to hang a carbon filter in this one. But for its intended purpose — a dedicated germination tent that you set up, fill with seedlings, and leave to work — it’s an outstanding value proposition.
Reviewers consistently praise the tool-free assembly and the convenient viewing door that rolls aside cleanly without disturbing interior conditions.
✅ Complete propagation system — no additional purchases needed
✅ Bottom heat mat + humidifier combination dramatically improves rooting success
✅ Tool-free setup in under 20 minutes
❌ 600D/16mm build not suited for heavy hanging equipment
❌ Limited to one standard tray’s worth of space
Price range: $120–$160 | Verdict: The best starter investment if you want zero guesswork.
3. Gorilla Clone Tent GGTCL18 (18″×13″×25″) — Best Compact Rooting Tent for Small Spaces
Don’t let the modest dimensions fool you — the Gorilla Clone Tent punches well above its weight. Gorilla Grow Tent built its reputation on industrial-strength hardware, and even this miniaturized version carries the DNA of a professional growing tool.
The 210D canvas is lighter than the 600D or 1680D fabrics on other tents in this list, which is appropriate for a propagation-only structure that doesn’t need flowering-grade light-proofing. What Gorilla does right here is the structural integrity: 16mm powder-coated steel poles with interlocking pins, micro-mesh pre-filter vents that keep fungus gnats and outdoor airborne pests out (genuinely critical during propagation — infestations at the seedling stage are devastating), and their signature double-cinching duct ports that seal tightly against light infiltration. There’s also a built-in compartment designed to house a small fan and filter, which is unusual for a tent this size. You don’t see that kind of thoughtful design on any budget propagation tent.
At 18″×13″×25″, this fits perfectly on a shelf, a workbench, or alongside your main flower tent as a dedicated nursery grow tent. Gorilla markets this for continuous clone production — run it year-round next to your main tent, and you always have rooted plants ready to transplant. It fits two standard 10″×20″ seedling trays side by side.
The EZ View window is useful but notably small; experienced growers won’t miss it, but beginners might wish for a larger observation panel. The 210D canvas is also the weakest structural point — this tent is meant to be picked up and repositioned regularly, not built permanently into a grow room.
Customers who grow at scale love this as a permanent fixture. Weekend propagators love it for the compact footprint and pro-grade design.
✅ Micro-mesh pre-filters keep pests out — a genuine differentiator
✅ Built-in fan/filter compartment for a tent this small
✅ Fits on shelving units — true tabletop propagation option
❌ 210D canvas lighter than competitors — not for permanent heavy-use setups
❌ Small observation window
Price range: $50–$80 | Verdict: The smartest small-space propagation solution on the market.
4. VIVOSUN 4×5 2-in-1 Propagation & Growing Tent (60″×48″×80″) — Best for Perpetual Harvest Growers
If you’re tired of buying a separate starter plant tent and a flower tent, the VIVOSUN 4×5 2-in-1 solves both problems in a single structure. This is the swiss-army knife of the propagation chamber tent world.
The design features two dedicated small interior chambers — each perfectly sized for seedling trays, humidity domes, and early-stage cultivation — plus one larger main chamber for mature vegetative or flowering plants. The dividing wall is made from the same 100%-reflective mylar as the exterior lining, so light from the propagation chambers doesn’t bleed into the flowering zone or vice versa. In practice, this means you can run an 18/6 light schedule for cuttings and a 12/12 for flowering plants in the same footprint, without either environment contaminating the other. That’s the kind of perpetual harvest setup that used to require two completely separate tents.
The 600D Oxford canvas with reinforced PE layer is solid — VIVOSUN has been making grow tents for over a decade and their fabric quality is consistent and reliable. The zippers have a black inner lining that creates a genuinely lightproof seal without extra tape or folded flaps. Multiple ventilation ports on both chambers mean you can run separate airflow circuits for each growing environment, which matters when seedlings need high humidity and mature plants need fresh dry air.
The downside of the 2-in-1 format: the separation wall, while functional, can have minor light leak issues at the zipper seams. A piece of Gorilla tape fixes it in two minutes, but it’s worth noting. Also, 60″×48″ is a meaningful footprint — this isn’t tucking into a closet corner.
Perpetual harvest growers and herb nursery operators who want to maximize every square foot of grow space will love this tent.
✅ True two-zone design — propagation and flowering simultaneously
✅ Eliminates need for a second tent entirely
✅ Multiple independent ventilation circuits
❌ Separation wall may need minor sealing at zipper seams
❌ Large footprint — not suitable for very small spaces
Price range: $100–$150 | Verdict: Buy it if you’re serious about continuous growing.
5. GROWNEER 2-in-1 Lodge Propagation Tent (36″×24″×53″) — Best Budget-Friendly Mid-Size Option
The GROWNEER Lodge Propagation Tent represents what value shopping in the indoor growing world actually looks like: a solid, functional germination tent without the premium branding markup.
The 2-tier lodge design gives you an upper shelf for seedling trays and a lower chamber for larger propagating pots or cloning equipment — all within a 36″×24″ footprint that fits in most spare corners. The 600D canvas is double-stitched and marketed as tear-proof, which is an accurate enough description for normal propagation use. The 95%-reflective mylar lining is functional — not lab-tested premium grade, but sufficient for early-stage cultivation where seedlings aren’t demanding maximum photon efficiency yet.
One honest observation: some customers report pinhole light leaks at stitch points, which matters more for photoperiod-sensitive plants than for general seedling propagation. For growing tomatoes, peppers, herbs, flowers from seed, or rooting cuttings that don’t care about light schedules, these leaks are irrelevant. For cloning light-sensitive cannabis or flowering photoperiod plants in the same tent, it’s worth checking and taping any seams after first assembly.
The observation window is genuinely easy to use, and the metal zippers perform above expectations for a budget-tier product. Assembly is tool-free and takes 15–20 minutes.
GROWNEER’s value proposition is clear: if you’re new to indoor propagation and not sure you’ll keep doing it long-term, this is a low-risk way to find out if a propagation environment control setup actually improves your results (it will).
✅ 2-tier design maximizes usable space
✅ 95% reflective mylar — solid light efficiency for the price
✅ Budget-accessible entry point for new growers
❌ Potential pinhole light leaks at stitch points — check and tape if needed
❌ Heavier zippers can be stiff initially — loosen up with use
Price range: $40–$70 | Verdict: The best bang-for-buck propagation tent under $70.
6. TopoLite 2-in-1 Lodge Propagation Tent (Multiple Sizes) — Best for Size Flexibility
TopoLite’s 2-in-1 Lodge Propagation Tent covers the widest size range of any product on this list, from a compact 36″×24″×53″ all the way up to a sprawling 108″×48″×80″ — making it one of the few brands where you can scale your propagation tent to match your operation without switching manufacturers.
The lodge design features three distinct growing areas in the larger configurations: two small tiered propagation chambers at the top and one large flowering/veg zone below. The 96%-reflective diamond mylar lining is a step up from GROWNEER’s 95% spec, and in practice it’s a noticeably brighter interior. The 600D canvas construction is consistent across all sizes — double-stitched and lightproof with proper zipper operation.
What makes the TopoLite especially interesting is the value-to-size ratio at the larger configurations. The 108″×48″×80″ unit gives you a dedicated propagation station and a full-size flowering room in a package that, at time of research, comes in noticeably cheaper than buying two separate tents. The separation wall performs well enough that customers in the $100+ size range report using it for simultaneous veg and flower cycles.
The main caveat: the separation wall in the lodge design requires some tape maintenance — particularly at the zipper connections — to prevent light bleed between zones. This is a known characteristic of the lodge-style propagation tent format and affects TopoLite and similar brands equally. It’s a five-minute fix, not a dealbreaker.
For growers who want to start small and scale up over time, TopoLite’s multi-size range means you can buy a 36″ unit now and a 60″ or 108″ later knowing the experience will be consistent.
✅ Available in the widest size range of any brand on this list
✅ 96%-reflective diamond mylar — above-average light efficiency
✅ Three separate growing zones in larger configurations
❌ Light leak at separation wall seams — standard tape fix required
❌ Larger sizes require more space and longer assembly time
Price range: $45–$130 depending on size | Verdict: Best if you want to scale your nursery grow tent as you grow.
7. MARS HYDRO 2×2 Grow Tent (24″×24″×55″) — Best High-Reflectivity Rooting Tent for Clone/Veg
MARS HYDRO built its name on grow lights — and the 2×2 tent reflects (pun very much intended) that heritage. This is one of the most light-efficient tents in the entry-to-mid price range, making it a favorite among growers who use it specifically as a clone tent and vegetative stage nursery before moving plants into a larger flowering environment.
The 1680D Oxford canvas is significantly thicker than the 600D material used by most budget propagation tents. In real terms: more durable, better light-proofing, heavier, and more tear-resistant. MARS HYDRO’s mylar lining is high-grade enough that customer after customer in verified reviews describes no light leaks whatsoever — not even pinhole leaks at stitch points. That’s a meaningful statement for propagating light-sensitive strains.
At 24″×24″×55″, the height of this tent is the interesting choice. At 55 inches tall, it’s taller than most dedicated propagation tents and shorter than most standard grow tents. That “in-between” height makes it ideal for cloning and vegetative growth where plants need more vertical clearance than a humidity dome provides, but don’t yet need the 6+ feet of a flowering environment. You can hang a small LED bar or T5 fixture with comfortable clearance while running clones, seedling trays, or small vegetative plants underneath.
The ports are positioned intelligently for 4-inch fan and filter combinations, and multiple customers specifically note using this as a perpetual clone tent alongside a larger main tent.
✅ 1680D canvas — the thickest material in this price range
✅ Proven zero-light-leak performance across verified reviews
✅ Height designed perfectly for clone-to-veg stage transition
❌ Square footprint (2×2) limits capacity to a handful of plants at a time
❌ Slightly heavier than 600D alternatives — less portable
Price range: $45–$75 | Verdict: The best 2×2 propagation tent for growers who hate light leaks.
How to Set Up Your Propagation Chamber Tent Correctly (Step-by-Step)
Option A: Practical Usage Guide
Getting the physical tent assembled is the easy part. Getting the environment dialed in? That’s where most people stumble, even with a great germination tent. Here’s the setup sequence that actually works:
Step 1 — Choose your location before unboxing. A propagation chamber tent works best somewhere with stable ambient temperature (60–75°F), away from drafts, air vents, and direct outdoor temperature swings. A spare bedroom, basement corner, or heated garage all work well. The tent will add heat and humidity to the immediate area, so air circulation nearby matters.
Step 2 — Assemble the frame first, then the canvas. Every brand recommends this and almost every new grower reverses it. Build the pole frame completely, then slip the canvas over it. Trying to insert poles into an assembled canvas is the fastest route to zipper frustration.
Step 3 — Set your heat mat before anything goes inside. Heat mats are significantly harder to position once your seedling trays and humidity domes are in place. Place the mat on the tent floor, run the cable out through the nearest port, and tuck the power cord where the zipper won’t catch it.
Step 4 — Dial humidity before adding plants. Run your humidifier or misting system for 30 minutes with the tent zipped before introducing any cuttings. Target 80–90% RH for unrooted cuttings during the first two weeks, then gradually step it down to 60–70% as roots develop. Greenhouse Management Magazine notes that achieving and maintaining high humidity consistently is the single most challenging — and most critical — aspect of successful cutting propagation.
Step 5 — Introduce minimal, indirect light. T5 fluorescent or LED bar lights at 20–30% intensity are ideal. Seedlings and unrooted cuttings have no root system to compensate for high light-driven transpiration. Too much light stresses them before they can support it.
Step 6 — Check for light leaks at first. Zip the tent completely, step outside, and observe after 5 minutes in darkness. Tape any pinhole leaks with black electrical tape immediately — this is especially important for photoperiod-sensitive plants.
Common mistake to avoid: Opening the tent too frequently during the first 7–10 days of rooting. Every time you unzip, you disrupt the humidity envelope that roots are depending on. Check through the observation window; resist the urge to open until week 2.
Matching the Right Tent to the Right Grower: Real-World Profiles
Different growers need very different things from an early-stage cultivation environment. Here’s how to match yourself:
The Weekend Herb Gardener: You’re propagating basil, mint, rosemary, and thyme from cuttings a few times a year. You don’t need a two-tier lodge tent or premium 2000D mylar. The Gorilla Clone Tent GGTCL18 or GROWNEER 2-in-1 Lodge in the 36″ size gives you everything you need at minimal expense. Light leaks? Completely irrelevant for herbs. Set it and forget it.
The First-Time Clone Grower: You’ve never propagated from cuttings before and you want to succeed on the first try. Buy the VIVOSUN Clone Tent Kit. Yes, it costs more upfront than a bare tent. But the all-in-one format eliminates the most common beginner mistake — mismatched or missing equipment. The T5 light, heat mat, and humidifier are pre-matched to the tent size, so the environment builds correctly without engineering it yourself.
The Perpetual Harvest Grower: You’re running a continuous cycle and need propagation happening simultaneously with flowering. The VIVOSUN 4×5 2-in-1 or a large-format TopoLite lodge tent gives you both environments under one roof. The cost savings versus two separate tents — and the footprint savings — are significant.
The Precision Propagator: You’re cloning expensive genetics, rare specimens, or medicinal plants where failure means real loss. The AC Infinity CLOUDLAB Propagation Tent is your tool. The lab-tested mylar, lightproof cable management, and dual-orientation design support the kind of controlled, repeatable environment that expensive clones require. Every detail is designed with propagation performance in mind.
The Mushroom Cultivator: Any of the lodge-style tents on this list work well for mushroom fruiting chambers, but the AC Infinity CLOUDLAB gets a specific call-out here because the horizontal orientation is perfectly suited for multi-tier grain jars and fruiting blocks.
✨ Don’t Miss These Exclusive Deals!
🔍 Ready to start your own propagation journey?
Click any of the highlighted products above to check current pricing and availability on Amazon. Whether you’re rooting your first cuttings or scaling a perpetual harvest operation, the right propagation chamber tent will change your germination game entirely!
How to Choose a Propagation Chamber Tent: What Actually Matters
There are six factors worth thinking through — in this order — before buying:
1. Canvas thickness (denier rating) — but know when it matters. Higher denier (600D, 1680D, 2000D) means thicker, more lightproof fabric. For seedlings and herb cuttings that don’t care about light schedules, 600D is perfectly adequate. For photoperiod-sensitive plants, 1680D or higher pays off.
2. Size — match it to your trays, not your ambitions. The most common buying mistake is oversizing. A 3×3 or 4×4 tent sounds great until you’re trying to heat, humidify, and light a space that’s mostly empty. Standard 10″×20″ seedling trays are your baseline unit. A 24″×16″×20″ tent holds one tray; a 36″×24″×53″ lodge holds two to four. Buy for what you’re actually running today.
3. Orientation and tier design. Single-chamber tents are simpler. Two-tier lodge designs give you more usable vertical space for the footprint. If you’re running seedling trays under humidity domes, a low-ceiling lodge shelf is ideal. If you’re rooting cuttings in net pots, a taller single-chamber gives better clearance for a T5 bar.
4. Pole diameter and weight capacity. Seedling propagation doesn’t demand 300-lb structural capacity. But thin 11mm or 13mm poles flex when you’re attaching even modest lighting. Look for 16mm minimum — it’s the sweet spot between weight and stability.
5. Zipper quality. This is where cheap tents reveal themselves over time. SBS zippers (used by AC Infinity and Gorilla) are smoother and more durable than standard metal zippers. For a tent you’re opening and closing daily, zipper quality matters more than you expect.
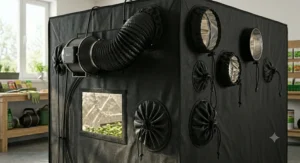
6. Ventilation ports — placement and count. You need at least two ports: one for intake (or passive air exchange) and one for exhaust fan output. Check that ports are positioned at different heights, since warm air rises and your airflow needs to create natural circulation.
Features That Actually Matter (And Those That Don’t)
Marketing teams work hard to make every spec sound essential. Here’s an honest filter:
Matters: Mylar reflectivity. The difference between 95% and 96% reflectivity sounds trivial. The difference between lab-tested 2000D diamond mylar and cheap generic mylar can be 15–25% more usable light at the plant surface. For seedlings that are developing their photosynthetic capacity, that translates to faster, stronger early growth.
Matters: Observation windows. You will check your plants constantly. A window that lets you see without opening the tent is not a gimmick — it’s a propagation tool. Every time you unzip to check on unrooted cuttings, you’re disrupting humidity.
Doesn’t matter much: The number of ports. Budget tents advertise 6, 8, or 10 ports as premium features. For a propagation chamber tent, you’re realistically using 2–4. Extra ports just require more cinching to keep them sealed.
Matters: Floor tray quality. A heavy-duty removable floor tray prevents water, nutrient solution, or rooting medium from soaking into your floor — and makes cleaning the tent between propagation cycles a five-minute job instead of an hour-long nightmare.
Doesn’t matter much for propagation: Maximum height. Tall ceilings matter for flowering plants that stretch toward lights. For seedlings and cuttings, you’re working in the bottom 18–30 inches of any tent. Paying extra for an 80″ tent when you’re using it purely for germination is unnecessary.
Propagation Chamber Tent vs. Open Bench Propagation: The Real Comparison
Many growers start propagating on open greenhouse benches or even kitchen counters with humidity domes. Here’s an honest look at when a dedicated rooting tent justifies the upgrade:
| Factor | Open Bench + Dome | Propagation Chamber Tent |
|---|---|---|
| Humidity control | ✅ Works — but loses RH every time dome is lifted | ✅ Better — sealed environment with active control |
| Temperature stability | ❌ Subject to room fluctuations | ✅ Insulated, stable microclimate |
| Light management | ❌ Ambient light, no control | ✅ Controlled spectrum and intensity |
| Pest protection | ❌ Fully exposed | ✅ Mesh filters keep gnats and airborne pests out |
| Scale | ❌ Limited to dome footprint | ✅ Lodge designs hold 4–8+ trays |
| Cost | ✅ Low upfront | Moderate but yields better propagation results |
The environmental science here is clear: research from acornhorticulture.com confirms that maintaining stable temperature and humidity — the core advantage of a sealed propagation tent — is the primary driver of rooting speed and success rate. Sealed tents win for anything beyond casual occasional propagation.
Common Mistakes When Buying a Propagation Chamber Tent
Mistake 1: Buying based on price alone. A $35 budget tent sounds appealing until it collapses under a T5 light bar, or the zipper fails in month two. The GROWNEER and MARS HYDRO tents in this guide prove you don’t need to spend a fortune — but don’t go lower than $40 for anything you plan to use seriously.
Mistake 2: Choosing a tent that’s too large. Heating and humidifying a half-empty 4×4 tent uses significantly more energy and hardware than a compact 2×2 or 2×3. Match your tent size to the number of seedling trays or cuttings you’re realistically running.
Mistake 3: Ignoring the root-zone temperature factor. Ambient temperature is what you read on a thermometer in the tent. Root-zone temperature — the warmth directly at the base of your cuttings — is what actually drives root formation. A heat mat under your tray compensates for the few degrees of difference that can slow or accelerate rooting by days. Most bare propagation tents don’t include one; the VIVOSUN Clone Tent Kit is a standout because it does.
Mistake 4: Running too much light. New growers often crank light intensity to maximum. Unrooted cuttings can’t process high photon loads without a root system to support water uptake — excess light wilts and stresses them. Start at 20–30% intensity and observe.
Mistake 5: Overlooking pest control. Fungus gnats and spider mites at the seedling stage are devastating because young plants have no tolerance for root damage. The Gorilla Clone Tent’s micro-mesh pre-filters are a feature worth paying for if you’re in an area with pest pressure.
FAQ
❓ What is a propagation chamber tent used for exactly?
❓ What size propagation chamber tent do I need for 40–50 seedlings?
❓ What humidity level should I maintain in a nursery grow tent for cuttings?
❓ Can I use a propagation chamber tent for mushroom cultivation?
❓ Is a propagation chamber tent better than a regular grow tent for seedlings?
Conclusion: The Right Propagation Chamber Tent Changes Everything
Germination isn’t magic. It’s environment. Every failed seed tray and every wilted cutting is the result of conditions — humidity, temperature, light — that were outside the narrow window young plants need to establish roots and start thriving. A propagation chamber tent brings those variables under your control, consistently, every cycle.
For most beginners, the VIVOSUN Clone Tent Kit is the safest investment: everything included, no guesswork, strong results out of the box. Experienced growers ready for precision performance will find the AC Infinity CLOUDLAB Propagation Tent worth every dollar in lab-tested materials and thoughtful engineering. Budget-conscious growers looking for a practical nursery grow tent will be well-served by the GROWNEER Lodge or MARS HYDRO 2×2, both of which outperform their price points significantly.
According to the Wikipedia overview of plant propagation, controlled environment propagation has been fundamental to horticulture for centuries — what’s changed is that gear this reliable and accessible now exists for home growers. Take advantage of it.
Your next harvest starts before your plants are even an inch tall. Give those seedlings the environment they need.
✨ Ready to Start Growing Smarter?
🌱 Click any highlighted product above to check current Amazon pricing and availability. Your best germination season yet is one tent away!
Recommended for You
- Best Propagation Grow Tent 2026: 7 Top Picks for Thriving Starts
- 7 Best Commercial Cannabis Tents for Licensed Growers in 2026
- 7 Best Commercial Grow Tents in 2026
Disclaimer: This article contains affiliate links. As an Amazon Associate, I earn from qualifying purchases. If you purchase products through these links, we may earn a small commission at no additional cost to you.
✨ Found this helpful? Share it with your friends! 💬🤗