
In This Article
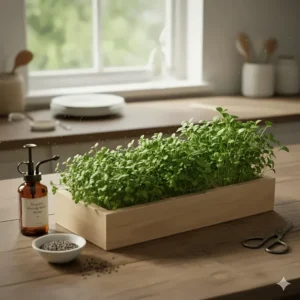
Imagine harvesting your own nutrient-packed greens in just 7-10 days—no garden required, no pesticides involved, and certainly no trips to overpriced farmers markets. That’s the magic of an organic microgreens growing kit, and honestly, once you start growing these tiny powerhouses, you’ll wonder why you ever bought wilted greens from the grocery store.
I stumbled into the microgreens world almost by accident. After spending way too much on “superfood” supplements that tasted like cardboard, I discovered something remarkable. Research from the USDA’s Agricultural Research Service found that microgreens contain up to 40 times more vitamins and nutrients than their mature counterparts. That means a handful of freshly harvested microgreens packs more nutritional punch than an entire salad bowl of mature lettuce.
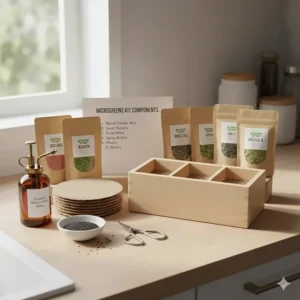
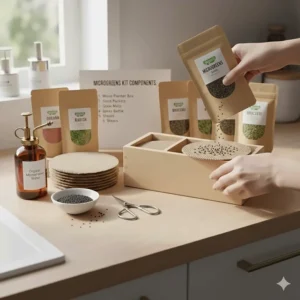
But here’s where it gets even better—organic microgreens growing kits make this incredibly simple. You don’t need a green thumb, fancy equipment, or even much space. Just water, light, and about 10 minutes of your time each week. Whether you’re looking for a non-GMO microgreens seeds option, seeking pesticide-free gardening solutions, or simply want to add more nutrition to your diet without the hassle, these kits deliver on every front.
The best part? Growing your own organic sprout kit means you control everything—no hidden chemicals, no mysterious growing practices, just pure, chemical-free growing kit goodness. Plus, watching those tiny seeds transform into vibrant greens is oddly satisfying. It’s like having a mini farm on your countertop, except this farm actually fits next to your coffee maker and doesn’t require overalls.
Quick Comparison Table: Top Organic Microgreens Growing Kits
| Product | Type | Price Range | Organic Seeds | Growing Time | Best For |
|---|---|---|---|---|---|
| ZestiGreens Self-Watering Kit | Hydroponic | $37-40 | ✅ Yes | 7-10 days | Beginners wanting soil-free |
| ingarden Microgreens Kit | Automated LED | $180-200 | ✅ USDA Certified | 7 days | Tech-savvy growers |
| Complete Microgreens Kit (6 Varieties) | Soil-Based | $26-29 | ✅ USDA Certified | 7-10 days | Value seekers |
| Window Garden Grow Kit | Acrylic Tray | $25-32 | ✅ Non-GMO | 10-14 days | Window growers |
| HAMAMA Ceramic Tray Kit | Seed Quilt System | $45-55 | ✅ Organic | 7-10 days | Design-conscious users |
| Mountain Valley Mini Kit | Single-Serve | $8-12 | ✅ OTCO Certified | 10 days | First-time testers |
| Back to the Roots Ceramic Kit | Soil & Ceramic | $28-35 | ✅ 95% Organic | 10-14 days | Gift-givers |
💬 Just one click – help others make better buying decisions too! 😊
Top 7 Organic Microgreens Growing Kits: Expert Analysis
1. ZestiGreens Self-Watering Microgreens Growing Kit
If you’re tired of the mess that comes with traditional soil-based growing, the ZestiGreens Self-Watering Kit is going to change your life. This clever hydroponic system eliminates dirt entirely while delivering consistent results every single time.
Key Specifications:
- 12″x6″ reusable tray with bamboo surround
- Includes 2 hemp grow mats and organic seeds (Amaranth & Superfood Mix)
- Dual growing modes: hydroponic or soil-based
- Price: $37-40
What makes this organic microgreens growing kit stand out is its versatility. The hydroponic insert can be removed if you prefer soil growing, giving you options as you learn what works best for your space. Customers rave about the zero-mess approach and how the self-watering system keeps greens perfectly hydrated without daily fussing.
✅ Pros:
- No soil mess, perfect for apartment living
- Self-watering design prevents over/under-watering
- Beautiful bamboo frame looks great on counters
❌ Cons:
- Slightly higher initial cost than basic kits
- Limited to specific seed varieties that work hydroponically
One reviewer shared, “I was skeptical about growing without soil, but this system works flawlessly. My broccoli microgreens were ready in 8 days and tasted incredible.”
2. ingarden Microgreens Growing Kit
For those who want the Ferrari of microgreens systems, the ingarden delivers automated growing with style. This isn’t just a kit—it’s a statement piece that happens to grow some of the most nutrient-dense food on the planet.
Key Specifications:
- Automated 4-stage LED grow lights (15-watt energy-efficient)
- Ceramic bowl in multiple colors (beige, black, rose, mint)
- Stainless steel frame, completely plastic-free
- Includes 3 pre-seeded organic pads
- Price: $180-200
This USDA certified organic system uses wavelengths that activate phytochemical development within microgreens for optimal growth 4X faster than in soil. The carbon-neutral certified system also uses 90% less water than conventional vegetables.
✅ Pros:
- Fully automated with one-button operation
- Premium design wins awards (Red Dot, iF Design Award)
- 7-day germination guarantee
❌ Cons:
- Premium price point
- Requires electricity for LED system
Customers particularly love the set-it-and-forget-it functionality. One enthusiast noted, “Worth every penny. The greens taste better than anything I’ve bought, and I love that it’s doing good for the planet.”
3. Complete Microgreens Growing Kit with 6 Varieties
Sometimes the best option is the straightforward one. This Complete Microgreens Kit gives you everything needed for traditional soil-based growing without fancy electronics or complicated systems.
Key Specifications:
- 6 USDA certified organic seed packets (Sunflower, Pea, Broccoli, Mixed Salad, Red Amaranth, Purple Radish)
- Cardboard growing trays and coconut coir soil pucks
- Full instruction guide included
- Price: $26-29
This organic microgreens growing kit excels at one thing: getting beginners started without overwhelming them. The included coconut coir expands when watered, and the seeds have excellent germination rates. It’s perfect for natural home farming beginners who want to test the waters before investing in expensive equipment.
✅ Pros:
- Budget-friendly entry point
- Wide variety of seeds to experiment with
- Biodegradable trays are eco-friendly
❌ Cons:
- Requires more hands-on attention than automated systems
- Trays aren’t reusable long-term
Users appreciate the variety, with one commenting, “Each seed type has a unique flavor. The radish microgreens add amazing spice to sandwiches!”
4. Window Garden Microgreens Grow Kit
The Window Garden Kit proves you don’t need elaborate setups to grow fantastic microgreens. This acrylic tray system utilizes the sun’s natural energy, making it ideal for pesticide-free gardening enthusiasts.
Key Specifications:
- BPA-free acrylic growing tray
- Non-GMO organic seeds and fiber soil included
- Mist sprayer for gentle watering
- Perfect windowsill size
- Price: $25-32
This chemical-free growing kit was specifically designed for window growing, taking advantage of natural sunlight. The clear acrylic lets you watch root development, which is surprisingly fascinating for both kids and adults.
✅ Pros:
- No electricity needed—uses natural sunlight
- Versatile tray works for herbs and succulents too
- Affordable and straightforward
❌ Cons:
- Requires south-facing window for best results
- Slower growth in winter months with less sunlight
One satisfied grower shared, “I rotate my tray daily for even growth. The microgreens are just as good as the expensive ones from Whole Foods.”
5. HAMAMA Microgreens Growing Kit
Innovation meets elegance with the HAMAMA system and its unique Seed Quilt technology. This organic sprout kit makes growing foolproof with pre-seeded mats that eliminate the guesswork.
Key Specifications:
- Patented Seed Quilt system with pre-seeded mats
- Choice of ceramic or plastic tray
- Includes 3 organic seed varieties (Kale, Broccoli, Salad Mix)
- Bamboo frame available as upgrade
- Price: $45-55 (ceramic), $35-40 (plastic)
The genius of this system lies in its Seed Quilts—compostable mats with perfectly distributed seeds that you simply place in the tray, add water, and watch grow. All HAMAMA seeds are non-GMO, with most options carrying organic certification, and they work in low-light conditions.
✅ Pros:
- Virtually impossible to mess up
- Beautiful ceramic options for visible countertop display
- Subscription service keeps seeds coming
❌ Cons:
- Ongoing cost for Seed Quilt refills
- Less hands-on than traditional growing
Users love the convenience factor, with one noting, “Perfect for busy professionals. I literally just add water once and harvest a week later.”
6. Mountain Valley Mini Microgreens Growing Kit
Perfect for skeptics who want to try before committing, the Mountain Valley Mini Kit offers single-serve growing containers that make experimenting easy and affordable.
Key Specifications:
- Individual growing container with humidity lid
- Pre-fertilized soil puck
- OTCO certified organic seeds (Salad Mix variety)
- Mist sprayer included
- Price: $8-12
These miniature kits pack everything needed for one growing cycle into a compact container. The pre-fertilized soil means you don’t need any additional nutrients, making this ideal for testing whether you enjoy the microgreens growing process.
✅ Pros:
- Ultra-affordable trial option
- Makes excellent stocking stuffers or gifts
- Perfect portion size for individuals
❌ Cons:
- Single-use design creates more waste
- Limited to one variety per container
Customers appreciate the low barrier to entry. One reviewer said, “I bought six different varieties to find my favorite. The salad mix won, and now I’m upgrading to a larger system.”
7. Back to the Roots Organic Microgreens Grow Kit
This beautiful Back to the Roots Kit combines aesthetics with function, featuring a gorgeous ceramic planter that you’ll actually want displayed on your kitchen counter.
Key Specifications:
- Elegant ceramic growing planter
- Expandable organic soil and germination lid
- USDA organic certified seeds
- 100% guaranteed to grow promise
- Price: $28-35
This kit features microgreens that contain up to 40 times the vitamins and minerals of mature plants, with organic soil and seeds that are 95% organic certified. The ceramic planter is sturdy enough for repeated use and beautiful enough to leave out permanently.
✅ Pros:
- Premium ceramic design looks professional
- Strong germination guarantee
- Gift-ready packaging
❌ Cons:
- Heavier and less portable than plastic alternatives
- Slightly higher price for the ceramic quality
Gift-givers love this option, with one purchaser commenting, “Gave this to my sister who loves cooking. She was harvesting microgreens within 10 days and now asks for refill seeds for every occasion!”
What Makes Organic Microgreens Growing Kits Worth It?
The Nutritional Powerhouse Factor
Let’s talk about why these tiny greens are creating such buzz in health circles. USDA research analyzing 25 commercially available microgreen varieties found vitamin C content ranging from 20 to 147 milligrams per 100 grams of fresh weight, with beta-carotene and other carotenoids ranging from 0.6 mg to 12.1 mg per 100 grams. That’s a massive range, and the winners were red cabbage for vitamin C, cilantro for carotenoids, and green daikon radish for vitamin E.
Think about it this way—when you eat a mature head of broccoli, you’re getting nutrients that have been distributed throughout the entire plant over months of growth. With microgreens, you’re capturing all that nutritional potential in a concentrated, 7-10 day window. It’s like the difference between taking a vitamin spread over a week versus getting it all in one powerful dose.
Chemical-Free Peace of Mind
One of the most compelling reasons to embrace an organic microgreens growing kit is the total control over what goes into your food. Because microgreens are grown indoors and harvested within days, they don’t require any fertilizer or pesticide use, unlike conventional produce that often carries chemical residues.
When you grow using USDA organic certified seeds and clean growing methods, you eliminate exposure to synthetic pesticides, herbicides, and chemical fertilizers that plague conventional produce. This matters especially for greens, which you typically eat raw without washing away surface residues.
Space-Efficient Natural Home Farming
Living in an apartment doesn’t mean giving up on growing your own food. A typical organic microgreens growing kit occupies less space than a large cutting board. You can grow on kitchen counters, windowsills, or even in closets with a small grow light. Compare this to traditional gardening, which requires yard space, tools, and constant maintenance.
This efficiency extends to resource use too. Microgreens need minimal water compared to field-grown vegetables, and the rapid 7-14 day growth cycle means you’re harvesting fresh greens weekly instead of waiting months for mature plants.

How to Choose the Right Organic Microgreens Growing Kit
1. Assess Your Available Light
Natural sunlight growers should look for kits designed for window placement, like the Window Garden system. If you lack good natural light, invest in systems with built-in LED lights like the ingarden. Some microgreens tolerate low light better than others—kale, pea shoots, and sunflower microgreens are more forgiving than fussy varieties like basil or cilantro.
2. Consider Your Maintenance Preference
Be honest about your commitment level. Self-watering hydroponic systems like ZestiGreens require minimal daily attention—just check water levels every few days. Traditional soil-based kits need more frequent monitoring to ensure proper moisture without overwatering. Automated systems cost more upfront but save time long-term.
3. Evaluate Space Constraints
Measure your available growing space before purchasing. Compact kits like the Mountain Valley Mini work for tiny kitchens, while larger systems like HAMAMA’s ceramic tray need about 12 inches of counter space. Vertical stacking is possible with some systems if you’re really space-challenged.
4. Budget for Ongoing Costs
Initial kit prices tell only part of the story. Calculate the cost of seed refills, growing medium replacements, and any required accessories. Systems using proprietary seed mats (like HAMAMA) cost more long-term than kits accepting standard seeds. However, the convenience might justify the premium.
5. Match Seeds to Your Taste Preferences
Not all microgreens taste alike. Radish and mustard varieties pack spicy punch, while pea shoots offer sweet, tender flavor. Broccoli and kale deliver mild, slightly bitter notes. Many kits come with variety packs, but eventually you’ll want to stock up on your favorites. Ensure your chosen system accommodates the seed varieties you enjoy most.
Maximizing Your Organic Microgreens Growing Kit Success
The Perfect Growing Environment
Temperature matters more than most beginners realize. Most microgreens thrive between 65-75°F (18-24°C). Colder temperatures slow growth, while excessive heat (above 80°F/27°C) encourages mold and reduces flavor. Keep kits away from heating vents, air conditioning blasts, and cold windows in winter.
Humidity control is your secret weapon for preventing the dreaded mold that plagues new growers. Aim for 40-60% humidity during growing. Too dry? Place a shallow water dish nearby. Too humid? Improve air circulation with a small fan. The germination stage needs higher humidity (covered with a dome), while growing greens prefer good airflow.
Watering Wisdom
Overwatering kills more microgreens than underwatering. Seeds need consistent moisture for germination but shouldn’t sit in water. Bottom watering (pouring water into the tray rather than over seeds) prevents fungal issues and keeps stems cleaner. Morning watering gives excess moisture time to evaporate during the day.
Watch for these watering signs: soil or growing medium should feel like a wrung-out sponge—moist but not soggy. If you squeeze it and water drips out, it’s too wet. If it crumbles when touched, add water immediately.
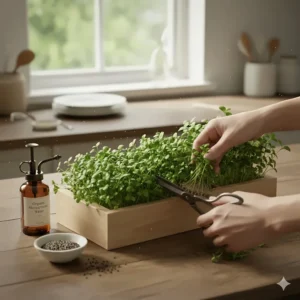
Harvesting for Maximum Freshness
Timing your harvest impacts both flavor and nutrition. Most microgreens peak 7-14 days after planting, when they’ve developed their first true leaves beyond the initial cotyledons. Wait too long and they become bitter; harvest too early and you miss maximum nutrient density.
Use clean, sharp scissors to cut just above the soil line. Harvest right before using for the freshest flavor and highest nutrient retention. Studies show proper storage temperature and atmosphere are critical for maintaining microgreen quality, as they have a naturally short shelf-life of only a few days.
Store unwashed in containers lined with paper towels in your refrigerator’s crisper drawer. They’ll last 5-7 days if kept dry and cool. Wash only what you’ll use immediately—moisture accelerates spoilage.
Common Growing Mistakes (And How to Avoid Them)
Overcrowding Seeds
New growers often overseed, thinking more seeds equal more greens. Reality? Overcrowded microgreens compete for light and air, resulting in thin, weak stems prone to disease. Follow seed packet recommendations carefully. For tiny seeds like mustard or broccoli, 1-2 tablespoons covers a standard 10×20 tray. Larger seeds like sunflower or pea need different spacing.
Insufficient Light Exposure
Even “low-light” varieties need adequate illumination. Insufficient light causes leggy, pale microgreens with weak flavor. South-facing windows work best for natural light; anything else needs supplemental lighting. LED grow lights positioned 4-6 inches above microgreens for 12-16 hours daily produce the strongest, most flavorful greens.
Ignoring Sanitation
Reusable trays harbor bacteria and mold spores from previous crops. Clean trays thoroughly with hydrogen peroxide or white vinegar solution between plantings. Sanitize scissors, domes, and water containers regularly. Contamination spreads quickly in the moist growing environment, potentially ruining entire harvests.
Premature Uncovering
Seeds need darkness and high humidity for germination—usually 2-4 days depending on variety. Uncovering too early stunts growth and creates uneven germination. Wait until seeds have sprouted and begun lifting the covering before exposing them to light. The first pale leaves (cotyledons) should be visible before removing domes or covers.
The Science Behind Organic vs. Conventional Microgreens
Why Organic Certification Matters
USDA organic certified microgreens follow strict guidelines prohibiting synthetic pesticides, herbicides, and genetically modified organisms (GMOs). Seeds must come from certified organic sources, and growing mediums must meet organic standards. This certification ensures what you’re eating is truly clean.
Organic farming practices work with nature rather than against it, avoiding synthetic chemicals while reducing soil and water pollution and promoting biodiversity. For non-GMO microgreens seeds, this means no genetic manipulation—just seeds as nature intended.
Nutrient Density Comparisons
USDA studies comparing red cabbage microgreens to mature red cabbage found that mice fed microgreens had lower bad cholesterol levels and reduced liver inflammation markers, with microgreens containing more polyphenols and glucosinolates than mature cabbage. These compounds provide powerful antioxidant and cholesterol-lowering properties.
The research is clear: growing method impacts nutritional content. Organic practices that prioritize soil health and avoid chemical inputs produce microgreens with enhanced bioactive compound levels. You’re not just avoiding bad stuff—you’re actively adding good stuff.
Beyond the Kitchen: Creative Uses for Microgreens
Culinary Applications
Microgreens aren’t just salad toppers. Their intense flavors and vibrant colors elevate countless dishes. Try them blended into smoothies for nutritional boosts without overwhelming taste, layered into sandwiches and wraps for textural contrast, stirred into scrambled eggs or omelets just before serving, or garnishing soups where their delicate structure adds visual appeal.
Experiment with flavor pairing. Spicy radish microgreens complement rich, fatty foods like avocado or salmon. Sweet pea shoots balance acidic tomato-based dishes. Mild sunflower microgreens work everywhere. Don’t cook them—heat destroys their delicate structure and reduces nutritional content.
Health and Wellness Integration
Forward-thinking health practitioners now recommend microgreens as concentrated nutrition sources. A handful daily provides remarkable vitamin, mineral, and antioxidant intake. Research published in the Journal of Agricultural and Food Chemistry indicates microgreens may help reduce heart disease risk, support diabetes management through improved blood sugar control, and provide anti-inflammatory and anti-cancer properties.
Athletes use microgreens for recovery support, thanks to high antioxidant content that fights exercise-induced oxidative stress. Parents sneak them into kids’ foods for easy veggie consumption. Seniors appreciate their easy-to-chew texture and digestive gentleness.
Gift-Giving and Educational Opportunities
Organic microgreens growing kits make thoughtful gifts for virtually anyone—health-conscious friends, apartment dwellers, cooking enthusiasts, or kids learning about plants. The quick growth cycle provides instant gratification, maintaining engagement where traditional gardening might lose interest.
Teachers use microgreens for biology lessons about germination, photosynthesis, and nutrition. The visible daily changes fascinate students while teaching responsibility through caretaking. Home-schooling families find them perfect for hands-on science education that doubles as lunch production.
Comparison Table: Soil vs. Hydroponic Growing Methods
| Feature | Soil-Based Kits | Hydroponic Kits |
|---|---|---|
| Mess Factor | Moderate (soil particles) | Minimal (water only) |
| Cleaning Effort | Higher | Lower |
| Seed Varieties | All types thrive | Some seeds prefer soil |
| Cost | Lower initial investment | Higher upfront, lower ongoing |
| Space Efficiency | Requires disposal space for used soil | More compact long-term |
| Nutrient Control | Soil-dependent | Precise control possible |
| Organic Options | Widely available | Requires organic seeds + clean water |
| Growth Speed | 7-14 days | Often 20-30% faster |
| Flavor Intensity | Slightly earthier notes | Cleaner, more pronounced |
Essential Growing Supplies Beyond Your Kit
Supplemental Equipment
Most organic microgreens growing kits include basics, but these additions enhance success:
pH Testing Kit ($10-15): Water pH affects nutrient availability. Microgreens prefer slightly acidic conditions (6.0-6.5 pH). Test and adjust if necessary with pH down solutions.
Small Fan ($15-20): Gentle air circulation prevents mold growth and strengthens stems. Position fan to create subtle movement, not strong wind.
Spray Bottle ($5-10): Fine mist settings provide gentle watering without disturbing tiny seedlings. Essential during germination phase.
Plant Scissors ($8-12): Sharp, stainless steel scissors designed for herbs ensure clean cuts without crushing delicate stems.
Backup Growing Medium ($10-25): Stock extra coconut coir, hemp mats, or potting mix so you’re never waiting on supplies when ready to plant.
Seed Storage Strategies
Proper seed storage extends viability and maintains germination rates. Store unused seeds in airtight containers with silica gel packets to control moisture. Keep containers in cool, dark locations—excessive heat and light degrade seeds rapidly. Most properly stored organic seeds remain viable 1-3 years depending on variety.
Label containers with purchase dates and varieties. Conduct germination tests on older seeds before planting entire trays. Soak 10 seeds overnight and count how many sprout—germination rates below 70% indicate seed replacement time.
Price Range and Value Analysis
| Budget Category | Initial Investment | Monthly Costs | Best For |
|---|---|---|---|
| Budget-Conscious | $8-30 | $5-10 (seeds/soil) | Testing the concept |
| Mid-Range | $30-60 | $10-20 (refills) | Regular home use |
| Premium | $60-200+ | $15-30 (specialty seeds) | Serious enthusiasts |
Budget options like Mountain Valley kits and basic soil systems work perfectly for beginners unsure about commitment levels. You’ll spend less upfront but invest more time managing growing conditions manually.
Mid-range kits like ZestiGreens and HAMAMA balance convenience with affordability. Self-watering features and improved designs reduce failure rates, justifying slightly higher costs through better harvests.
Premium systems like ingarden deliver automation, superior design, and often faster growth. They’re investments for people who’ve confirmed their love for fresh microgreens and want the best possible experience.
Consider cost-per-harvest calculations. A $40 kit producing weekly harvests for a year costs roughly $0.77 per week, while buying equivalent fresh microgreens from stores runs $4-8 weekly. The math heavily favors home growing, with premium kits paying for themselves within 3-4 months.
🔍 Transform Your Kitchen with Fresh, Organic Microgreens
Ready to grow the most nutrient-dense food on the planet right in your kitchen? Click on any highlighted product above to check current pricing and availability on Amazon. These carefully selected organic microgreens growing kits will help you create authentic, chemical-free greens your whole family will love. From USDA organic certified options to innovative hydroponic systems, there’s a perfect kit waiting to revolutionize your approach to fresh, pesticide-free gardening.

FAQ: Your Organic Microgreens Growing Kit Questions Answered
❓ How long does an organic microgreens growing kit last before needing replacements?
❓ Can you grow organic microgreens without special lighting equipment?
❓ What is the actual cost difference between organic and conventional microgreens seeds?
❓ Do organic microgreens growing kits work in apartments with limited space?
❓ How much cheaper is growing your own versus buying organic microgreens at stores?
Conclusion: Start Your Organic Microgreens Journey Today
After exploring seven exceptional organic microgreens growing kits, one truth becomes clear: there’s never been a better time to start growing your own nutrient-packed greens at home. Whether you choose the budget-friendly Complete Microgreens Kit for $26, the high-tech ingarden system for ultimate convenience, or something perfectly in between, you’re making an investment in your health that pays dividends with every harvest.
The beauty of these kits lies in their accessibility. You don’t need gardening experience, fancy equipment, or even much time. Ten minutes weekly produces continuous harvests of USDA organic certified greens bursting with vitamins, minerals, and that fresh-from-the-garden flavor impossible to find in stores.
Remember, choosing an organic microgreens growing kit means you control every aspect of production—from non-GMO microgreens seeds to chemical-free growing methods. No hidden pesticides, no mystery growing practices, just pure natural home farming in your own kitchen. The peace of mind that comes from knowing exactly what goes into your food? That’s priceless.
My advice? Start with whichever kit fits your budget and space constraints. You’ll quickly discover which varieties you love, refine your growing technique, and probably find yourself planning your meals around harvest schedules. That connection to your food—watching those tiny seeds transform into vibrant, nutritious greens—changes how you think about eating.
The microgreens revolution isn’t slowing down. Join the thousands of home growers who’ve discovered this simple, sustainable way to boost nutrition, reduce grocery bills, and enjoy the freshest possible produce. Your future self (and your taste buds) will thank you.
Recommended for You
- 7 Best Complete Microgreens Growing Systems (2026 Guide)
- 7 Best Affordable Microgreens Growing Kits 2026 (Under $50)
- 7 Best Hydroponic Microgreens Kit 2026
Disclaimer: This article contains affiliate links. If you purchase products through these links, we may earn a small commission at no additional cost to you.
✨ Found this helpful? Share it with your friends! 💬🤗