In This Article
Walking into your spare bedroom and seeing lush, thriving plants under perfect lighting conditions feels like magic, doesn’t it? That transformation from empty space to productive indoor garden starts with choosing the right foundation—a quality grow tent that creates the ideal microclimate for your plants.
Finding the best grow tent doesn’t have to be overwhelming. Whether you’re cultivating herbs on your apartment balcony or setting up a serious indoor garden in your basement, the right tent makes all the difference between disappointing harvests and abundant yields. After testing dozens of options and analyzing thousands of customer reviews, I’ve discovered what separates mediocre tents from game-changers.
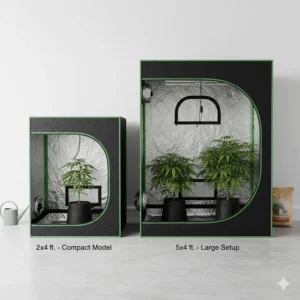
Today’s grow tents combine thick, light-proof materials with sturdy frames and smart features like observation windows and cable management systems. The market has exploded with options ranging from compact 2×2 setups perfect for beginners to massive 10×10 configurations for experienced growers. Understanding canvas density, pole thickness, and reflective materials helps you invest wisely rather than buying twice.
Quick Comparison Table: Top Grow Tents at a Glance
| Product | Size | Material | Weight Capacity | Price Range | Best For |
|---|---|---|---|---|---|
| AC Infinity CLOUDLAB 844 | 4’×4’×80″ | 2000D Mylar | 150 lbs | $200-250 | Tech-savvy growers |
| Gorilla Grow Tent Pro 4×4 | 4’×4’×6’11”-7’11” | 1680D Canvas | 300 lbs | $300-380 | Premium quality |
| VIVOSUN S448 | 4’×4’×80″ | 600D Oxford | 100 lbs | $110-140 | Budget-conscious |
| Spider Farmer 4×4 2025 | 4’×4’×80″ | 1680D Oxford | 150 lbs | $160-190 | Value seekers |
| MARS HYDRO 4×4 | 4’×4’×80″ | 1680D Mylar | 88 lbs | $150-180 | Complete kits |
| Gorilla Grow Tent 2×2.5 | 2’×2.5’×6’6″ | 1680D Canvas | 300 lbs | $186-266 | Small spaces |
| AC Infinity CLOUDLAB 811 | 10’×10’×80″ | 2000D Mylar | 150 lbs | $600-750 | Large operations |
💬 Just one click – help others make better buying decisions too!😊
Top 7 Best Grow Tent Products: Expert Analysis
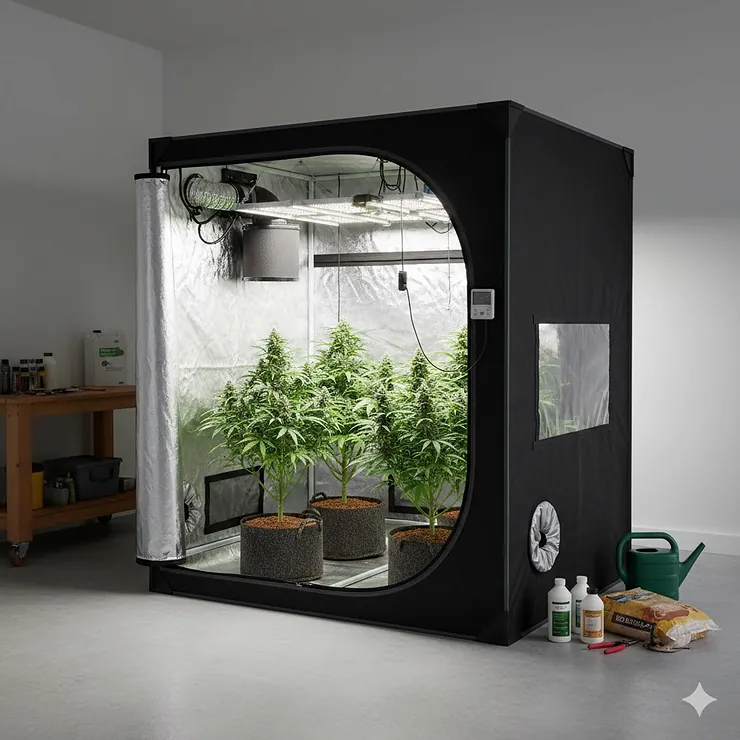
1. AC Infinity CLOUDLAB 844 – The Tech Enthusiast’s Dream
If you love smart home integration and pristine engineering, the AC Infinity CLOUDLAB 844 represents the pinnacle of modern grow tent design. This 4×4 tent features laboratory-tested 2000D mylar canvas that reflects more light than competing products, according to independent testing.
Key Specifications:
- Dimensions: 48″×48″×80″
- Material: 2000D diamond mylar canvas
- Pole thickness: 1″ (22mm) steel construction
Customers rave about the controller mounting plate with lightproof cable passthrough—a game-changer for anyone building a UIS ecosystem. One verified buyer mentioned their setup stays perfectly sealed even with multiple devices connected. The SBS zippers glide smoothly after thousands of openings, unlike cheaper alternatives that jam within months.
✅ Pros: Lab-tested highest reflectivity, future-ready controller integration, genuine SBS zippers
✅ Thickest poles (1 inch) provide rock-solid stability
✅ Enlarged observation windows for easy monitoring
❌ Cons: Higher price point than budget options
❌ Controller sold separately
Price: $200-250 | Capacity: 8 plants (5-gallon pots)
2. Gorilla Grow Tent Pro 4×4 – When Only the Strongest Will Do
The Gorilla Grow Tent Pro 4×4 earns its reputation as the strongest tent on the market through relentless engineering. With 1680D threaded fabric that’s 3-9 times denser than competitors and an all-steel frame boasting 300-pound weight capacity, this tent handles serious equipment without breaking a sweat.
Key Specifications:
- Adjustable height: 6’11”-7’11” (with included extension)
- Frame strength: 300 lbs hanging capacity
- Canvas: 1680D threaded, reflective fabric
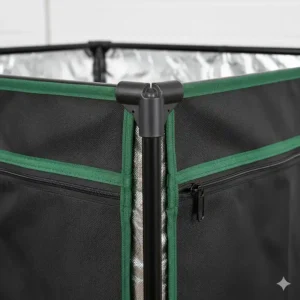
Height adjustability sets Gorilla apart—the included 1-foot extension kit lets you grow taller plants or add more vertical equipment. The 360-degree wrap-around zippers provide access from any angle, eliminating those frustrating reach-around moments in tight spaces.
✅ Pros: Tallest adjustable height system, unmatched 300 lb capacity
✅ Industrial-strength zippers prevent light leaks
✅ Comprehensive 360-degree access
❌ Cons: Premium pricing
❌ Heavier and bulkier for solo assembly
Price: $300-380 | Capacity: 4-8 plants
3. VIVOSUN S448 – Best Bang for Your Buck
Don’t let the budget-friendly price fool you—the VIVOSUN S448 delivers solid performance for beginner and intermediate growers. This 4×4 tent features 600D high-density Oxford canvas with 100% reflective mylar lining that effectively blocks light leakage.
Key Specifications:
- Canvas: 600D Oxford with PE layer and mylar walls
- Top bar capacity: 100 lbs
- Multiple duct ports for ventilation flexibility
What surprised me most about VIVOSUN was the thoughtful design details at this price point. The transparent observation window with hook-and-loop fasteners lets you check progress without disturbing your environment. The removable floor tray simplifies cleaning—a feature often missing from budget tents.
✅ Pros: Exceptional value, tool-free corner connectors
✅ Observation window and removable tray
✅ Well-sealed zipper with black inner lining
❌ Cons: Thinner canvas than premium options
❌ Lower weight capacity than Gorilla
Price: $110-140 | Capacity: 4-8 plants
4. Spider Farmer 4×4 2025 – Smart Features Meet Affordable Quality
The Spider Farmer 4×4 2025 strikes an impressive balance between features and price. This new model includes hooks for controllers and power strips—finally, a solution for cable chaos! The 1680D thickened mylar canvas matches premium tents at a fraction of the cost.
Key Specifications:
- 1680D tear-proof, waterproof Oxford canvas
- Reinforced steel poles (3x thicker than standard)
- Enlarged view window: 11.8″×15.7″
Spider Farmer nailed the details growers actually want. The Velcro cable organization straps keep your setup tidy, while the side buckle lets you fasten the main door open for quick access during maintenance. Customer feedback consistently praises the smooth SBS zippers and effective light blocking.
✅ Pros: Controller/power strip hooks included, excellent cable management
✅ Large observation window for monitoring
✅ Supports 150 lbs of equipment
❌ Cons: Slightly smaller observation window than CLOUDLAB
❌ Standard 80″ height (no extension option)
Price: $160-190 | Capacity: 4-8 plants
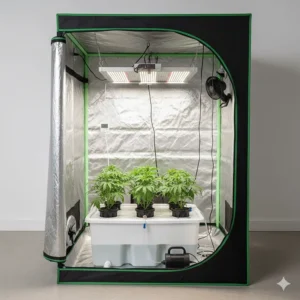
5. MARS HYDRO 4×4 Complete Kit – Everything You Need in One Box
Starting fresh? The MARS HYDRO 4×4 Complete Kit eliminates decision fatigue by bundling a quality tent with properly matched equipment. This complete system includes the tent, TS1000 LED grow light, smart WiFi ventilation, and all essential accessories.
Key Specifications:
- 1680D high-reflective diamond mylar (25% more PPFD than 600D)
- Integrated smart WiFi control system
- Complete kit with light, fan, filter, and accessories
The real value shines in the ventilation system with 10 adjustable speeds and WiFi control via the MARS HYDRO app. Simply purchase their Iconconnect USB adapter and monitor temperature/humidity from anywhere. One reviewer mentioned how the automation saved their crops during an unexpected heatwave.
✅ Pros: Complete matched system, no guesswork
✅ Smart WiFi ventilation control
✅ High-reflective 1680D canvas
❌ Cons: Light may need upgrading for maximum yields
❌ Kit components not individually replaceable
Price: $280-340 (complete kit) | Capacity: 4-8 plants

6. Gorilla Grow Tent 2×2.5 – Small Space Powerhouse
Apartment dwellers and closet growers, meet your perfect match. The Gorilla Grow Tent 2×2.5 solves the classic small tent problem: how to pack professional features into compact footprints without compromising quality.
Key Specifications:
- Unique dimensions: 2’×2.5’×6’6″ (fixed height)
- Same 1680D canvas as larger Gorilla models
- 300 lb weight capacity (unchanged from larger tents)
The 2.5-foot depth transforms usability in tight spaces—you can actually reach the back corner! Gorilla didn’t cut corners on materials, giving you the same industrial-strength construction as their premium line. This tent stands 20-60% taller than comparable-sized competitors, providing crucial vertical space for lights and ventilation.
✅ Pros: Superior reach-ability in compact footprint
✅ Full Gorilla quality in small size
✅ Tallest in class for vertical equipment space
❌ Cons: Fixed height (no extension available)
❌ Higher price per square foot
Price: $186-266 | Capacity: 1-2 plants
7. AC Infinity CLOUDLAB 811 – Commercial-Grade Large Operation
Serious growers scaling up operations need serious infrastructure. The AC Infinity CLOUDLAB 811 offers professional-grade growing space with 10×10 dimensions that accommodate up to 25 plants in 5-gallon containers.
Key Specifications:
- Massive 10’×10’×80″ growing area
- 16 total hanging bars (8 standard + 8 extra)
- Multiple access points: 2 side doors plus main entrance
Managing this much space becomes manageable with thoughtful design: multiple duct port sizes (4″, 8″, 10″), dual side doors for easy access, and reinforced corners that handle heavy-duty equipment. The controller mounting system scales perfectly for larger automation needs.
✅ Pros: Professional capacity for 25+ plants
✅ Multiple entry points for maintenance
✅ Varied duct port sizes for flexible setups
❌ Cons: Requires significant floor space
❌ Two-person assembly recommended
Price: $600-750 | Capacity: 25 plants (5-gallon pots)
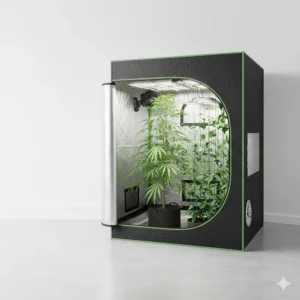
What is a Grow Tent? Understanding the Indoor Growing Revolution
A grow tent creates a controlled, enclosed environment specifically designed for cultivating plants indoors year-round. According to the USDA National Agricultural Library, these portable structures enable growers to control temperature, humidity, light exposure, and air circulation with precision impossible in open-room growing.
Think of a grow tent as a miniature greenhouse optimized for indoor use. The reflective interior (typically mylar or diamond-patterned material) bounces light back onto your plants, maximizing photosynthesis efficiency. Sealed construction prevents light pollution during dark periods—critical for photoperiod-sensitive plants that rely on specific light/dark cycles.
Modern tents feature multiple duct ports for ventilation systems, observation windows for monitoring without environmental disruption, and sturdy frames supporting grow lights, carbon filters, and other equipment. Hydroponics research shows indoor cultivation can produce 20-25% higher yields compared to traditional outdoor methods, primarily due to optimized growing conditions.
The materials matter significantly. Canvas density (measured in “D” or denier) affects durability and light blocking—600D represents entry-level quality, while 1680D and 2000D provide professional-grade performance. Frame thickness determines weight capacity, with 19mm poles handling basic setups and 22mm (1-inch) poles supporting commercial equipment loads.
Why Invest in a Quality Grow Tent? The Science Behind Better Yields
Climate Control Mastery
Indoor growing success hinges on environmental consistency. Quality grow tents create isolated microclimates where you control every variable affecting plant health. Temperature fluctuations stress plants, reducing vigor and yields. A well-insulated tent maintains stable temperatures even when outside conditions swing wildly.
Humidity management becomes effortless inside a sealed tent. Young seedlings thrive at 65-70% humidity, while flowering plants prefer 40-50%. Controlling these parameters in open rooms requires expensive whole-room humidification. Tents concentrate your efforts in manageable spaces, reducing equipment costs and energy consumption.
Light Optimization and Energy Efficiency
The reflective interior of grow tents amplifies your lighting investment. Standard mylar reflects approximately 95% of light back toward plants, effectively doubling the useful light from each fixture. This means you can achieve optimal growth with lower-wattage lights, cutting electricity costs significantly.
Light leaks sabotage photoperiod plants that need darkness for flowering. Even tiny light intrusions during dark periods can prevent flowering or cause plants to revert to vegetative growth. Professional tents eliminate this risk through light-proof zippers, sealed seams, and double-stitched construction.
Pest and Contamination Prevention
University research on hydroponics confirms that enclosed growing environments dramatically reduce pest pressure. Soil-borne diseases, common in traditional gardening, become non-issues in controlled tent environments. The enclosed space creates a barrier against flying insects, mold spores, and other contaminants that plague outdoor gardens.
Filtration systems work more effectively in tents because you’re treating a defined space rather than an entire room. Carbon filters eliminate odors completely, while HEPA filters remove airborne particles and spores. This controlled environment means fewer pesticides, healthier plants, and safer harvests.
Space Efficiency and Versatility
Modern life often means limited square footage, yet grow tents maximize vertical space brilliantly. A 4×4 tent occupying just 16 square feet can produce hundreds of pounds annually through successive harvests. Compare this to traditional outdoor gardens requiring 100+ square feet for similar yields.
Apartment renters particularly benefit from tent growing. When you move, simply disassemble and transport your complete growing environment. This portability preserves your investment and enables year-round cultivation regardless of housing changes. The National Park Service notes that indoor hydroponic systems can produce crops anywhere, independent of climate or season.
How to Choose the Best Grow Tent for Your Needs
1. Determine Your Space Requirements
Measure your available area carefully before shopping. Remember to account for equipment placement outside the tent—inline fans, controllers, and reservoirs need space too. A 4×4 tent actually requires roughly 6×6 feet of floor space when properly set up.
Consider ceiling height limitations. Standard 80-inch tents work in most rooms, but basement growers with 7-foot ceilings should opt for shorter models. Conversely, rooms with 9+ foot ceilings benefit from height-adjustable models like Gorilla’s extension systems.
2. Assess Material Quality and Durability
Canvas density directly correlates with longevity and light blocking. Budget tents using 210D-420D materials develop light leaks within months as fabric degrades. Professional growers report 600D tents lasting 2-3 years under regular use, while 1680D and 2000D models remain pristine after 5+ years.
Pole construction determines structural integrity. Look for 19mm minimum diameter with powder-coated finishes preventing rust. Premium models feature 22mm poles and reinforced corner connectors. These support heavier equipment loads without sagging or collapsing.
3. Evaluate Zipper and Seam Quality
Cheap zippers fail repeatedly, forcing you to carefully align tracks each time. SBS brand zippers (found on AC Infinity and Spider Farmer models) operate smoothly through thousands of cycles. Double-stitched seams prevent tears, while light-blocking flaps behind zippers eliminate the primary light leak source.
Test zippers in person if possible—they should glide effortlessly without catching. Corners and stress points benefit from reinforced stitching. Some manufacturers add protective strips over seams for additional durability.
4. Calculate Weight Capacity Needs
Inventory your equipment weight before finalizing tent selection. LED grow lights weigh 15-40 pounds, carbon filters add 10-20 pounds, and inline fans contribute 5-15 pounds. Plus ducting, clip fans, and trellis netting—it adds up quickly!
Entry-level tents support 50-80 pounds, adequate for basic setups. Intermediate growers need 100-150 pound capacity for multiple lights and substantial filtration. Commercial operations require 200-300 pound capacity, like Gorilla’s professional line, supporting multiple lights, industrial fans, and redundant systems.
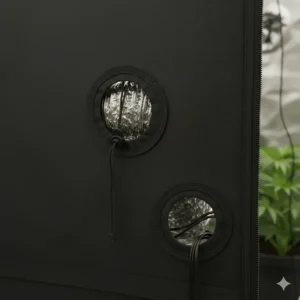
5. Plan for Ventilation and Duct Ports
Count your ventilation needs: intake fan, exhaust fan, passive intake vents, and possibly ports for humidifiers, dehumidifiers, or air conditioning. Quality tents provide 4-8 duct ports in various sizes (4″, 6″, 8″).
Port placement matters enormously. Top-mounted exhaust ports naturally evacuate hot air, while bottom ports facilitate cool air intake. Side ports accommodate horizontal ducting when vertical space is limited. Ensure ports include cinch cords or covers preventing light leaks when unused.
Essential Grow Tent Accessories for Maximum Success
Climate Control Equipment
Temperature and humidity sensors represent your first essential purchase. WiFi-enabled controllers like the GrowHub E42A or AC Infinity UIS Controller 69 Pro provide remote monitoring and automated responses. Set temperature thresholds triggering fans automatically, maintaining perfect conditions even when you’re away.
Inline fans and carbon filters form the ventilation core. Match fan CFM (cubic feet per minute) to tent size—a 4×4 tent needs 200-250 CFM minimum. Carbon filters scrub odors completely, essential for apartment growing or maintaining good neighbor relations.
Lighting Accessories and Controllers
Light hanging systems require attention beyond basic rope ratchets. Heavy LED fixtures demand caution—use rated equipment preventing catastrophic failures. Some growers prefer fixed-height hanging with adjustable dimming, while others use motorized lifters for precision height control.
Light meters (PAR meters) help optimize placement, measuring photosynthetically active radiation reaching your canopy. This data-driven approach eliminates guesswork, positioning lights at optimal heights for each growth stage. Expect to invest $150-500 in quality PAR meters providing accurate readings.
Support Systems and Training Tools
Trellis netting supports plants during heavy flowering, distributing weight and preventing branch breakage. Elastic netting adjusts as plants grow, while rigid screens work for SCROG (screen of green) training methods maximizing canopy coverage.
Corner shelves organize small items like measuring tools, pH testers, and nutrient bottles. They utilize otherwise wasted space while keeping essentials accessible. Some growers add magnetic tool holders on poles for scissors, thermometers, and other frequently needed implements.
Water Management Solutions
Floor trays catch spills and runoff, protecting floors from water damage. Raised flood tables with drainage systems enable efficient watering and runoff collection. For hydroponic grows, reservoirs and pumps become tent fixtures requiring dedicated space planning.
Automatic watering systems using drippers or sprayers reduce daily maintenance while ensuring consistent moisture. Timers control watering frequency and duration, critical during vacation periods. Budget $50-200 for quality automated watering depending on system complexity.
Big Grow Tent Considerations: Scaling Your Operation
Structural Reinforcement for Large Tents
Tents exceeding 6×6 feet require additional bracing preventing wall suction. High CFM Kit accessories (offered by Gorilla and AC Infinity) add support bars maintaining tent shape under negative pressure. Without these, powerful exhaust fans can pull walls inward, reducing usable space.
Weight distribution becomes critical in large tents. Spread heavy equipment across multiple hanging points rather than concentrating loads. Consider reinforced hanging bars rated for specific weight limits—exceeding these ratings risks catastrophic frame failure mid-grow.
Multi-Chamber and Modular Systems
Advanced growers benefit from multi-chamber setups segregating different growth stages. A 2×4 veg tent pairs perfectly with a 4×4 flowering tent, maintaining continuous production. As plants transition from veg to flower, new seedlings fill the vegetative space—you’re always 4-6 weeks from harvest.
Some manufacturers offer connecting systems linking multiple tents with shared ventilation. This approach provides flexibility without requiring massive single structures. You can start small, adding capacity as experience and budget grow.
Commercial Considerations and Regulations
Before investing in 8×8 or larger tents, verify local regulations regarding plant counts and growing area. Some jurisdictions impose strict limits making large tents impractical legally. Commercial growers should consult regulatory requirements before purchasing equipment.
Insurance considerations matter for valuable setups. Document your equipment with photos and receipts. Some homeowners policies exclude cultivation equipment, requiring specialized coverage. Electrical capacity also limits large operations—consult electricians before installing multiple high-wattage fixtures.

Common Mistakes When Buying Your First Grow Tent
Choosing Based Solely on Price
The cheapest tent costs twice when you replace it six months later. Budget tents using thin materials and inferior zippers develop light leaks quickly. Failed zippers force buying replacements or struggling with damaged equipment throughout each grow.
Smart budget shopping means identifying where to save safely. Entry-level tents work fine for beginners planning 1-2 grows before upgrading. But growers committed long-term should invest in mid-range or premium tents lasting years without degradation.
Ignoring Height Requirements
First-time growers routinely underestimate vertical space needs. Lights require 12-24 inches from tent ceiling. Plants need 12-18 inches between canopy and lights. Your plant height varies, but 24-36 inches is typical. That totals 48-78 inches before considering pots and trays!
A 6-foot tent leaves minimal working room. 7-foot models provide breathing space for most grows, while 8-foot heights accommodate taller plants or additional vertical training. Gorilla’s adjustable height solves this perfectly—start standard, add extensions as needed.
Overlooking Ventilation Planning
Inadequate ventilation causes countless grow failures. Stagnant air invites mold, mildew, and pest infestations. Excessive heat stresses plants, reducing vigor and yields. Yet many first-time buyers purchase tents without confirming duct ports accommodate their fan sizes.
Count required openings: exhaust fan, intake fan or passive vent, possibly dehumidifier or air conditioner ports. Ensure your chosen tent provides sufficient ports in appropriate sizes. Quality tents include 4-8 ports in multiple diameters accommodating various equipment.
Neglecting Future Expansion
Today’s 2×2 beginner setup often becomes tomorrow’s seedling station when you upgrade to 4×4 flowering. Buying compatible systems simplifies expansion—matching brands ensures accessories and add-ons work across your growing collection.
Consider purchasing slightly larger than current needs. The price difference between 3×3 and 4×4 tents is minimal, yet the larger size provides growth headroom. You won’t outgrow the investment within one season, and the extra space simplifies plant maintenance.
Maintaining Your Grow Tent for Years of Service
Regular Cleaning and Sanitization
Between grows, thoroughly clean tent interiors preventing pathogen buildup. Mild soap solutions work well—avoid harsh chemicals damaging reflective surfaces. Remove and wash floor trays, wipe down walls and poles, and vacuum corners where debris accumulates.
Sterilize equipment between crops using hydrogen peroxide or specialized sanitizers. This practice prevents disease transmission between grow cycles. Pay special attention to hydroponic systems and irrigation equipment where bacteria and algae flourish.
Zipper Maintenance and Repair
Lubricate zippers annually using graphite powder or zipper-specific lubricants. Avoid oil-based products attracting dust and grime. Periodically check zipper alignment—misaligned zippers create light leaks and become progressively harder to operate.
Small tears in mesh screening can be patched using tent repair tape available from outdoor retailers. Larger tears in canvas require professional-grade patches or replacement panels. Address damage immediately before it spreads.
Frame Inspection and Tightening
Check connector tightness monthly, especially on heavily loaded tents. Vibration from fans gradually loosens connections, creating sag and instability. Tighten all joints finger-tight without overtightening—stripped threads ruin connectors requiring replacement.
Inspect poles for rust or corrosion, particularly in high-humidity environments. Touch up damaged powder coating using rust-preventive paint. Severe corrosion weakens poles structurally, necessitating replacement before failure occurs.
Light Leak Detection and Remediation
Test for light leaks by closing tent completely in a dark room, then turning on interior lights. Any visible light indicates sealing problems. Common culprit areas include zipper tracks, duct port closures, and seam joints.
Light-blocking tape specifically designed for grow tents seals minor leaks. Gorilla tape works temporarily but may damage fabric when removed. For persistent leaks around duct ports, upgrade to better cinch systems or add light-proof ducting sleeves.
Comparing Tent Brands: What Sets Premium Apart from Budget
| Feature | Budget Tents | Mid-Range Tents | Premium Tents |
|---|---|---|---|
| Canvas Density | 210D-600D | 600D-1200D | 1680D-2000D |
| Pole Thickness | 16mm-18mm | 19mm | 22mm (1 inch) |
| Weight Capacity | 40-80 lbs | 100-150 lbs | 200-300 lbs |
| Zipper Quality | Basic coil | Standard SBS | Heavy-duty SBS |
| Warranty | 30-90 days | 1 year | 2+ years |
| Price Range | $60-120 | $120-250 | $250-800 |
VIVOSUN: The Value Leader
VIVOSUN dominates the value segment through efficient manufacturing and smart feature selection. Their tents incorporate thoughtful touches like observation windows and tool bags at prices competitors can’t match. The trade-off involves thinner materials and lower weight capacities unsuited for heavy commercial equipment.
Recent VIVOSUN smart tent kits integrate WiFi controllers and automation, bringing premium features to budget-conscious growers. Customer service receives mixed reviews—some report excellent support, others experience slow response times. For beginners prioritizing affordability, VIVOSUN delivers solid performance.
Spider Farmer: Innovation Meets Affordability
Spider Farmer bridges budget and premium segments remarkably well. Their 2025 model updates address common complaints from earlier versions: better cable management, larger windows, and improved zipper design. The 1680D canvas matches premium tents at mid-range pricing.
Spider Farmer’s strength lies in complete kit offerings with properly matched components. Their grow lights pair perfectly with tent sizes, eliminating guesswork for beginners. The company actively engages customer feedback, iterating rapidly based on user experience.
AC Infinity: Technology-Forward Design
AC Infinity approaches tent design from an engineering perspective, evident in details like lab-tested reflectivity and controller integration. Their UIS (Universal Irrigation System) ecosystem creates seamless automation—fans, lights, humidifiers all communicate through one interface.
The premium pricing reflects advanced features and materials. 2000D canvas provides the industry’s highest density, while 1-inch poles support substantial equipment. Growers investing in AC Infinity typically build complete ecosystems leveraging smart controllers and integrated devices.
Gorilla Grow Tent: The Premium Standard
Gorilla established the premium tent category through uncompromising quality and innovative features. The height-adjustable design originated with Gorilla, now widely copied by competitors. Their 300-pound weight capacity seems excessive until you’re hanging multiple commercial fixtures plus redundant filtration.
Construction quality justifies premium pricing for serious growers. Gorilla tents routinely last 10+ years under heavy use while maintaining light-tight integrity. The thick canvas resists punctures from accidental contact with sharp equipment. For professional operations where tent failure means lost crops, Gorilla’s reliability proves invaluable.
Setting Up Your Grow Tent: Step-by-Step Success Guide
Location Selection and Preparation
Choose your tent location strategically before unpacking anything. Basements offer natural temperature stability but may lack electrical capacity for multiple lights. Spare bedrooms provide climate control through existing HVAC but might disturb household members with fan noise. Garages work wonderfully in moderate climates yet require supplemental heating or cooling in extreme weather.
Level flooring prevents water pooling and ensures proper drainage. Concrete floors ideal for water resistance, but add insulating mats in cold environments. Carpet requires waterproof tarps protecting against spills and humidity. Measure doorways confirming equipment passage—some larger tents barely squeeze through standard 32-inch doors.
Electrical considerations demand attention early. Dedicated 15-20 amp circuits prevent breaker trips during peak operation. Extension cords create fire hazards and voltage drops reducing light efficiency. Professional electricians can install proper outlets inexpensively, providing peace of mind and optimal performance.
Frame Assembly and Tent Installation
Lay out all components before starting assembly—nothing frustrates like discovering missing pieces mid-build. Most frames connect tool-free using simple push-fit joints. Start with the base frame ensuring square corners before adding vertical poles. Double-check connections click firmly; loose joints cause wobbling and potential collapse.
Slide the tent fabric over the frame carefully to avoid tears. Work slowly, especially at corners where stress concentrates. Two people make installation significantly easier, but solo assembly succeeds with patience. Zip the tent closed once positioned, then adjust tension evenly by tightening corner connectors systematically.
Hang all equipment before adding plants. Install lights, fans, and filters while the tent remains empty and accessible. Check weight distribution across hanging bars—concentrate heavy items at structural intersections rather than mid-span. Test zippers and verify all duct ports seal properly before introducing your environment.
Ventilation System Configuration
Fresh air exchange maintains plant health through several mechanisms: oxygen replenishment, heat removal, humidity control, and CO₂ introduction. Calculate required CFM (cubic feet per minute) by multiplying tent volume by desired air exchanges per minute (typically 1-3 times). A 4×4×7 tent contains 112 cubic feet, needing 112-336 CFM depending on equipment heat output.
Position exhaust fans at the tent top where hot air naturally accumulates. Mount carbon filters inside the tent connected to fans via ducting, pulling air through the filter before exhausting. This configuration maximizes odor elimination and equipment lifespan. Passive intake vents at tent bottom enable natural convection when opened.
Ducting paths should minimize bends reducing airflow efficiency. Each 90-degree turn reduces effective CFM by approximately 10%. Insulated ducting prevents condensation in cold environments while maintaining temperature during long ducting runs. Secure ducting with adjustable clamps preventing disconnection during fan operation.
Growing Different Plants: Tent Customization Strategies
Herbs and Leafy Greens
Culinary herbs like basil, cilantro, and parsley thrive in smaller tents under moderate lighting. These fast-growing plants (25-40 day cycles) benefit from perpetual harvest systems where you remove outer leaves while plants continue producing. A 2×4 tent can yield fresh herbs weekly with proper succession planting.
Lettuce, spinach, and similar greens prefer cooler temperatures (60-70°F) than fruiting plants. This makes them perfect for garage grows in winter months when supplemental heating becomes unnecessary. Compact fluorescent or T5 lighting suffices for leafy greens, reducing electrical costs compared to high-intensity fixtures required for flowering.
Vertical stacking multiplies yields in limited footprints. Commercial growers use vertical hydroponic systems producing 3-4 times output per square foot compared to traditional horizontal layouts. Home growers can implement simplified versions using shelf systems and multiple LED panels optimized for each level.
Vegetables and Fruiting Plants
Tomatoes, peppers, and cucumbers demand more vertical space and intense lighting than herbs. Choose 7-8 foot tall tents accommodating mature plant heights plus equipment overhead. These heat-loving crops prefer temperatures 5-10 degrees warmer than herbs, simplifying climate control in most indoor environments.
Flowering and fruiting require significantly more light energy than vegetative growth. Plan for 30-50 watts per square foot from quality LED fixtures. Lesser lighting produces leggy plants with poor fruit set. Proper light spectrum matters too—full spectrum LEDs with enhanced red wavelengths optimize flowering and fruit development.
Support structures become essential as fruits develop weight. Tomato cages, trellis netting, or stake systems prevent branch breakage. Some growers prefer string support systems popular in commercial greenhouses, training plants vertically to maximize space efficiency. Regular pruning maintains airflow and concentrates energy into productive growth.
Flowers and Ornamentals
Flowering plants require strict light cycle control—most bloom only after experiencing specific photoperiods. Light leaks from even tiny sources disrupt flowering, making tent quality critical for success. The light-tight construction of premium tents eliminates guesswork, ensuring complete darkness during rest periods.
Fragrance management becomes important for strongly scented flowers. Carbon filtration effectively eliminates odors, but size your filter to tent volume plus 20-30% safety margin. Under-sized filters become overwhelmed during peak flowering, allowing scents to escape. Replace carbon media annually or as effectiveness diminishes.
Many ornamental flowers appreciate lower humidity during flowering (40-50%) preventing mold and extending bloom longevity. Dehumidifiers maintain ideal conditions, but right-sized equipment matters—oversized units cycle on/off excessively while undersized units run constantly without reaching targets. Calculate based on tent volume and ambient humidity levels.
Energy Efficiency and Cost Management
LED Lighting Economics
LED technology revolutionized indoor growing economics through dramatically reduced energy consumption and heat output. Modern LEDs provide 2.5-3.0 μmol/J efficiency compared to 1.0-1.5 μmol/J from older HPS (high-pressure sodium) fixtures. This translates to 50-70% electricity savings while producing equivalent light output for plant growth.
Heat reduction from LEDs shrinks cooling requirements substantially. HPS fixtures generate intense heat necessitating powerful ventilation and often supplemental air conditioning. LEDs produce primarily usable light wavelengths with minimal waste heat, enabling smaller fans and reduced cooling costs. The combined savings (lighting + cooling) often recoup LED investment within 12-18 months.
Quality LEDs last 50,000-100,000 hours compared to 10,000-20,000 hours for HPS bulbs requiring frequent replacement. Calculate total cost of ownership including bulb replacements, electrical consumption, and cooling costs rather than focusing solely on initial fixture price. Premium LEDs cost more upfront but provide better long-term value.
Climate Control Optimization
Programmable controllers automate climate management while optimizing energy usage. Rather than running fans continuously at maximum speed, smart controllers adjust CFM based on real-time temperature and humidity readings. This approach maintains perfect conditions using minimal energy while extending equipment lifespan through reduced wear.
Insulation improvements pay immediate dividends in reduced heating and cooling requirements. Tent wraps or room insulation minimize temperature transfer, allowing smaller HVAC equipment to maintain conditions. Even simple improvements like draft sealing around duct ports yield measurable savings.
Off-peak electricity pricing rewards strategic scheduling where available. Many utilities offer significantly reduced rates during nighttime hours. Running lights overnight captures these savings while producing less daytime heat requiring cooling. Check your local utility rate structures identifying optimization opportunities.
Water Conservation Techniques
Drip irrigation systems deliver water precisely where needed, eliminating waste from overspray or runoff. Automated systems with moisture sensors prevent overwatering while ensuring plants never experience drought stress. Though initial setup requires investment, reduced water consumption and improved plant health justify costs quickly.
Recirculating hydroponic systems reuse nutrient solutions, consuming 90% less water than soil-based growing. While requiring larger upfront investments in pumps, reservoirs, and monitoring equipment, these systems provide unmatched efficiency. Commercial operations routinely implement recirculating systems for both environmental and economic benefits.
Collect condensate from dehumidifiers and air conditioning units for reuse in irrigation. This “waste” water is essentially distilled, perfect for mixing nutrient solutions or topping off reservoirs. A typical dehumidifier extracts 2-5 gallons daily, providing significant free water in humid climates.
Advanced Techniques: Maximizing Tent Productivity
Sea of Green (SOG) Method
SOG methodology maximizes yield per square foot through dense planting of small plants. Rather than growing 4 large plants in a 4×4 tent, SOG utilizes 16-25 smaller plants flowered immediately after establishing roots. This approach reduces vegetative time, enabling more harvest cycles annually.
Uniform canopy height simplifies lighting placement and ensures even light distribution. All plants receive optimal PPFD (photosynthetic photon flux density) rather than taller plants shading shorter neighbors. This consistency produces uniform maturity, allowing single-day harvests rather than staggered picking.
SOG requires more initial plants but shorter growing cycles offset this through increased annual yields. Many growers report 20-30% higher productivity compared to traditional methods in the same footprint. The technique works particularly well in tents 4×4 or larger where space accommodates multiple plants comfortably.
Screen of Green (SCROG) Training
SCROG employs horizontal screening to train plants laterally rather than vertically. As growth extends above the screen, you weave stems back under, creating an even canopy utilizing maximum horizontal space. This approach suits tents with height limitations, converting vertical restriction into lateral productivity.
Proper SCROG implementation requires patience during vegetative growth as you establish the screen framework. Once flowering begins, explosive vertical growth quickly fills the canopy. The even surface created ensures uniform light penetration and air circulation, critical factors affecting yield quality.
Single-plant SCROG can fill entire 4×4 tents given adequate vegetative time. This method particularly benefits growers working within plant-count restrictions, maximizing output from minimal plants. The technique demands more training labor than SOG but produces impressive results in skilled hands.
Perpetual Harvest Systems
Multi-tent perpetual systems maintain continuous production through staggered planting schedules. A seedling/clone tent feeds a vegetative tent which supplies a flowering tent. As mature plants harvest, new plants transition from veg, and fresh seedlings enter the vegetative tent. You’re harvesting every 3-4 weeks rather than waiting 3-4 months between crops.
This approach requires careful planning and record-keeping tracking multiple batches simultaneously. However, the consistent harvest schedule provides regular yields rather than feast-or-famine cycles. Many growers find the steady production more manageable than large, infrequent harvests.
Equipment sharing across tents reduces costs compared to multiple complete systems. One large carbon filter and inline fan can service multiple tents through ducting manifolds. Shared controllers monitor multiple spaces, eliminating redundant sensor purchases. The synergies make multi-tent operations surprisingly affordable.
Choosing the Right Tent Size: A Practical Decision Guide
Small Tents (2×2 to 2×4): Perfect for Beginners and Limited Spaces
Compact tents excel in apartments, closets, and small rooms where space comes at a premium. A 2×2 tent fits comfortably in most closets, producing 1-2 plants yielding 2-6 ounces per harvest. This size proves perfect for personal herb gardens or as a dedicated seedling station supporting larger flowering tents.
The 2×4 footprint provides significantly more versatility while maintaining a small profile. Growers commonly fit 2-4 plants comfortably, or use SCROG techniques filling the entire canopy with a single well-trained plant. Equipment costs remain manageable—a single 200-watt LED adequately illuminates 2×4 spaces, keeping electrical consumption under 50 kWh monthly.
Maintenance in small tents takes minutes rather than hours. The limited plant count simplifies watering, feeding, and training while teaching fundamental skills without overwhelming beginners. Many experienced growers maintain small tents alongside larger flowering spaces, using them for mother plants or testing new varieties.
Medium Tents (3×3 to 4×4): The Sweet Spot for Most Growers
The 3×3 and 4×4 categories represent the most popular tent sizes, balancing productivity with manageable complexity. A 3×3 tent accommodates 2-4 plants yielding 6-12 ounces typically, while 4×4 spaces support 4-8 plants producing 12-20 ounces per harvest with proper technique.
These sizes work wonderfully in spare bedrooms, basements, or garages without dominating entire rooms. Equipment remains reasonably priced—$600-1,000 buys complete quality setups including tent, lighting, ventilation, and accessories. The increased footprint allows experimentation with different training methods and plant varieties simultaneously.
Climate control becomes more forgiving in medium tents compared to tiny spaces where environmental changes happen rapidly. The larger air volume buffers temperature and humidity swings, giving you time to react to problems before they become critical. Most first-time growers who skip directly to 4×4 never feel limited by space constraints.
Large Tents (5×5 to 10×10): For Serious Cultivators
Large-format tents suit dedicated growing rooms and experienced cultivators scaling production. A 5×5 tent holds 6-10 plants yielding 20-32 ounces, while 8×8 configurations support 16-24 plants producing 50+ ounces per harvest. These yields require substantial equipment investments and electrical capacity.
Plan for $1,500-3,000 in equipment costs setting up large tents properly. Multiple high-wattage LEDs, industrial-strength ventilation, and automated climate control become necessities rather than luxuries. The electrical draw often necessitates dedicated circuits preventing breaker trips during peak operation.
Maintenance time scales with tent size—larger spaces demand proportionally more effort watering, training, and harvesting. However, the efficiency of managing many plants in one location beats operating multiple small tents. Commercial growers invariably prefer single large spaces over fragmented small areas for this reason.
Environmental Responsibility and Sustainable Growing
Energy Efficiency Strategies
Indoor growing consumes significant electricity, but conscious choices minimize environmental impact. LED lighting reduces energy consumption 50-70% compared to traditional HPS fixtures while producing superior light quality. The higher initial investment pays back through lower operating costs and extended lifespan.
Smart environmental controllers optimize HVAC operation, running equipment only when needed rather than continuously. This responsive approach cuts energy waste while maintaining perfect conditions. Many growers report 20-30% energy savings after implementing automated controls compared to manual systems.
Solar panels offset growing operations completely in sunny climates. The consistent daily electrical demand makes grow operations ideal candidates for solar installation. Many jurisdictions offer incentives or net metering programs improving solar economics. Calculate payback periods—in optimal locations, solar systems recoup costs within 5-8 years.
Water Conservation Practices
According to USDA research on hydroponics, properly designed systems use up to 90% less water than traditional soil agriculture. Recirculating hydroponic setups capture and reuse nutrient solutions, eliminating the runoff common in soil-based growing.
Rainwater harvesting provides free, chlorine-free water perfect for plant cultivation. Simple collection systems capturing roof runoff through gutters cost $100-300 implementing. In areas with adequate rainfall, harvesting completely eliminates municipal water consumption for growing operations.
Greywater recycling from sinks and showers (avoiding toilet water) can supplement irrigation in areas where regulations permit. Simple filtration removes particulates, producing water suitable for non-edible ornamental crops. Always verify local codes before implementing greywater systems—regulations vary widely by jurisdiction.
Responsible Material Selection
Choose growing media thoughtfully considering environmental impact and reusability. Coco coir, derived from coconut husks, provides excellent growing characteristics while being renewable and biodegradable. Though individual bags seem expensive, coco can be reused 2-3 times with proper buffering between cycles.
Avoid peat-based products when possible—peat harvesting damages sensitive bog ecosystems requiring decades for regeneration. Alternative media like composted bark, wood fiber, or recycled materials provide similar performance without environmental destruction. Many professional growers transitioned to sustainable media without yield compromises.
Nutrient selection matters environmentally too. Organic nutrients derived from natural sources break down completely, while some synthetic nutrients contain environmentally persistent compounds. Both approaches grow plants successfully—choose based on personal values balancing convenience, cost, and ecological considerations.
Future Trends in Grow Tent Technology
Smart Integration and IoT Connectivity
The growing Internet of Things revolution transforms tent management through connected devices communicating seamlessly. Imagine your tent texting alerts about temperature spikes or humidity issues, with automated responses adjusting equipment before problems develop. This technology exists today and becomes more affordable and reliable annually.
Advanced systems integrate with home automation platforms like Home Assistant or HomeKit, enabling complex automation sequences. Program your tent to reduce ventilation during AC operation saving energy, or coordinate lighting schedules with solar production maximizing renewable energy usage. The possibilities expand continuously as smart home adoption grows.
Machine learning algorithms could soon optimize growing conditions automatically by analyzing historical data and adjusting parameters in real-time. Early commercial systems demonstrate impressive results, though consumer-grade options remain limited currently. Expect mainstream availability within 2-3 years as technology matures and costs decrease.
Improved Materials and Construction
Material science advances promise even better tent fabrics combining light-tightness, durability, and sustainability. Researchers develop recyclable mylar alternatives providing equivalent reflectivity without environmental persistence. Some experimental materials incorporate antimicrobial treatments preventing mold and mildew growth naturally.
Frame construction evolves toward lighter yet stronger materials through advanced alloys and composite materials. Carbon fiber poles could reduce weight 50% while increasing strength dramatically. Though currently prohibitively expensive, economies of scale will eventually make advanced materials accessible to home growers.
Modular connecting systems enabling tent expansion without complete replacement represent another emerging trend. Add sections as needs grow rather than buying entirely new tents. This approach reduces waste while providing flexibility adapting to changing requirements over time.
Sustainability and Renewable Energy Integration
Pre-configured solar-ready tent kits will simplify renewable energy adoption by bundling properly sized panels, batteries, and charging controllers. Turnkey systems eliminate the complexity currently deterring many growers from solar implementation. As battery technology improves and costs decrease, off-grid growing becomes increasingly practical.
Passive climate control through advanced insulation and thermal mass design could dramatically reduce active heating and cooling requirements. Some experimental designs incorporate phase-change materials maintaining stable temperatures without electrical input. While currently impractical for most applications, expect breakthroughs making passive systems viable within 5-10 years.
❓ FAQ: Your Grow Tent Questions Answered
❓ How big of a grow tent do I need for 4 plants?
❓ Can you use a grow tent in a cold garage?
❓ What accessories are absolutely essential for a new grow tent?
❓ How do I prevent light leaks in my grow tent?
❓ Is a 2×2 grow tent too small for beginners?
Conclusion: Choosing Your Perfect Growing Environment
Selecting the best grow tent represents your first major decision as an indoor cultivator, but it doesn’t have to overwhelm you. The key lies in honestly assessing your space, budget, and goals. Beginners benefit most from complete kits eliminating compatibility concerns, while experienced growers appreciate premium tents supporting advanced equipment.
Remember that the best grow tent for you balances immediate needs with future expansion potential. That budget 2×2 starter tent might perfectly serve today, becoming your cloning station when you upgrade to 4×4 flowering next year. Or investing in Gorilla’s adjustable height system provides flexibility adapting as your skills and ambitions grow.
Quality tents pay for themselves through longevity and crop consistency. Light leaks from cheap materials sabotage harvests, while failed zippers create frustration throughout each grow. The mid-range sweet spot—products like Spider Farmer or AC Infinity CLOUDLAB—delivers premium features without luxury pricing, making them ideal for most growers.
Your indoor garden deserves a foundation supporting consistent success. Whether you choose VIVOSUN’s value, Spider Farmer’s innovation, AC Infinity’s technology, or Gorilla’s premium construction, invest in quality materials and thoughtful design. The plants you’ll nurture to harvest abundance will reward your careful choice many times over.
Recommended for You
- 7 Best Carbon Filter for Grow Tent 2025 – Expert Reviews & Guide
- 7 Best Grow Tent Fan Options for 2025 (Performance Tested)
- 7 Best Grow Tent AC 2025: Ultimate Cooling Guide
Disclaimer: This article contains affiliate links. If you purchase products through these links, we may earn a small commission at no additional cost to you.
✨ Found this helpful? Share it with your friends! 💬🤗