In This Article
Picture this: you’re standing in your apartment, staring at that awkward corner space that’s been gathering dust for months. What if I told you that cramped 2-foot-by-2-foot area could transform into your own personal indoor garden oasis? That’s exactly what a 2×2 grow tent brings to the table.
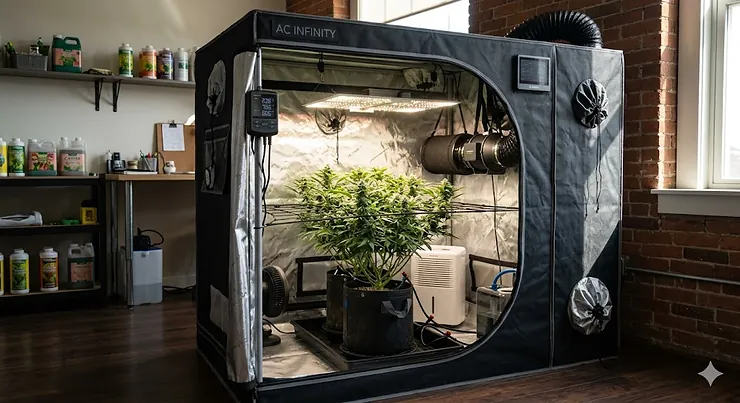
A 2×2 grow tent is a compact, self-contained cultivation space measuring 24 inches by 24 inches, specifically designed for indoor plant growing in tight quarters. These mini indoor growing spaces pack serious punch despite their small footprint, offering complete environmental control through reflective interiors, light-blocking materials, and strategic ventilation ports. Unlike sprawling outdoor gardens or massive commercial setups, the space-saving cultivation setup fits neatly into closets, spare rooms, or even under staircases.
The beauty of these beginner-friendly small tents lies in their simplicity. You don’t need a green thumb or a horticulture degree to get started. Modern 2×2 systems come equipped with everything from LED grow lights to ventilation fans, creating a plug-and-play experience that even first-timers can master. According to research published by the National Park Service, hydroponic systems used in controlled indoor environments can use up to 10 times less water than traditional field methods while allowing plants to grow year-round.
Whether you’re cultivating herbs for your kitchen, starting seedlings for your outdoor garden, or experimenting with specialty crops, a small grow tent 2×2 offers the perfect testing ground. In this comprehensive guide, I’ll walk you through the top rated 2×2 grow tent options available in 2026, helping you find the perfect match for your indoor growing ambitions.
Quick Comparison Table
| Product | Canvas Material | Height | Price Range | Best For |
|---|---|---|---|---|
| Spider Farmer SF1000D Kit | 1680D | 55″ | $350-400 | Complete beginners |
| MARS HYDRO TS600 System | 1680D | 55″ | $280-330 | Budget-conscious growers |
| AC Infinity CLOUDLAB 422 | 2000D | 48″ | $120-140 | Tent-only purchase |
| VIVOSUN S224 Complete Kit | 600D | 48″ | $200-250 | Value seekers |
| MELONFARM Complete Setup | 600D | 48″ | $150-200 | First-time growers |
| JupiterForce Compact Tent | 600D | 36″ | $50-70 | Low-height spaces |
| Hydropolis Nursery System | 600D | Variable | $80-100 | Propagation focus |
💬 Just one click – help others make better buying decisions too!😊
✨ Don’t Miss These Exclusive Deals!
🔍 Take your indoor growing to the next level with these carefully selected products. Click on any highlighted item to check current pricing and availability. These tools will help you create authentic cultivation results your plants will love!
Top 7 2×2 Grow Tent Reviews: Expert Analysis
1. Spider Farmer SF1000D Complete Grow Tent Kit
The Spider Farmer SF1000D stands as the gold standard in the compact grow tent 2×2 category for 2026. This isn’t just a tent—it’s a complete ecosystem that arrived ready to rock out of the box.
Key Specifications:
- Dimensions: 24″x24″x55″
- 1680D Oxford fabric with 99% reflective Mylar
- SF1000D LED grow light (100W, Samsung diodes)
- GGS Controller with app integration
- 4″ inline fan (205 CFM) with carbon filter
Priced between $350-400, this premium kit justifies every dollar. The 2026 version features an upgraded GGS controller that monitors temperature, humidity, and VPD (Vapor Pressure Deficit) through the Spider Farmer app. Customers rave about the “whisper-quiet” 26.8 dB inline fan and the sturdy steel frame that supports up to 120 lbs of equipment.
✅ Pros:
- Complete plug-and-play system
- Smart app control for automation
- Professional-grade components
❌ Cons:
- Higher initial investment
- App learning curve for beginners
Customer feedback consistently highlights the thick 1680D canvas material that eliminates light leaks completely. One verified buyer noted, “After three grows, the zippers still glide smoothly and there’s zero degradation.”
2. MARS HYDRO 2×2 Grow Tent Kit with TS600
The MARS HYDRO TS600 system delivers exceptional value without cutting corners. This mid-range option has dominated Amazon’s bestseller rankings for good reason.
Key Specifications:
- Dimensions: 24″x24″x55″
- 1680D diamond Mylar interior
- Upgraded TS600 LED (100W with dimming)
- 10-speed WiFi ventilation system
- Complete accessory package
At $280-330, this kit offers 25% more PPFD (Photosynthetic Photon Flux Density) than standard 600D tents thanks to its superior reflective material. The MARS HYDRO tent interior uses exclusive shade cloth between zipper and canvas, preventing those annoying pinhole light leaks that plague cheaper models.
✅ Pros:
- WiFi-controlled ventilation
- Dimmable grow light (0-100%)
- Extensive accessory kit included
❌ Cons:
- Slightly heavier than competitors
- WiFi setup can be finicky
Multiple growers praise the included extras: trellis netting, pruning shears, rope hangers, and even grow bags. According to user reviews, the tent’s 0.8mm metal frame thickness provides rock-solid stability even when fully loaded.
3. AC Infinity CLOUDLAB 422 Advanced Tent
For those building custom setups, the AC Infinity CLOUDLAB 422 represents the premium tent-only option. This is the Rolls-Royce of 2×2 grow tent construction.
Key Specifications:
- Dimensions: 24″x24″x48″
- Ultra-thick 2000D Mylar canvas
- 1-inch diameter steel poles
- Lab-tested 95% reflectivity
- Controller mounting plate included
Priced at $120-140 for the tent alone, AC Infinity justifies the premium through superior build quality. The 2000D canvas is noticeably thicker than standard options, and those 1-inch poles support significantly more weight than competitors’ 0.6-inch versions.
✅ Pros:
- Best-in-class construction
- Largest observation window
- Heavy equipment capacity
❌ Cons:
- Tent only (no lights or fans)
- Higher price point
Independent testing by MIGRO revealed that while AC Infinity excels in construction quality, its reflectivity performance sits in the middle range. However, the durability and longevity make this a buy-it-for-life investment.
4. VIVOSUN S224 Complete 2×2 System
The VIVOSUN S224 strikes the sweet spot between affordability and performance. This brand has earned its reputation through consistent quality across millions of units sold.
Key Specifications:
- Dimensions: 24″x24″x48″
- 600D reflective Mylar
- VS1000 LED grow light
- Basic ventilation setup
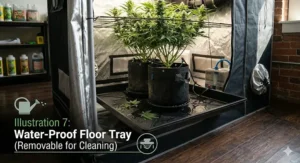
- Removable floor tray
At $200-250, this represents excellent value for budget-conscious growers. The VIVOSUN tent features reinforced corners—a detail many competitors skip—that prevent the ripping issues common in cheaper tents. According to research from Texas A&M University, controlled indoor growing environments like this can significantly improve grower well-being and success rates.
✅ Pros:
- Proven reliability across years
- Reinforced corner construction
- Easy assembly process
❌ Cons:
- Standard 600D fabric
- Basic light compared to premium options
User reviews frequently mention the smooth SBS zippers that outlast other brands. The observation window provides convenient monitoring without environmental disruption.
5. MELONFARM Complete Setup 2×2
The MELONFARM Complete Setup targets absolute beginners with its simplified design and comprehensive package. Everything arrives ready to assemble and grow.
Key Specifications:
- Dimensions: 24″x24″x48″
- 600D diamond Mylar canvas
- 70W full spectrum LED
- 4″ ventilation system with soundproof connector
- Observation window
Priced at $150-200, this entry-level option removes decision paralysis. The MELONFARM kit includes detailed instructions with QR codes linking to video tutorials—perfect for visual learners tackling their first setup.
✅ Pros:
- Ultra-beginner-friendly
- Soundproof duct connector
- Video tutorial support
❌ Cons:
- Lower wattage light
- Thinner canvas material
Customer feedback emphasizes the “surprisingly quiet” operation thanks to the soundproof connector—a thoughtful detail that apartment dwellers appreciate. The efficient airflow system maintains proper environmental conditions despite the smaller fan size.
6. JupiterForce Compact 2×2 Tent
The JupiterForce Compact solves a specific problem: ultra-low ceiling spaces. At just 36 inches tall, this mini indoor growing space fits where others can’t.
Key Specifications:
- Dimensions: 24″x24″x36″
- High-reflective 600D Mylar
- Dual ventilation windows
- Tool storage compartment
- Clear PVC observation window
At $50-70 for the tent only, this budget option suits propagation stations or low-profile growing needs. The JupiterForce design includes a clever tool storage pocket—a small touch that improves daily workflow.
✅ Pros:
- Perfect for low spaces
- Built-in tool storage
- Double ventilation options
❌ Cons:
- Very limited height
- Tent only (no equipment)
Reviews note the surprisingly robust construction given the low price. The hook-and-loop observation window provides quick checks without full door opening.
7. Hydropolis Nursery Grow Tent
The Hydropolis Nursery system specializes in seedling starts and clone propagation. This isn’t your typical 2×2 grow tent—it’s engineered specifically for early-stage cultivation.
Key Specifications:
- Dimensions: 24″x24″ (variable height)
- Authentic 600D weave
- 100% steel frame (250 lb capacity)
- Tear-proof reinforced fabric
- Multiple port configurations
Priced at $80-100, Hydropolis brings commercial-grade features to the home market. The tent fits two propagation trays side-by-side, making it ideal for growers starting multiple plant varieties simultaneously.
✅ Pros:
- Extreme weight capacity
- Propagation-optimized design
- Strongest zipper available
❌ Cons:
- Limited height options
- Better for starts than full grows
Users appreciate the reinforced corners that prevent damage in high-use scenarios. The durable flood pool prevents water from reaching bottom poles—extending tent lifespan significantly.
Understanding 2×2 Grow Tent Materials and Construction
Not all grow tents wear the same armor. The “D” rating you see (600D, 1680D, 2000D) refers to fabric density—higher numbers mean tougher, more light-blocking material. Think of it like thread count in bed sheets, except here we’re measuring denier thickness.
A 600D tent works perfectly fine for most home growers. It blocks light effectively, costs less, and handles normal use without issues. However, step up to 1680D or 2000D, and you’re entering commercial territory. These thicker fabrics resist tears, support heavier loads, and typically outlast their lighter cousins by years.
The Mylar interior deserves equal attention. According to Wikipedia’s comprehensive hydroponics article, reflective environments maximize light efficiency—crucial when you’re working with limited space. Diamond Mylar patterns create more reflection points than flat surfaces, bouncing light into every corner of your canopy.
Steel frame construction separates weekend warriors from serious growers. Premium tents use 0.8mm to 1-inch diameter poles that won’t sag under heavy carbon filters and lights. Cheaper alternatives cut corners here, literally—watch for reinforced corner connectors that prevent splitting at stress points.
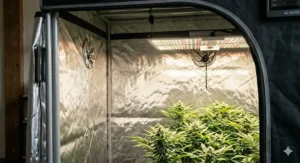
Lighting Requirements for Your 2×2 Space
Here’s where beginners often stumble: cramming a 300W light into a 2×2 tent because “more watts equals more growth,” right? Wrong. You’ll cook your plants and waste electricity.
A proper 2×2 grow tent thrives with 100-150W of modern LED lighting. The Samsung LM301H and LM301B diodes found in premium fixtures like Spider Farmer and MARS HYDRO deliver exceptional efficiency at around 2.7-3.0 µmol/J. Translation? You get professional results without melting your electric bill.
Full-spectrum LEDs eliminate the purple glow that annoyed earlier LED generations. These lights mimic natural sunlight, supporting plants from seedling through flowering. Dimmability isn’t just fancy—it’s essential. Seedlings need 30-40% power while mature plants max out the dial.
Hang height matters tremendously in compact spaces. Start seedlings 24-30 inches below the light, gradually lowering to 12-18 inches during vegetative growth. Flowering stages often require 10-12 inches of distance. Too close causes light burn; too far wastes lumens.
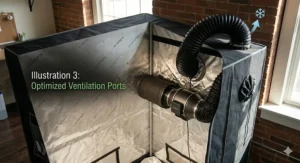
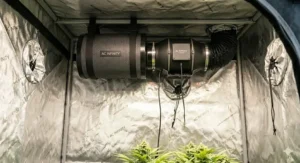
Ventilation and Climate Control Essentials
Your 2×2 grow tent needs to breathe. Without proper air exchange, you’re creating a disease incubator with stagnant air and unchecked humidity.
A 4-inch inline fan moving 150-250 CFM (Cubic Feet per Minute) provides adequate airflow for this size. Calculate your tent’s cubic footage (24x24x48 = 16 cubic feet), then aim for complete air exchange every 1-3 minutes. That’s where the 150-250 CFM range emerges.
Carbon filters control odor—critical for apartment growers or anyone maintaining discretion. Quality filters like those included in Spider Farmer and MARS HYDRO kits last 12-18 months before needing replacement. Mount them inside the tent with the fan pulling air through the filter and out the ducting.
Temperature sweet spots fall between 68-78°F during light periods, dropping 5-10 degrees during dark cycles. Humidity requirements shift through growth stages: 65-70% for seedlings, 40-50% for vegetative growth, and 40-45% during flowering. Modern controllers like the GGS system automate these adjustments based on real-time sensor data.
Maximizing Your 2×2 Grow Tent Yield
Four square feet doesn’t sound like much, but I’ve seen growers pull impressive harvests from these compact grow tent 2×2 setups through smart techniques.
Training methods transform cramped spaces into productive powerhouses. Low-Stress Training (LST) bends plants horizontally, creating multiple top colas instead of one central stalk. The Screen of Green (SCROG) method uses netting to spread growth evenly across the canopy, maximizing light penetration.
Plant your 2×2 grow tent strategically. One large plant works beautifully with proper training. Alternatively, four smaller plants in 3-gallon pots create a perpetual harvest system—start new plants while others finish. According to research published in PMC, controlled hydroponic systems optimize resource efficiency while reducing pest and disease pressure.
Nutrient management becomes simpler in controlled environments. Start with 25-50% of recommended doses, gradually increasing based on plant response. Monitor pH levels (5.5-6.5 for hydroponics, 6.0-7.0 for soil) and maintain electrical conductivity (EC) between 1.0-2.0 depending on growth stage.
Automate everything possible. WiFi controllers, automated watering systems, and programmable lights remove human error from the equation. Set it, monitor it, and let technology handle the minutiae while you focus on plant health.
Common Mistakes to Avoid with Small Grow Tents
Every beginner makes mistakes—I certainly did. Here’s your cheat sheet to skip the painful learning curve.
Overcrowding ranks as mistake number one. That empty floor space tempts you to add “just one more plant.” Resist! Packed tents create air circulation nightmares, humidity spikes, and pest havens. Stick to the recommended plant count and thank yourself during harvest.
Neglecting light leaks seems minor until you’re troubleshooting why plants won’t flower properly. Even tiny pinholes disrupt dark cycles, confusing photoperiod-sensitive plants. Run your tent in complete darkness, then check from inside for any visible light.
Skipping the carbon filter because “my plants don’t smell much” backfires spectacularly during flowering. What starts as subtle aroma becomes unmistakable fragrance that neighbors definitely notice. Install proper filtration from day one.
Ignoring temperature fluctuations causes slow growth and opens doors to pathogens. That 20-degree swing between day and night? It’s stressing your plants. Insulate the tent’s exterior walls, adjust light intensity, and consider supplemental heating or cooling.
Choosing the wrong height trips up many first-time buyers. That 36-inch tent looks cute, but after subtracting space for lights, pots, and plant growth, you’ve got maybe 18 inches of usable vertical space. Always buy taller than you think you need.
Budget Breakdown: Complete 2×2 Grow Tent Setup
Let’s talk numbers. Setting up a functional 2×2 grow tent ranges from $150 to $500+ depending on your quality preferences and DIY capabilities.
Budget Entry ($150-250):
- MELONFARM or budget tent with basic light
- Manual ventilation control
- Standard accessories
- Works perfectly for beginners learning the ropes
Mid-Range Sweet Spot ($250-350):
- MARS HYDRO or VIVOSUN complete kit
- WiFi-enabled ventilation
- Quality LED with dimming
- Comprehensive accessory package
Premium Performance ($350-500+):
- Spider Farmer or AC Infinity systems
- Smart controllers with app integration
- Samsung diode LEDs
- Commercial-grade components
Don’t forget recurring costs: electricity ($10-20/month), nutrients ($15-30/month), growing medium ($20-40 per cycle), and carbon filter replacement ($40-60 annually). Calculate your total cost of ownership before committing.
2×2 Grow Tent Setup Guide: Step-by-Step
Assembling your first beginner-friendly small tent feels intimidating, but manufacturers design these for tool-free installation. Here’s your roadmap to success.
Step 1: Choose Your Location Select a spot with electrical access, moderate temperature stability, and ideally away from main living areas. Closets, spare bedrooms, or basement corners work brilliantly. Ensure the floor can handle potential water spills.
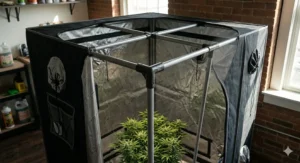
Step 2: Assemble the Frame Lay out all poles and connectors. Most systems use color-coded or numbered pieces—match them according to instructions. Start with the base, add vertical poles, then top crossbars. The frame should stand rigid without the fabric.
Step 3: Add the Canvas Slip the tent fabric over the assembled frame, starting from the top. Work methodically, ensuring zipper placement aligns with your entry preference. Secure all velcro straps to poles—they prevent sagging and improve stability.
Step 4: Install Ventilation Mount your inline fan at the tent’s top, connecting it to the carbon filter inside. Run ducting from the fan through a top port to exhaust outside the tent or into your room. Seal unused ports with covers to maintain negative pressure.
Step 5: Hang Your Lights Attach rope hangers to top crossbars, then suspend your LED panel. Ensure even weight distribution and adjust height according to plant stage. Most tents support 40-120 lbs—check your model’s specifications before loading equipment.
Step 6: Add Final Touches Install the floor tray, position fans for air circulation, and run power cords through designated ports. Mount any sensors, timers, or controllers. Double-check all electrical connections before powering up.
Step 7: Dial In the Environment Run your system for 24 hours without plants, monitoring temperature and humidity. Adjust fan speeds, light intensity, and ventilation until you hit target ranges. This shake-down period catches issues before introducing living plants.
Grow Tent Size Comparison: Why 2×2 Works
| Tent Size | Footprint | Best Use Case | Plant Capacity | Space Efficiency |
|---|---|---|---|---|
| 2×2 | 4 sq ft | Beginners, apartments, single grower | 1-4 plants | ⭐⭐⭐⭐⭐ |
| 2×4 | 8 sq ft | Small-medium grows, variety | 2-8 plants | ⭐⭐⭐⭐ |
| 3×3 | 9 sq ft | Dedicated grow room | 4-9 plants | ⭐⭐⭐⭐ |
| 4×4 | 16 sq ft | Serious hobbyists | 6-16 plants | ⭐⭐⭐ |
| 5×5 | 25 sq ft | Commercial-scale home growing | 10-25 plants | ⭐⭐⭐ |
The 2×2 grow tent hits the sweet spot for urban growers and beginners. It demands minimal floor space while providing enough room to experiment and learn. Unlike larger tents that overwhelm new growers with complexity and cost, the space-saving cultivation setup keeps things manageable.
Seasonal Considerations for Indoor Growing
One major advantage of your mini indoor growing space? It laughs at weather patterns. However, seasonal changes still impact your setup indirectly.
Summer challenges include elevated ambient temperatures. When your grow room hits 85°F, maintaining 75°F inside the tent becomes difficult. Solutions include:
- Running lights during cooler nighttime hours
- Installing portable AC units
- Increasing ventilation CFM
- Using LED lights that generate less heat
Winter obstacles flip the script—now you’re fighting excessive cold. Basement grows particularly suffer. Combat this through:
- Daytime light schedules when ambient temps are higher
- Small space heaters outside the tent (never inside)
- Insulating tent exteriors with thermal blankets
- Reducing ventilation slightly to retain heat
Spring and fall provide ideal conditions. Moderate temperatures require less environmental manipulation, letting you focus on plant care rather than climate control.
Maintenance and Longevity Tips
Proper care extends your top rated 2×2 grow tent investment from a season to several years. Here’s how the pros keep their equipment performing.
Clean between grows: Remove all plant material, then wipe interior surfaces with diluted hydrogen peroxide (1:10 ratio). This kills pathogens without leaving harmful residues. Let the tent air dry completely before starting new plants.
Inspect zippers monthly: Dirt and debris accumulate in zipper tracks, causing snags. Brush them clean with a soft toothbrush and apply zipper lubricant or beeswax annually. Replace zippers showing teeth damage before they fail completely.
Check for light leaks: Run this test every 3-4 months. Seal yourself inside the tent with lights off—any pinhole leaks appear as bright spots. Patch them with duct tape or specialized light-blocking tape.
Monitor structural integrity: Examine pole connections and corner adapters for stress cracks. Tighten any loosening connectors. Replace damaged poles immediately—they often fail at the worst possible moment.
Service ventilation components: Clean fan blades and carbon filters monthly. Replace carbon filter media every 12-18 months depending on usage intensity. Neglected filters lose effectiveness, letting odors escape.
Maintain grow lights: Dust LED panels monthly with compressed air or soft microfiber cloths. Check electrical connections for corrosion. Most quality LEDs last 50,000+ hours but driver components may fail earlier—keep receipts for warranty claims.
FAQ Section
❓ What size plants can I grow in a 2x2 grow tent?
❓ Do I need a complete kit or can I buy components separately?
❓ How much does it cost to run a 2x2 grow tent monthly?
❓ Can I use a 2x2 grow tent in my apartment without issues?
❓ How often should I replace my 2x2 grow tent?
Conclusion: Choosing Your Perfect 2×2 Grow Tent
After evaluating dozens of small grow tent 2×2 options, clear patterns emerge. For complete beginners seeking turnkey solutions, the Spider Farmer SF1000D Complete Kit delivers unmatched value despite its premium price. The smart controller and app integration remove guesswork, letting you focus on plant care rather than environmental troubleshooting.
Budget-conscious growers should seriously consider the MARS HYDRO TS600 System. It sacrifices nothing essential while saving $70-120 compared to premium alternatives. The WiFi ventilation and dimmable LED provide features that were luxury options just two years ago.
If you’re assembling a custom setup, invest in the AC Infinity CLOUDLAB 422 tent and pair it with your preferred lighting and ventilation. The 2000D canvas and 1-inch poles create a foundation that outlasts cheaper tents by years—a classic “buy once, cry once” scenario.
The 2×2 grow tent revolution has democratized indoor cultivation. No longer requiring massive rooms or commercial budgets, today’s space-saving cultivation setups bring professional results to anyone with 4 square feet and enthusiasm to learn. Whether you’re starting seedlings for outdoor transplant, maintaining year-round herb gardens, or exploring specialty crops, these compact systems deliver.
Your journey into indoor growing starts with a single decision. Browse the products highlighted in this guide, read recent customer reviews, and choose based on your space constraints and budget reality. The plants you’ll grow and the skills you’ll develop make this investment pay dividends for years to come.
Recommended for You
- 7 Highest Yielding Tomato Seeds for Maximum Harvests in 2026
- 7 Best Fast Growing Vegetable Seeds for Impatient Gardeners in 2026
- 7 Best Seeds for Indoor Growing 2026
Disclaimer: This article contains affiliate links. If you purchase products through these links, we may earn a small commission at no additional cost to you.
✨ Found this helpful? Share it with your friends! 💬🤗