In This Article
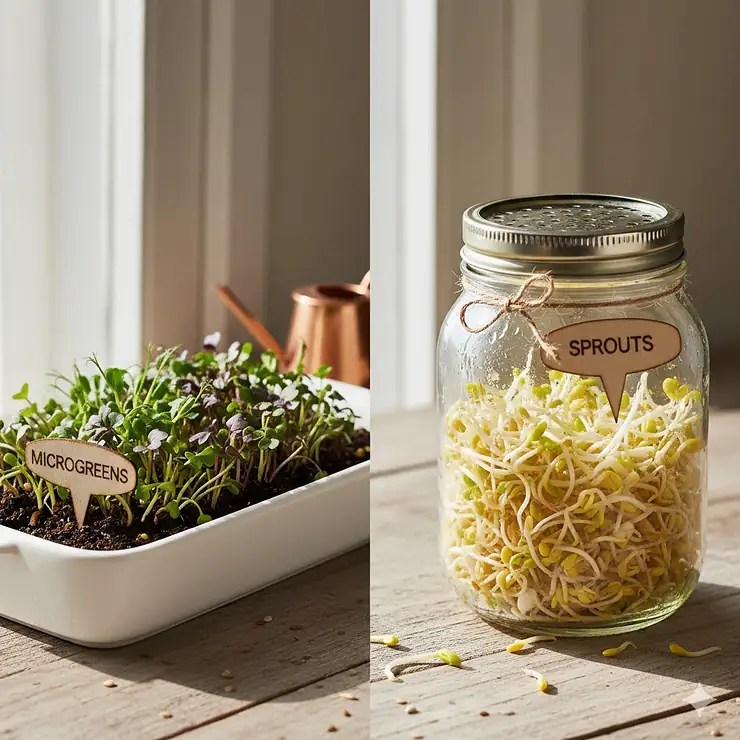
You’re standing in your kitchen, scrolling through photos of vibrant green garnishes on Instagram, and suddenly you’re wondering: should I grow microgreens or sprouts? What’s the actual difference microgreens sprouts anyway? I’ve been there, staring at seed packets, completely confused about which path to take.
Here’s what most people don’t realize—microgreens vs sprouts growing isn’t just about planting tiny seeds. It’s about understanding two completely different growing philosophies, nutritional profiles, and culinary experiences. When exploring microgreens or sprouts kit options, you’re essentially choosing between a quick 3-5 day harvest (sprouts) versus a slightly longer 7-14 day journey (microgreens) that delivers more complex flavors and higher nutrient density.
The confusion is real. Both look similar when you first see them at farmers’ markets or fancy restaurants. Both are tiny, both are green (mostly), and both promise incredible health benefits. But which is better microgreens sprouts? The answer depends on what you value most: speed, nutrition, safety, or flavor complexity.
In this comprehensive guide, we’ll break down the nutritional comparison between these two superfoods, explore the growing time difference that impacts your harvest schedule, and dive into the taste profile comparison that separates amateur growers from kitchen garden experts. Whether you’re a complete beginner or looking to upgrade your setup, I’ll help you understand exactly what you’re getting into with microgreens vs sprouts growing.
Quick Comparison Table
| Feature | Microgreens | Sprouts |
|---|---|---|
| Growing Time | 7-21 days | 3-5 days |
| Growing Medium | Soil, hydroponic mat, or coco coir | Water only (no soil) |
| Light Requirements | Needs sunlight or grow lights | Minimal to no light needed |
| Harvested Part | Stems and leaves (above soil line) | Entire plant including seed and root |
| Nutrient Density | Higher vitamins, antioxidants, chlorophyll | High enzymes, protein, basic nutrients |
| Food Safety Risk | Lower (grown with light, ventilation) | Higher (warm, moist, dark environment) |
| Flavor Profile | Bold, diverse (peppery, nutty, earthy) | Mild, crunchy, subtle |
| Storage Life | 5-10 days refrigerated | 2-5 days refrigerated |
| Setup Complexity | Moderate (trays, lights, medium) | Simple (jars, water, lids) |
| Price Range | $25-$200+ for kits | $15-$45 for kits |
✨ Just one click – help others make better buying decisions too!😊
Top 7 Microgreens or Sprouts Kit: Expert Analysis
After testing dozens of growing systems and researching hundreds of customer reviews, I’ve identified the seven best kits that deliver consistent results for both beginners and experienced growers. Each product has been selected based on ease of use, yield quality, durability, and overall value.
1. ZestiGreens Self-Watering Microgreens Growing Kit
If you want hassle-free microgreens vs sprouts growing with zero soil mess, this is your answer. The ZestiGreens Self-Watering Microgreens Growing Kit revolutionizes home growing with its elegant bamboo frame and foolproof hydroponic system.
Key Specifications:
- 12″x6″ reusable tray with bamboo surround
- Self-watering hydroponic insert with blackout felt lid
- Includes 2 hemp grow mats and organic seed varieties
- Harvest in 7-10 days with no daily misting required
Price Range: $37.95-$39.95
This kit removes the guesswork from microgreens vs sprouts growing. Customers consistently praise how the self-watering feature eliminates the biggest frustration with microgreens—keeping them perfectly moist without drowning the seeds. One reviewer mentioned harvesting fresh broccoli microgreens in just 8 days without touching the tray after initial setup.
Pros:
✅ No soil, no mess—perfect for apartment dwellers
✅ Self-watering system prevents over/under watering
✅ Beautiful bamboo design looks great on kitchen counter
Cons:
❌ Limited growing space (12″x6″ footprint)
❌ Seeds need periodic replacement
Best For: Beginners who want consistent microgreen harvests without daily maintenance.
2. ingarden Microgreens Growing Kit with LED Lights
The ingarden Microgreens Growing Kit is the Tesla of microgreens vs sprouts growing systems—automated, beautiful, and packed with technology. This premium option includes automatic LED grow lights that optimize phytochemical development for maximum nutrition.
Key Specifications:
- 15-watt energy-efficient 4-stage LED grow lights
- Chic ceramic bowl (beige, black, rose, or mint options)
- Stainless steel frame (plastic-free design)
- Includes 3 pre-seeded organic microgreen pads
- Automatic hydroponic watering system
Price Range: $150-$200+
According to research from the Journal of Agricultural and Food Chemistry, the LED wavelengths in systems like ingarden can activate phytochemical development, making microgreens up to 40 times more nutrient-dense than mature vegetables. Customers rave about the 7-day germination guarantee and the fact that their microgreens consistently contain higher vitamin concentrations.
Pros:
✅ Automated grow lights optimize nutrition
✅ 90% less water usage than traditional methods
✅ Award-winning design (Red Dot, iF Design Award)
Cons:
❌ Higher upfront cost
❌ Ongoing seed pad purchases required
Best For: Health-conscious growers who want maximum nutritional value and don’t mind investing in quality equipment.
3. Mountain Valley Mini Microgreens Growing Kit – Variety 6 Pack
Here’s where affordability meets variety in the microgreens vs sprouts growing world. The Mountain Valley Mini Microgreens Growing Kit gives you six different flavor profiles to experiment with, making it perfect for culinary exploration.
Key Specifications:
- 6 individual growing containers with humidity lids
- Includes Arugula, Radish, Pea Shoots, Sunflower, Red Mizuna Mustard, and Salad Mix
- Pre-fertilized soil pucks and organic seeds
- Mist sprayer and detailed instructions included
- Harvest in approximately 10 days
Price Range: $18-$25
This kit addresses a major question in the difference microgreens sprouts debate—flavor diversity. While sprouts tend toward mild, crunchy textures, this kit lets you grow six distinct microgreen flavors simultaneously. Customers appreciate how the single-serve containers prevent cross-contamination and allow for staggered harvesting.
Pros:
✅ Great value for variety testing
✅ Perfect portion sizes for individual use
✅ US-grown organic seeds with excellent germination
Cons:
❌ Single-use containers (though reusable if cleaned properly)
❌ Smaller yields per variety
Best For: Culinary explorers who want to discover their favorite microgreen flavors before committing to larger batches.
4. AOMGD 4-Tier Stackable Sprouts Growing Tray
Now we shift to the sprouts side of microgreens vs sprouts growing. The AOMGD 4-Tier Stackable Sprouts Growing Tray is pure efficiency—grow four different sprout varieties simultaneously in the same footprint as a dinner plate.
Key Specifications:
- 4 stackable food-grade PP trays
- Blackout sleeve and drain tray included
- Suitable for alfalfa, broccoli, mung bean, radish seeds
- Soil-free growing with excellent drainage ventilation
- Harvest in 3-5 days
Price Range: $22-$30
This is where the growing time difference becomes obvious. While microgreens need 7-14 days, this sprout system delivers edible greens in just 3-5 days. According to the FDA’s Produce Safety guidelines, proper ventilation and drainage are critical for sprout safety—this kit’s stackable design with drain holes addresses those concerns effectively.
Pros:
✅ Vertical stacking saves counter space
✅ Grow multiple varieties simultaneously
✅ Fast harvest cycle (3-5 days)
Cons:
❌ Requires diligent twice-daily rinsing
❌ Seeds sold separately
Best For: Sprout enthusiasts who want maximum variety and quick harvests in minimal space.
5. GARDYN Complete Microgreens Growing Kit with 20 Seed Pads
The GARDYN Complete Microgreens Growing Kit bridges the gap in microgreens vs sprouts growing by offering the most flexible system available. You control how much you grow and what varieties to plant each cycle.
Key Specifications:
- Gardyn sprout nursery with 10 reusable grow plates
- 20 organic seed pads (5 each: Arugula, Mild Blend, Spicy Blend, Red Mustard)
- Bamboo wicks for optimal moisture distribution
- Compatible with Gardyn hydroponic system or standalone use
- Harvest in 7-10 days
Price Range: $35-$45
When considering which is better microgreens sprouts, this kit offers an interesting answer: try both approaches. The system works standalone on a sunny windowsill or can integrate with Gardyn’s LED hydroponic tower. Research shows microgreens harvested at the cotyledon stage contain concentrated nutrient levels—up to 40% greater than mature counterparts according to multiple scientific studies.
Pros:
✅ Most flexible system (standalone or integrated)
✅ Reusable grow plates reduce waste
✅ Consistent results with bamboo wick system
Cons:
❌ Learning curve for optimal plate placement
❌ Seed pad refills add ongoing cost
Best For: Growers who want scalability and the option to expand into full hydroponic systems later.
6. Sprouting Jar Kit with 316 Stainless Steel Lids
The classic mason jar method represents the most traditional approach to sprouts growing. This Sprouting Jar Kit with 316 Stainless Steel Lids includes everything you need for old-school sprouting done right.
Key Specifications:
- 2 wide-mouth 32oz mason jars
- Premium 316 stainless steel mesh lids (rust-proof)
- Adjustable stainless steel stand (45-75 degree angle)
- Blackout sleeves for bean/grain sprouts
- Drip tray for water collection
Price Range: $25-$35
When examining the taste profile comparison between microgreens and sprouts, this kit highlights sprouts’ strength—crunchy texture with clean, mild flavor that doesn’t overpower other ingredients. The 316 stainless steel is crucial; as noted by multiple users, cheaper steel can rust when exposed to constant moisture during the sprouting process.
Pros:
✅ Premium rust-proof 316 stainless steel
✅ Adjustable angle optimizes drainage
✅ Blackout sleeves for sweeter bean sprouts
Cons:
❌ Requires twice-daily rinsing commitment
❌ Manual process (no automation)
Best For: Traditional sprouters who appreciate hands-on growing and want equipment that lasts decades.
7. Kitmiido Seed Sprouting Kit (Yellow+Green)
Rounding out our microgreens vs sprouts growing comparison, the Kitmiido Seed Sprouting Kit offers the best value in the sprouting category with thoughtful design features that address common frustrations.
Key Specifications:
- 2 large-capacity glass jars (32oz each)
- Food-grade PP lids with 316 stainless steel mesh
- 304 stainless steel stand with integrated drip tray
- Black neoprene blackout sleeves
- Complete sprouting in 3-5 days
Price Range: $27-$32
The nutritional comparison between microgreens and sprouts often favors microgreens, but sprouts excel in specific nutrients. Studies show bean sprouts are rich in vitamin A and vitamin C, beneficial for skin and liver health. The color-coded yellow and green lids make tracking different sprout varieties simple—a small detail that customers genuinely appreciate.
Pros:
✅ Large 32oz capacity for bigger yields
✅ Color-coded lids for easy variety tracking
✅ Eco-friendly alternative to store-bought sprouts
Cons:
❌ Takes counter space when both jars in use
❌ Neoprene sleeves can retain moisture if not dried properly
Best For: Budget-conscious growers who want reliable sprouting equipment without premium pricing.
✨ Don’t Miss These Exclusive Deals!
🔍 Take your microgreens vs sprouts growing journey to the next level with these carefully selected products. Click on any highlighted item to check current pricing and availability. These tools will help you create authentic fresh greens your family will love!
Understanding the Difference Microgreens Sprouts: Growth Stage Matters
One of the biggest misconceptions in home gardening is that microgreens and sprouts are interchangeable. They’re not. Understanding the fundamental difference microgreens sprouts starts with recognizing they’re harvested at completely different developmental stages.
What Exactly Are Sprouts?
Sprouts are seeds that have just begun germination—you’re eating them at their very first moment of life. Think of sprouts as plant embryos that have cracked out of their protective seed coat but haven’t yet established themselves as independent plants.
The sprouting process is remarkably fast. You soak seeds for 8-12 hours, then rinse and drain them twice daily for 3-5 days. That’s it. You eat the entire sprout—seed, root, stem, and any tiny cotyledon leaves that appear. Common sprout varieties include alfalfa, mung bean, broccoli, and lentil.
According to USDA food safety guidelines, sprouts are grown in warm (68-70°F), humid, dark conditions—unfortunately, these are also ideal conditions for bacterial growth. This explains why there have been over 30 documented foodborne illness outbreaks associated with sprouts since 1996.
What Exactly Are Microgreens?
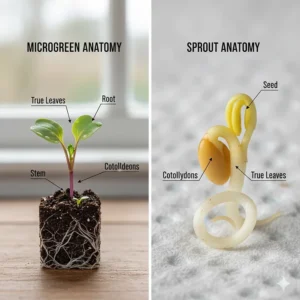
Microgreens represent the next phase of plant development. These are young seedlings harvested after the first true leaves (not just cotyledons) have developed. The plant has moved beyond simple germination—it’s now photosynthesizing, developing chlorophyll, and creating complex phytonutrients.
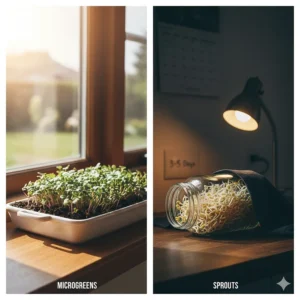
The microgreens growing process requires more infrastructure. You need a growing medium (soil, coco coir, or hydroponic mat), adequate lighting (sunlight or grow lights), and proper air circulation. The harvest timeline stretches to 7-21 days depending on the variety.
You harvest microgreens by cutting them just above the soil line, leaving the roots and growing medium behind. This means you’re eating pure stem and leaf material—no roots, no seed hulls. Popular microgreen varieties include sunflower shoots, pea shoots, radish, arugula, and basil.
Research published in peer-reviewed studies demonstrates that microgreens develop significantly higher concentrations of vitamins K, C, and E compared to sprouts due to their extended growing time and exposure to light.
The Critical Distinction: What You Actually Eat
Here’s the simplest way to remember the difference microgreens sprouts:
Sprouts: You eat the whole thing—seed, root, cotyledons
Microgreens: You eat only what’s above the soil—stems and true leaves
This fundamental difference affects everything: nutrition, safety, flavor, and growing requirements. When people ask which is better microgreens sprouts, they’re really asking two different questions depending on their priorities.
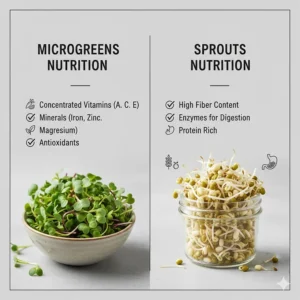
Nutritional Comparison: Which Packs More Punch?
The nutritional comparison between microgreens and sprouts reveals surprising complexity. Both are nutritional powerhouses, but they excel in different areas.
Microgreens: The Vitamin and Antioxidant Champions
Multiple scientific studies confirm that microgreens contain exceptional concentrations of vitamins and antioxidants. Research from the Journal of Agricultural and Food Chemistry found that certain microgreens contain up to 40 times more nutrients than their mature vegetable counterparts.
Why such intense nutrition? Because microgreens undergo photosynthesis. When light hits those tiny leaves, the plant synthesizes chlorophyll and produces antioxidants like polyphenols and flavonoids. These compounds help plants protect themselves from UV damage—and those same compounds benefit us when we eat them.
Nutritional highlights of microgreens:
- Vitamin C: Red cabbage microgreens contain up to 6x more vitamin C than mature cabbage
- Vitamin K: Essential for blood clotting and bone health, concentrated in brassica microgreens
- Carotenoids: Beta-carotene and lutein for eye health
- Polyphenols: Anti-inflammatory compounds with heart health benefits
- Chlorophyll: Anti-inflammatory and antioxidant properties
The nutritional profile varies dramatically by variety. Broccoli microgreens are famous for vitamin C and sulforaphane (a cancer-fighting compound), while sunflower shoots deliver protein and healthy fats.
Sprouts: The Enzyme and Protein Specialists
Sprouts take a different nutritional approach. The germination process activates enzymes that break down complex nutrients into more digestible forms. This is why sprouts are easier to digest than the seeds they came from—the plant has already done some of the digestive work for you.
Nutritional highlights of sprouts:
- Enzymes: Help digest proteins, carbohydrates, and fats
- Protein: Especially high in legume sprouts (mung bean, lentil)
- Vitamin C: Increases during germination
- B vitamins: B1, B2, B6 develop during sprouting
- Bioavailability: Minerals like iron and zinc become easier to absorb
Broccoli sprouts deserve special mention. They contain exceptionally high levels of sulforaphane—up to 100 times more than mature broccoli. Scientists at Johns Hopkins University have extensively researched sulforaphane’s potential cancer-preventive properties.
The Verdict: Which Wins the Nutritional Comparison?
If you’re asking which is better microgreens sprouts nutritionally, here’s the honest answer: it depends on what nutrients you’re prioritizing.
Choose microgreens for:
- Maximum vitamin content (especially C, E, K)
- High antioxidant levels
- Chlorophyll benefits
- Broader micronutrient diversity
Choose sprouts for:
- Digestive enzymes
- High protein content
- Quick bioavailability
- Specific compounds like sulforaphane (broccoli sprouts)
For optimal nutrition, many health-conscious individuals grow and eat both. They’re not competitors—they’re complementary superfoods that address different nutritional needs.
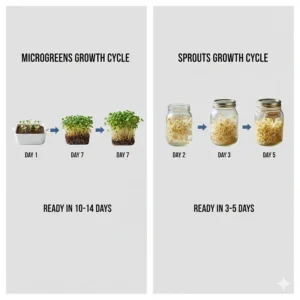
Growing Time Difference: Speed vs Substance
The growing time difference between microgreens and sprouts fundamentally shapes your growing experience, kitchen workflow, and harvest expectations.
Sprouts: The Speed Demons
Sprouts are remarkably fast—you can go from dry seed to edible food in just 3-5 days. This rapid timeline makes sprouts perfect for impatient growers or anyone wanting continuous fresh produce with minimal planning.
Typical sprout timeline:
- Day 0: Soak seeds for 8-12 hours
- Days 1-2: Rinse and drain twice daily, seeds begin sprouting
- Days 3-5: Harvest when sprouts reach desired length
The speed comes with a trade-off: constant attention. You must rinse and drain your sprouts twice daily without fail. Miss even one rinsing session, and you risk bacterial growth or mold developing in your sprouting jar.
Alfalfa and broccoli sprouts typically finish in 4-5 days. Mung beans and lentils can be ready in just 3-4 days. Wheat grass and sunflower sprouts might extend to 5-6 days.
Microgreens: The Patient Path to Flavor
Microgreens require a longer growing time difference—typically 7-14 days, though some varieties stretch to 21 days. This extended timeline allows the plants to develop true leaves, complex flavors, and higher concentrations of certain nutrients.
Typical microgreen timeline:
- Days 0-2: Seed germination in dark, moist conditions
- Days 2-4: Remove blackout cover, expose to light
- Days 5-10: True leaves develop, plant photosynthesizes
- Days 7-14: Harvest when first true leaves fully formed
The longer growing time difference actually works in your favor. Microgreens require less daily attention than sprouts. After initial seeding and the blackout phase, you simply water once daily and monitor growth. No twice-daily rinsing required.
Different varieties have different timelines:
- Fast growers (7-10 days): Radish, arugula, mustard greens
- Medium growers (10-14 days): Broccoli, kale, cabbage
- Slow growers (14-21 days): Basil, cilantro, parsley
Time Investment: The Real Calculation
When comparing microgreens vs sprouts growing from a time perspective, consider both the total timeline and daily effort:
Sprouts:
- Total time: 3-5 days
- Daily effort: 5-10 minutes twice daily
- Total time investment: 50-100 minutes per cycle
Microgreens:
- Total time: 7-14 days
- Daily effort: 2-5 minutes once daily
- Total time investment: 14-70 minutes per cycle
Surprisingly, microgreens often require less total hands-on time despite the longer growing period. The difference lies in the intensity of daily care—sprouts demand your attention morning and evening without exception.
Taste Profile Comparison: Mild Crunch vs Bold Flavors
The taste profile comparison between sprouts and microgreens represents one of the most dramatic differences—and it’s purely subjective which you’ll prefer.
Sprouts: Clean, Crunchy, Subtle
Sprouts deliver a mild, fresh flavor with satisfying crunch. They’re the supporting actor in your dish—adding texture and freshness without dominating the flavor profile.
Sprout flavor characteristics:
- Alfalfa: Neutral, slightly sweet, very mild
- Mung bean: Clean, crisp, subtle bean flavor
- Broccoli: Mild cruciferous taste, slight sweetness
- Lentil: Nutty undertones, gentle earthiness
- Radish: Mildest of the peppery varieties
The mildness makes sprouts incredibly versatile. They work in smoothies without altering the flavor, add crunch to sandwiches without competing with other ingredients, and bulk up salads without overwhelming delicate dressings.
Texture is where sprouts truly shine. That satisfying snap when you bite into fresh sprouts cannot be replicated. The crunch comes from the seed coat and the turgid, water-filled cells in the young stem.
Microgreens: Bold, Intense, Diverse
Microgreens pack concentrated flavors that can completely transform a dish. These aren’t subtle garnishes—they’re flavor bombs that chefs use strategically to add complexity and visual appeal.
Microgreen flavor profiles:
- Radish: Sharp, peppery, spicy bite
- Mustard: Intense wasabi-like heat
- Arugula: Nutty with peppery finish
- Sunflower: Rich, nutty, slightly sweet
- Basil: Concentrated basil essence
- Pea shoots: Sweet, fresh pea flavor
The taste intensity varies by variety more dramatically than with sprouts. You can choose mild sunflower shoots for beginners or aggressive mustard microgreens for heat lovers. This diversity makes microgreens fascinating for culinary experimentation.
Texture in microgreens is more complex—tender stems, delicate leaves, varying degrees of crispness depending on the variety. They’re less about crunch and more about mouthfeel and flavor delivery.
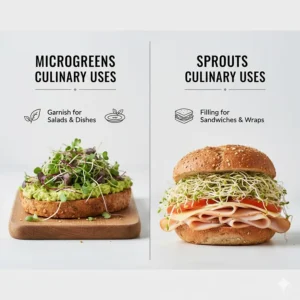
Culinary Applications: How to Use Each
Understanding the taste profile comparison helps you deploy each green effectively:
Use sprouts for:
- Sandwich and wrap fillings (texture without flavor interference)
- Salad bulk (volume without overpowering)
- Smoothie nutrition boost (invisible nutrition)
- Stir-fry additions (quick cooking preserves crunch)
Use microgreens for:
- Finishing touches on plated dishes (visual and flavor pop)
- Salad feature ingredient (let the flavor shine)
- Pizza and flatbread toppings (after cooking for fresh contrast)
- Cocktail and mocktail garnishes (aromatic appeal)
Many home growers eventually maintain both systems—sprouts for daily smoothies and sandwich toppings, microgreens for dinner party presentations and special meal garnishes. They serve different purposes in the kitchen.
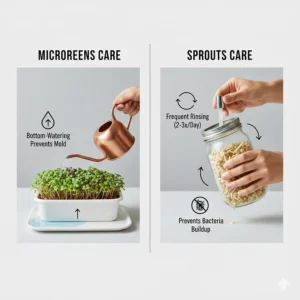
Safety Considerations: Why Growing Method Matters
Food safety represents the most critical difference between microgreens vs sprouts growing. This isn’t just theoretical—it has real implications for your health and well-being.
The Sprouts Safety Challenge
Sprouts have been associated with numerous foodborne illness outbreaks. Since 1996, the FDA has documented over 30 outbreaks linked to sprouts, resulting in thousands of cases of illness, hundreds of hospitalizations, and several deaths. The pathogens involved include E. coli, Salmonella, and Listeria.
Why are sprouts risky? The growing conditions that produce perfect sprouts also create ideal conditions for bacterial growth:
- Warm temperatures: 68-70°F is perfect for germination and bacteria
- High moisture: Constant wetness provides bacteria with water
- Darkness: No UV light to inhibit bacterial growth
- Nutrients: Soaking water and seed nutrients feed bacteria
According to FDA Produce Safety guidelines, contamination often starts with the seed itself. Bacteria can hide in tiny cracks in seed coats where even vigorous washing cannot reach them.
Safety practices for home sprout growing:
- Purchase seeds specifically labeled for sprouting from reputable suppliers
- Sanitize all equipment before each batch
- Rinse sprouts thoroughly with clean water
- Refrigerate immediately after final rinse
- Consume within 2-3 days of harvest
- When in doubt, cook your sprouts before eating
Pregnant women, young children, elderly individuals, and anyone with compromised immune systems should either avoid raw sprouts entirely or cook them thoroughly before consumption.
The Microgreens Safety Advantage
Microgreens have a significantly better safety record. From 1998 to 2017, there were zero documented foodborne illness outbreaks associated with microgreens in the United States, according to Colorado State University research.
Why are microgreens safer? The growing conditions naturally discourage bacterial growth:
- Light exposure: UV light has antimicrobial properties
- Air circulation: Prevents moisture stagnation
- Growing medium: Soil or substrate isolates roots from leaves
- Harvest method: Cut above soil line, leaving contamination risk below
That said, microgreens aren’t immune to food safety concerns. Recent research shows similar background bacterial levels between sprouts and microgreens when tested. The key difference is that microgreen growing practices and harvest methods create barriers that prevent bacteria from reaching the edible portions.
Safety practices for microgreen growing:
- Use sterile growing medium or sanitized hydroponic mats
- Test water sources for E. coli if using well water
- Maintain good ventilation in growing area
- Sanitize trays and equipment between crops
- Harvest with clean scissors or knives
- Handle harvested microgreens minimally
The FDA considers microgreens distinct from sprouts precisely because of these safety differences. Microgreens fall under general produce safety rules rather than the stricter sprout-specific regulations.
Equipment and Setup: What You Actually Need
The equipment requirements represent another major difference microgreens sprouts that impacts your initial investment and ongoing maintenance.
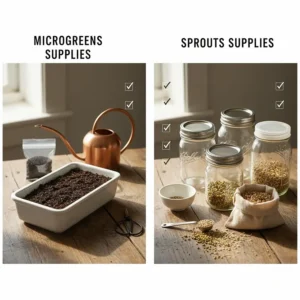
Essential Sprout Growing Equipment
The beauty of sprouts is simplicity. You can start growing for under $30 with basic equipment.
Minimum requirements:
- Wide-mouth mason jars or dedicated sprouting jars
- Sprouting lids with mesh screens
- Jar stand (holds jars at angle for drainage)
- Drip tray to catch water
Optional upgrades:
- Blackout sleeves for bean sprouts
- Multiple jars for variety rotation
- Sprouting-specific seeds
- Spray bottle for gentle rinsing
The sprouting jar is your primary investment. Quality matters here—316 stainless steel mesh resists rust better than cheaper alternatives. Some growers skip the jar entirely and use sprouting bags or trays, but jars remain the most popular method for home use.
Water is your only ongoing supply need. You’re using tap water (or filtered if you prefer) for rinsing twice daily. No fertilizers, no soil, no complex amendments required.
Essential Microgreen Growing Equipment
Microgreens require more infrastructure, but still remain accessible for beginners. Entry-level kits start around $25, while premium automated systems can exceed $200.
Minimum requirements:
- Growing trays with drainage holes
- Solid trays for bottom watering
- Growing medium (soil, coco coir, or hydroponic mats)
- Spray bottle or gentle watering device
- Light source (sunny window or grow lights)
Optional upgrades:
- LED grow lights for consistent results
- Humidity domes for germination
- Blackout covers for germination phase
- Heat mats for faster germination
- Shelf systems for multi-level growing
The growing medium choice significantly impacts your experience. Organic potting soil is cheapest but creates more mess. Coco coir provides excellent drainage with less weight. Hydroponic mats (like in the ZestiGreens kit) eliminate soil entirely but require ongoing purchases.
Light represents the biggest variable. A south-facing windowsill works perfectly if you have one. Without adequate natural light, you’ll need grow lights—LED systems have dropped dramatically in price and now start under $30 for basic models.
Space Requirements: Footprint Comparison
Sprouts:
- Minimum space: 12″ x 12″ counter area for 2-jar setup
- Vertical: Minimal (jars sit at angle in stand)
- No dedicated space needed—can share counter with other kitchen activities
Microgreens:
- Minimum space: 10″ x 20″ for standard growing tray
- Vertical: 18-24″ if using grow lights
- Dedicated space helpful—trays sit stationary for 7-14 days
Apartment dwellers often prefer sprouts for space efficiency. However, vertical microgreen setups with shelf systems can actually produce more edible greens per square foot of floor space.
Cost Analysis: Initial Investment vs Ongoing Expenses
Sprouts Initial Setup:
- Basic kit: $20-35
- Quality seeds (3-month supply): $15-25
- Total startup: $35-60
Sprouts Ongoing Costs:
- Seeds: $5-10/month
- Water: Negligible
- Monthly cost: $5-10
Microgreens Initial Setup:
- Basic kit: $25-50
- Premium automated kit: $150-200
- Seeds and medium (first month): $20-30
- Grow lights (if needed): $30-60
- Total startup: $45-280
Microgreens Ongoing Costs:
- Seeds: $8-15/month
- Growing medium: $5-15/month
- Electricity (if using grow lights): $2-5/month
- Monthly cost: $15-35
Over a year, sprouts remain more economical—roughly $60-120 annually versus $180-420 for microgreens. However, the nutritional value per dollar shifts the calculation. Since microgreens are more nutrient-dense and command higher retail prices ($4-8 per ounce at stores), many growers find the extra investment worthwhile.
Common Mistakes and How to Avoid Them
After analyzing hundreds of customer reviews and troubleshooting questions, certain mistakes appear repeatedly in microgreens vs sprouts growing. Here’s what trips up beginners and how to avoid these pitfalls.
Sprout Growing Mistakes
Mistake #1: Inconsistent Rinsing
Skipping even one rinse session invites bacterial growth and off-flavors. Sprouts need twice-daily rinsing like clockwork.
Solution: Set phone alarms for morning and evening rinses. Keep your sprouting jar visible on the counter as a reminder.
Mistake #2: Insufficient Drainage
Standing water in the bottom of your sprouting jar is bacteria’s best friend.
Solution: Always invert jars at a 45-degree angle in the stand after rinsing. Ensure proper drainage for 15-30 minutes between rinses.
Mistake #3: Using Garden Seeds
Seeds treated with fungicides or pesticides for planting aren’t food-safe.
Solution: Always purchase seeds specifically labeled for sprouting. They’re tested for pathogens and untreated with chemicals.
Mistake #4: Overcrowding Jars
Too many seeds create poor air circulation and uneven moisture distribution.
Solution: Use 1-2 tablespoons of small seeds (alfalfa, broccoli) or ¼ cup of large seeds (mung beans) per 32oz jar.
Mistake #5: Ignoring Off Smells
Sprouts should smell fresh and clean. Any sour, musty, or unpleasant odor indicates contamination.
Solution: Trust your nose. If sprouts smell wrong, discard them immediately and sanitize all equipment before starting a new batch.
Microgreen Growing Mistakes
Mistake #1: Overwatering
Soggy growing medium suffocates roots and promotes fungal growth.
Solution: Water from bottom using tray method, or mist lightly from top. Medium should be moist, never saturated.
Mistake #2: Inadequate Lighting
Leggy, pale microgreens indicate insufficient light exposure.
Solution: Provide 12-16 hours of bright light daily. If using grow lights, position 6-12 inches above plants.
Mistake #3: Harvesting Too Early
Cutting before the first true leaves fully develop reduces flavor and nutrition.
Solution: Wait for the true leaves (the set after cotyledons) to fully open before harvesting.
Mistake #4: Poor Air Circulation
Stagnant air promotes damping-off disease (white fuzzy growth at soil line).
Solution: Use a small fan on low setting for gentle air movement, or ensure adequate ventilation in growing area.
Mistake #5: Reusing Soil Without Treatment
Used growing medium harbors pathogens and depleted nutrients.
Solution: Compost used soil between crops. Start each batch with fresh, sterile medium.
Scaling Up: From Hobby to Production
Many growers start with one sprouting jar or microgreen tray out of curiosity, then find themselves wondering about expansion. Understanding how to scale microgreens vs sprouts growing helps you move from kitchen hobby to potential income source.
Scaling Sprout Production
Sprouts scale efficiently because the process remains simple regardless of volume. Commercial sprout operations use the same basic principles as home growers—just with larger equipment.
Small-scale expansion (feeding family + friends):
- Add 2-4 more sprouting jars
- Stagger planting every 2 days for continuous harvest
- Investment: $40-80 for additional jars and seeds
- Weekly yield: 1-2 pounds of fresh sprouts
Medium-scale expansion (farmers market sales):
- Upgrade to sprouting trays or commercial sprouting racks
- Implement strict food safety protocols
- Investment: $200-500 for commercial equipment
- Weekly yield: 5-15 pounds
The growing time difference works in sprouts’ favor for scaling. With a 3-5 day cycle, you can produce 52-104 harvests annually from the same setup. This rapid turnover means mistakes are less costly—a failed batch represents just a few days of lost time.
Scaling Microgreen Production
Microgreens scale differently because they require more space and infrastructure. However, the higher retail value ($30-60 per pound wholesale, $4-8 per ounce retail) makes commercial microgreen production potentially more profitable.
Small-scale expansion (supplemental income):
- Add 4-8 standard 10×20 trays
- Install basic shelf system with grow lights
- Investment: $200-400 for shelving, lights, supplies
- Weekly yield: 2-4 pounds (rotating harvest schedule)
Medium-scale expansion (part-time business):
- Dedicated growing room with climate control
- Professional grow light systems
- Multiple varieties for restaurant clients
- Investment: $1,000-3,000 for professional setup
- Weekly yield: 10-30 pounds
The longer growing time difference means microgreens require more patience for scaling. You need enough space to have multiple trays at different growth stages simultaneously. Most commercial growers maintain 3-4x the tray count needed for their weekly target harvest.
Seasonal Considerations and Year-Round Growing
One underappreciated advantage in the microgreens vs sprouts growing comparison—both can be grown indoors year-round with consistent results. However, seasons still matter for anyone utilizing natural light or growing in non-climate-controlled spaces.
Winter Growing Challenges
Challenge: Reduced natural light
Solution: Supplement with grow lights for microgreens. Sprouts unaffected—they grow in darkness anyway.
Challenge: Dry air from heating systems
Solution: Use humidity domes during microgreen germination. Sprouts benefit from dry air between rinses.
Challenge: Cold windowsills
Solution: Add heat mats under microgreen trays or move growing area to warmer interior location.
Summer Growing Challenges
Challenge: Excessive heat
Solution: Critical for sprouts—warm temperatures accelerate bacterial growth. Move sprouting jars to coolest area of kitchen.
Challenge: Direct sunlight burning delicate leaves
Solution: Filter intense midday sun for microgreens. Provide shade during peak hours.
Challenge: Faster drying of growing medium
Solution: Increase watering frequency for microgreens during hot weather.
The Year-Round Advantage
Both systems excel at providing fresh, nutritious greens during winter months when outdoor gardening ceases. This is actually when the nutritional comparison between microgreens and sprouts matters most—your body needs those vitamins and antioxidants when fresh produce becomes expensive and travels thousands of miles to reach supermarkets.
FAQ
❓ How long does it take to grow microgreens vs sprouts?
❓ Are microgreens or sprouts more nutritious?
❓ Which is safer to eat raw, microgreens or sprouts?
❓ Can I use the same kit for growing microgreens and sprouts?
❓ What's the taste difference between microgreens and sprouts?
Conclusion: Making Your Choice in Microgreens vs Sprouts Growing
So you’ve explored the complete landscape of microgreens vs sprouts growing—the nutritional comparison, growing time difference, taste profile comparison, safety considerations, and equipment requirements. What’s the final verdict on which is better microgreens sprouts?
The honest answer is that neither is universally better. They’re different tools for different purposes, and the right choice depends entirely on your specific situation and goals.
Choose sprouts if you want:
- The fastest possible harvest (3-5 days)
- Minimal equipment investment ($20-35 to start)
- Crunchy texture for sandwiches and salads
- Enzyme-rich nutrition for digestion
- The simplest possible setup
Choose microgreens if you want:
- Maximum vitamin and antioxidant density
- Bold, diverse flavors for culinary creativity
- Lower food safety risks
- Visual appeal for plating and garnishing
- Year-round fresh greens from a sunny windowsill
Choose both if you want:
- Complementary nutrition covering different nutrient profiles
- Continuous harvests (sprouts every 3-5 days, microgreens every 7-14 days)
- Maximum versatility in the kitchen
- The complete fresh greens experience
Here’s what I’ve learned after years of growing both: the difference microgreens sprouts isn’t about one being superior—it’s about understanding what each brings to your table and your life. Sprouts give you instant gratification and daily smoothie nutrition. Microgreens reward patience with explosion of flavor and nutritional density.
The best part? You don’t need to choose just one. Many successful growers maintain a simple 2-jar sprout rotation alongside 2-3 microgreen trays at different stages. This combination provides fresh greens daily while keeping time investment under 10 minutes per day.
Your microgreens vs sprouts growing journey starts with a single seed. Whether that’s an alfalfa seed soaking in a mason jar tonight or radish seeds pressed into a tray of soil tomorrow morning, you’re taking control of your nutrition and food security. That first harvest—whether it’s crunchy mung bean sprouts in 4 days or peppery radish microgreens in 10 days—will likely hook you for life.
Start small, experiment fearlessly, and remember that every professional grower once stood exactly where you are right now, wondering which kit to buy and whether they could actually make this work. The answer is yes, you absolutely can. The only question is whether you’ll start with sprouts, microgreens, or both.
Recommended for You
- 7 Best Countertop Microgreens Kit For Small Spaces 2026
- 7 Best Microgreens Kit Gift: Health Meets Sustainability (2026)
- 7 Best Alfalfa Sprout Growing Kits 2026: Expert Reviews
Disclaimer: This article contains affiliate links. If you purchase products through these links, we may earn a small commission at no additional cost to you.
✨ Found this helpful? Share it with your friends! 💬🤗