In This Article
Have you ever dreamed of having fresh herbs, vegetables, or flowers year-round, regardless of the weather outside? You’re not alone. Indoor gardening has exploded in popularity, and for good reason. According to research from Gardening Know How, grow tents create a controlled mini-climate that extends your growing season far beyond what Mother Nature allows.
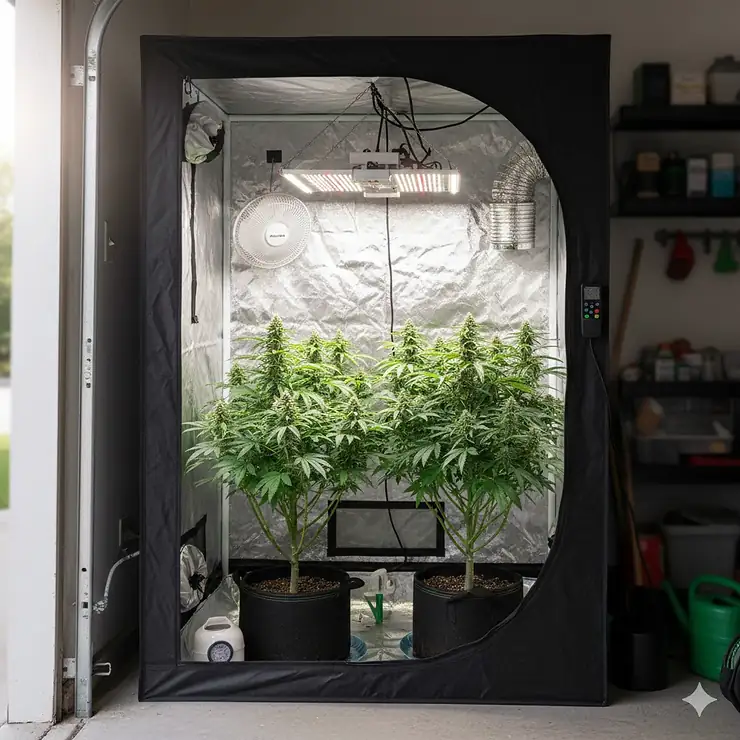
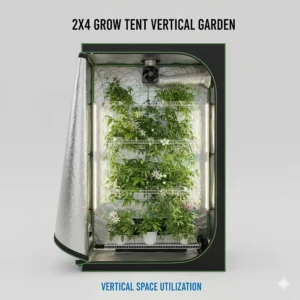
A 2×4 grow tent is the sweet spot for home gardeners who want serious results without dedicating an entire room. Think of it as your personal indoor greenhouse—compact enough to fit in a closet or spare corner, yet spacious enough to cultivate 2-4 full-cycle plants or up to 8 smaller plants during vegetative stages. The beauty? You control every aspect of your growing environment, from temperature and humidity to light cycles and air circulation.
Whether you’re a complete beginner taking your first steps into indoor cultivation or an experienced grower looking to optimize your setup, this guide will walk you through everything you need to know. I’ve tested, researched, and compared dozens of options to bring you the most comprehensive review of 2×4 grow tent systems available in 2025.
Quick Comparison Table
| Product | Dimensions | Canvas Density | Price Range | Best For |
|---|---|---|---|---|
| Gorilla Grow Tent 2×4 | 24″x48″x79″ | 1680D | $285-$320 | Premium durability |
| AC Infinity Advance System | 24″x48″x72″ | 2000D | $679 | Smart automation |
| VIVOSUN S425 | 24″x48″x60″ | 600D | $85-$120 | Budget-friendly |
| Spider Farmer 2×4 | 28″x55″x80″ | 1680D | $109-$149 | Slightly larger size |
| Mars Hydro 2×4 | 24″x48″x71″ | 1680D | $129-$169 | Balanced performance |
| VIVOSUN PRO 2×4 | 24″x48″x60″ | 2000D | $149-$189 | Enhanced features |
| Spider Farmer Complete Kit | 24″x47″x71″ | 1680D | $399-$449 | All-in-one solution |
💬 Just one click – help others make better buying decisions too!😊
Top 7 2×4 Grow Tents: Expert Analysis
1. Gorilla Grow Tent 2×4 – The Premium Powerhouse
When you think premium grow tents, Gorilla immediately comes to mind—and for good reason. This isn’t just marketing hype; it’s backed by some seriously impressive engineering.
Key Specifications:
- Dimensions: 24″x48″x79″ (extends to 8’11” with extension kit)
- Canvas: 1680D thickness (9x denser than competitors)
- Weight capacity: 300 lbs
- Pole diameter: 22mm hardened steel
The Gorilla Grow Tent 2×4 stands head and shoulders above the competition—literally. Starting at 6’11” and extending up to 8’11”, you’ll never worry about height restrictions. I’ve seen too many growers struggle with tents that max out at 6 feet, forcing them to constantly train or even stunt their plants.
Customer feedback consistently praises the industrial-grade zippers that actually glide smoothly (unlike cheaper alternatives that stick and tear) and the Diamond Reflection Technology that redistributes light directly to your plants rather than absorbing it. One grower mentioned that after switching from a budget tent, their yield increased by approximately 20% simply due to better light distribution.
✅ Pros:
- Exceptional build quality that lasts years
- Superior height adjustability for tall plants
- 300 lbs weight capacity handles heavy equipment safely
- Light-tight double cinching duct ports
❌ Cons:
- Premium price point ($285-$320)
- Heavier weight makes relocation more challenging
Price Range: $285-$320 Target User: Serious growers who want a long-term investment
2. AC Infinity Advance Grow Tent System 2×4 – Smart Growing Revolution
Welcome to the future of indoor gardening. The AC Infinity Advance System isn’t just a tent—it’s a complete ecosystem with WiFi-integrated controls that would make any tech enthusiast grin.
Key Specifications:
- Dimensions: 24″x48″x72″
- Canvas: 2000D Mylar
- Includes: Controller 69 Pro, IonBoard S24 LED (200W), 6″ inline fan
- Smart features: VPD automation, mobile app control
What sets this apart? The Controller 69 Pro automatically adjusts your inline fan and circulation based on real-time VPD (vapor pressure deficit), temperature, and humidity readings. For those unfamiliar, VPD is crucial for optimal plant transpiration, and AC Infinity makes it completely automatic.
I particularly appreciate the app connectivity—imagine checking your tent’s environment from work or adjusting settings from your couch. The Samsung LM301H diodes in the included LED provide full-spectrum lighting that rivals much more expensive standalone lights.
✅ Pros:
- Complete plug-and-play system
- WiFi app control for remote monitoring
- Premium 2000D canvas with superior light blocking
- Includes everything except plants and nutrients
❌ Cons:
- Higher initial investment ($679)
- Learning curve for automation features
Price Range: $679 complete system Target User: Tech-savvy growers wanting total automation
3. VIVOSUN S425 2×4 Grow Tent – Best Budget Option
Let’s be honest—not everyone can or wants to spend $600+ on their first grow tent. That’s where VIVOSUN S425 shines as the accessible entry point.
Key Specifications:
- Dimensions: 24″x48″x60″
- Canvas: 600D Oxford with 100% reflective Mylar
- Weight capacity: 100 lbs per bar
- Features: Observation window, removable floor tray
Don’t let the lower price fool you. VIVOSUN has built a reputation on delivering solid value, and this tent proves it. The 600D canvas is thinner than premium options but still provides excellent light-tightness when properly zipped. The upgraded black inner lining on zippers prevents light leaks—a common problem in budget tents.
Customer reviews consistently highlight the easy assembly (most complete it in under 30 minutes) and the practical observation window that lets you check plants without disturbing the environment. One beginner grower mentioned this tent lasted them two full years before they upgraded to a larger system.
✅ Pros:
- Extremely affordable ($85-$120)
- Quick tool-free assembly
- Good light reflection for the price
- Perfect starter tent for beginners
❌ Cons:
- Lower weight capacity than premium options
- Shorter height (60″) limits tall plant growth
- Thinner canvas may show wear faster
Price Range: $85-$120 Target User: Beginning growers testing the waters
4. Spider Farmer 2×4 Grow Tent – The Slightly Bigger Alternative
Here’s something interesting: Spider Farmer’s 2×4 is actually slightly larger than standard 2×4 tents, measuring 28″x55″x80″. Those extra inches make a surprising difference.
Key Specifications:
- Dimensions: 28″x55″x80″ (55″x28″ floor space)
- Canvas: 1680D tear-proof Oxford
- Features: Enlarged observation window, GGS smart hook system
- Weight capacity: 150 lbs
The extra width and height provide more flexibility for equipment placement and plant training. I particularly like the new smart hook system that works with Spider Farmer’s GGS controllers—everything just clicks together securely without fumbling with cheap carabiners.
The enlarged viewing window (11.8″x15.7″) is genuinely useful. Traditional small windows force you to squint and crane your neck; this one gives you a proper view of your entire canopy. Multiple customers mentioned the premium SBS zippers that operate smoothly even after hundreds of opening cycles.
✅ Pros:
- Larger than standard 2×4 dimensions
- Compatible with GGS automation system
- Superior zipper quality
- Excellent customer service from Spider Farmer
❌ Cons:
- Slightly higher price than basic models
- Non-standard size means accessories may not fit perfectly
- Some users reported minor light leaks at intake vents
Price Range: $109-$149 Target User: Growers wanting extra growing space
5. Mars Hydro 2×4 Grow Tent – Balanced Performance
Mars Hydro has carved out a reputation for reliable, middle-ground products, and their 2×4 tent continues that tradition.
Key Specifications:
- Dimensions: 24″x48″x71″
- Canvas: 1680D Oxford fabric
- Weight: 19.3 lbs
- Features: 98% reflective Mylar lining, multiple access ports
The tent strikes an excellent balance between quality and affordability. The 1680D fabric blocks light effectively while the 98% reflective Mylar lining maximizes your lighting efficiency. Mars Hydro claims this design helps maintain stable temperatures during winter growing—something backed by user testimonials.
What impressed me most is the thoughtful port placement. Six double-cinching duct ports and two electrical ports give you flexibility for various ventilation and equipment setups. The sturdy metal frame supports 110 lbs, adequate for most home growing setups with lights, filters, and fans.
✅ Pros:
- Well-balanced features for the price
- Good winter insulation properties
- Multiple duct and electrical ports
- Compatible with Mars Hydro complete kits
❌ Cons:
- Mid-range pricing without standout features
- Some assembly instructions could be clearer
- Zippers occasionally stick according to reviews
Price Range: $129-$169 Target User: Practical growers seeking reliable performance
6. VIVOSUN PRO 2×4 Grow Tent – Premium VIVOSUN
Taking everything great about the standard VIVOSUN and turning it up to eleven, the VIVOSUN PRO represents their premium offering.
Key Specifications:
- Dimensions: 24″x48″x60″
- Canvas: 2000D Oxford (ultra-thick)
- Pole thickness: 1″ (25mm) steel poles
- Weight capacity: 150-400 lbs depending on configuration
- Features: High CFM support kit included
The jump from 600D to 2000D canvas is massive. This three-layer thick fabric ensures absolute zero light leaks—crucial for photoperiod plants that require strict light schedules. The φ22mm (approximately 1″) steel poles feel incredibly stable compared to the thinner alternatives.
Here’s something unique: the included high CFM kit provides additional support for powerful inline fans. If you’ve ever seen a tent wall sucking inward from negative pressure, you’ll appreciate this feature. The kit minimizes tent flexing and helps secure trellis netting.
✅ Pros:
- Ultra-thick 2000D canvas eliminates light leaks
- Robust 1″ poles for heavy equipment
- Enhanced stability with CFM support kit
- Larger observation window for better viewing
❌ Cons:
- Higher price than standard VIVOSUN
- Heavier overall weight
- Still limited to 60″ height
Price Range: $149-$189 Target User: Growers upgrading from entry-level tents
7. Spider Farmer Complete 2×4 Grow Tent Kit – All-in-One Solution
Buying individual components can be overwhelming and expensive. The Spider Farmer Complete Kit solves this by bundling everything you need.
Key Specifications:
- Dimensions: 24″x47″x71″
- Includes: SF2000 LED (200W), 4″ ventilation system, 6″ clip fan
- Additional accessories: Timer, grow bags, trellis netting, thermometer
- Total package value: Saves $100+ vs. buying separately
The SF2000 LED features Samsung LM301H EVO diodes with an impressive 3.14 µmol/J efficiency rating—this translates to more light output per watt consumed. The included 4-inch inline fan moves 205 CFM while maintaining quiet operation (26.8 dB).
What really makes this kit shine is the thoughtfulness. You get fabric grow bags, trellis netting, pruning shears, and even a timer—basically everything except your growing medium and plants. Multiple first-time growers mentioned setting up their entire operation in one afternoon with just this kit.
✅ Pros:
- Complete solution eliminates guesswork
- Significant cost savings vs. buying separately
- High-quality SF2000 LED included
- All components pre-matched for compatibility
❌ Cons:
- Initial cost appears high ($399-$449)
- May include items you already own
- Less flexibility in component selection
- Some users reported tent light leaks at seams
Price Range: $399-$449 complete kit Target User: First-time growers wanting everything immediately
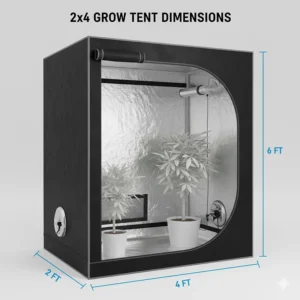
Understanding 2×4 Grow Tent Dimensions
One of the most common questions I get is: “What exactly does 2×4 mean?” Let me clear this up because it’s more nuanced than you might think.
Standard 2×4 grow tents measure approximately 24 inches wide by 48 inches deep—that’s 2 feet by 4 feet in floor space. However, heights vary dramatically from 60 inches (5 feet) up to 80 inches (nearly 7 feet) or more with extension kits.
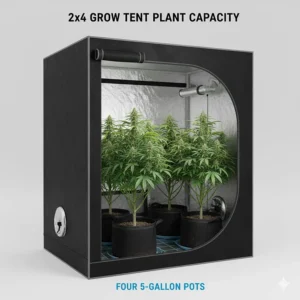
Floor Space Breakdown:
- 2×4 footprint: Perfect for 2-4 full-cycle plants in 5-gallon containers
- Vegetative stage: Can accommodate 6-8 smaller plants
- Mother plant setup: Ideal for maintaining 2-3 mother plants
Here’s what many beginners don’t realize: height matters more than you think. A 60-inch tent might seem adequate, but once you account for your light fixture (hanging 12-18 inches from the canopy), pots (12 inches), and plant height (potentially 24-36 inches), you’re working with very limited space. I always recommend tents 70+ inches tall unless you’re exclusively growing compact strains.
Key Features to Consider When Choosing Your 2×4 Grow Tent
Canvas Density Explained
Canvas density, measured in “D” (denier), indicates fabric thickness and durability. Here’s the breakdown:
- 420D-600D: Entry-level thickness, adequate for beginners but may show wear after 1-2 years
- 1680D: Professional-grade standard offering excellent durability and light blocking
- 2000D: Premium thickness providing superior longevity and complete light-tightness
According to data from indoor gardening specialists, higher canvas density also provides better insulation, helping maintain stable temperatures—especially important for winter growing.
Frame Stability and Weight Capacity
Your tent’s frame determines how much equipment it can safely support. Most 2×4 tents handle 100-150 lbs, but premium options like Gorilla support 300 lbs.
Typical Equipment Weight:
- LED grow light: 8-15 lbs
- Carbon filter: 10-20 lbs
- Inline fan: 5-8 lbs
- Ducting and hangers: 5-10 lbs
As you can see, you’ll easily approach 50-75 lbs with basic equipment. Having extra capacity provides peace of mind and room for future upgrades.
Mylar Reflectivity
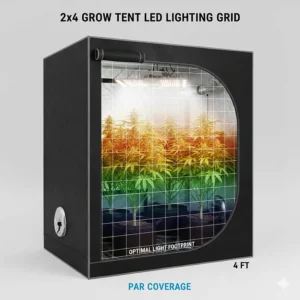
Interior reflectivity maximizes your lighting investment. Most quality tents feature 95-98% reflective Mylar lining. This means nearly all light bounces back to your plants instead of being absorbed by the tent walls.
Impact on growing: Better reflectivity translates to more uniform light distribution across your canopy, potentially increasing yields by 10-20% compared to non-reflective surfaces.
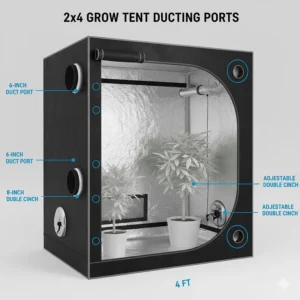
Duct and Electrical Ports
Proper ventilation requires well-designed ports. Look for:
- Multiple duct ports: Minimum 4-6 ports for flexibility
- Double cinching design: Tightens completely around ducting to prevent light leaks
- Electrical ports: Separate ports for power cables keep everything organized
- Various sizes: 4″, 6″, 8″ ports accommodate different fan and filter sizes
Light-Tightness
Even small light leaks during dark periods can stress photoperiod plants, potentially causing hermaphroditism or reduced yields. Premium tents use:
- Black-lined zippers: Prevent light from passing through zipper teeth
- Reinforced seams: Double or triple stitching blocks gaps
- Velcro flaps: Cover zippers for additional light blocking
2×4 vs Other Grow Tent Sizes Comparison
| Size | Floor Space | Best For | Plant Capacity |
|---|---|---|---|
| 2×2 | 4 sq ft | Single plants, mother plants | 1-2 plants |
| 2×4 | 8 sq ft | Small personal grows | 2-4 plants |
| 3×3 | 9 sq ft | Slightly larger harvests | 3-6 plants |
| 4×4 | 16 sq ft | Serious home growing | 4-8 plants |
The 2×4 hits the sweet spot for most home growers. It’s small enough to fit in closets, spare bedrooms, or basements while providing adequate space for meaningful harvests. A 3×3 offers slightly more space but with a less efficient footprint for narrow rooms.
Benefits vs Traditional Growing Methods
Space Efficiency
Traditional outdoor gardens require significant yard space and favorable climates. A 2×4 grow tent provides year-round growing in just 8 square feet of floor space—that’s smaller than most office cubicles!
Environmental Control
According to research on controlled environment agriculture, grow tents allow precise management of:
- Temperature: Maintain optimal 70-80°F range regardless of outside weather
- Humidity: Control moisture levels to prevent mold and optimize growth
- Light cycles: Perfectly timed photoperiods for each growth stage
- CO2 levels: Enrichment becomes possible in sealed environments
Pest Prevention
Enclosed environments dramatically reduce pest pressure. No more dealing with aphids, spider mites, or caterpillars that plague outdoor gardens. The controlled entry point makes pest management significantly easier.
Odor Management
Built-in ports for carbon filters keep your growing discreet. Quality carbon filters remove 90-95% of plant odors when properly sized and maintained.
Setting Up Your 2×4 Grow Tent: Step-by-Step
Step 1: Choose the Location
Select a spot with:
- Level floor surface
- Access to electrical outlets
- Adequate ventilation
- Comfortable working height
- Away from extreme temperature fluctuations
Pro tip: Basements maintain more stable temperatures than attics or garages.
Step 2: Assemble the Frame
Most tents use tool-free corner connectors. Simply:
- Connect corner pieces to vertical poles
- Add horizontal support poles
- Attach top hanging bars
- Verify everything clicks securely
Time required: 15-30 minutes for most tents
Step 3: Install the Canvas
Slide the canvas over the assembled frame, ensuring:
- Zippers face the correct direction (usually front-opening)
- All corners seat properly
- Floor tray lays flat
- Observation windows align correctly
Step 4: Install Equipment
Recommended installation order:
- Hang LED grow light from top bars
- Mount inline fan and carbon filter
- Connect ducting between fan and filter
- Position oscillating circulation fans
- Route electrical cables through designated ports
- Seal all duct ports with included cinching straps
Step 5: Test and Adjust
Before adding plants:
- Run all equipment for 24 hours
- Check for light leaks in complete darkness
- Verify temperature and humidity levels
- Ensure adequate airflow throughout tent
- Test automatic controls if applicable
✨ Don’t Miss These Exclusive Deals!
🔍 Take your indoor garden to the next level with these carefully selected products. Click on any highlighted item to check current pricing and availability. These tools will help you create authentic year-round harvests your whole family will love!
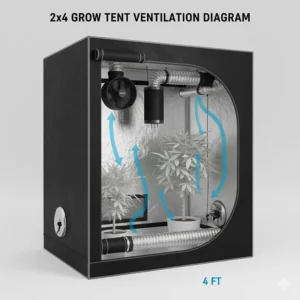
Ventilation and Climate Control Essentials
Proper ventilation isn’t optional—it’s critical for healthy plant growth. Here’s why and how to set it up correctly.
Understanding Air Exchange
Your tent should completely exchange its air every 2-3 minutes. Here’s the calculation:
Formula: (Tent Length × Width × Height) ÷ 3 = Minimum CFM required
For standard 2×4 (24″×48″×72″): (2 × 4 × 6) = 48 cubic feet 48 ÷ 3 = 16 CFM minimum
However, add 25-30% capacity to account for carbon filter resistance. Most growers use 200-250 CFM inline fans for 2×4 tents.
Temperature Management
Optimal ranges:
- Lights on: 70-80°F (21-27°C)
- Lights off: 60-70°F (15-21°C)
Cooling strategies:
- Increase exhaust fan speed
- Add air conditioning to intake air
- Use LED lights instead of HID (less heat generation)
- Ensure adequate tent height for heat rising
Heating strategies:
- Reduce exhaust fan speed
- Use seedling heat mats
- Add small space heater outside tent with intake ducting
- Increase light wattage (generates beneficial heat)
Humidity Control
Different growth stages require different humidity levels:
- Seedlings/Clones: 65-75% RH
- Vegetative: 55-65% RH
- Flowering: 40-50% RH
- Late flowering: 35-45% RH
Increase humidity: Add humidifiers or water trays Decrease humidity: Install dehumidifiers or increase ventilation
Lighting Your 2×4 Grow Tent
Lighting represents your biggest impact on plant growth and yield. Let’s break down what works best.
LED vs HID Lighting
LED Advantages:
- 40-50% more energy efficient
- Longer lifespan (50,000+ hours)
- Lower heat generation
- Full spectrum options available
- No bulb replacements
HID Advantages:
- Lower initial cost
- Proven track record
- Deep canopy penetration
For 2×4 tents, I strongly recommend LED. The reduced heat makes climate control significantly easier, and modern LEDs match or exceed HID performance.
Recommended Wattage
For a 2×4 tent (8 sq ft):
- Minimum: 200W LED (25W per square foot)
- Optimal: 240-320W LED (30-40W per square foot)
- Maximum: 400W LED (50W per square foot for commercial results)
Most home growers find 200-300W perfect for 2×4 spaces.
Light Placement and Height
General guidelines:
- Seedlings: 24-36 inches from canopy
- Vegetative: 18-24 inches from canopy
- Flowering: 12-18 inches from canopy
Modern dimmable LEDs give you control to adjust intensity without changing height.
Price Range & Value Analysis
Understanding what you get at each price tier helps make informed decisions.
Budget Tier ($80-$150)
What to expect:
- 420D-600D canvas
- Basic reflective interior
- 100 lb weight capacity
- Limited warranty (6-12 months)
Best for: First-time growers testing indoor cultivation
Mid-Range Tier ($150-$250)
What to expect:
- 1680D professional canvas
- High-reflectivity Mylar (95-98%)
- 120-150 lb weight capacity
- 1-2 year warranty
Best for: Committed hobbyists planning multiple grows
Premium Tier ($250-$400)
What to expect:
- 1680D-2000D ultra-thick canvas
- Diamond reflection technology
- 150-300 lb weight capacity
- Extended warranties (2+ years)
- Height extension options
Best for: Serious growers wanting long-term investment
Complete Systems ($400-$900)
What to expect:
- Everything listed above plus
- LED grow lights
- Ventilation systems
- Climate controllers
- All accessories included
Best for: Beginners wanting plug-and-play solutions
Common Mistakes to Avoid
1. Undersizing Your Inline Fan
Many beginners buy fans too small for their carbon filters. Always match or exceed your filter’s CFM rating, then add 25% for ducting resistance.
2. Ignoring Height Requirements
That 60-inch tent seems adequate until you realize you need 18 inches for lights, 12 inches for pots, leaving just 30 inches for plant growth. Always go taller than you think necessary.
3. Skimping on Ventilation
Poor air circulation leads to mold, pests, and weak plants. Don’t cut corners on fans—they’re your life support system.
4. Overlooking Light Leaks
Even small leaks stress photoperiod plants. Test in complete darkness and seal every gap.
5. Neglecting Regular Cleaning
Dirty tents breed pests and pathogens. Clean between grows using diluted hydrogen peroxide or bleach solution.
✨ Don’t Miss These Exclusive Deals!
🔍 Maximize your growing success with professionally tested equipment. Click on any highlighted product to explore current offers and detailed specifications. Create the perfect controlled environment your plants need to thrive!
Frequently Asked Questions
❓ How many plants can fit in a 2x4 grow tent?
❓ What size LED light do I need for a 2x4 grow tent?
❓ Can I use a 2x4 grow tent in my apartment?
❓ How much does it cost to run a 2x4 grow tent monthly?
❓ Do I need a carbon filter for my 2x4 grow tent?
Conclusion: Making Your Final Decision
Choosing your first 2×4 grow tent feels overwhelming with so many options, but here’s the bottom line: match the tent to your goals and budget.
If you’re just starting out and want to test indoor growing without major investment, the VIVOSUN S425 offers unbeatable value at $85-$120. It’s not perfect, but it’s more than adequate for learning the basics and growing quality plants.
For growers ready to invest in quality that lasts years, the Gorilla Grow Tent 2×4 justifies its $285-$320 price tag through superior durability, height adjustability, and commercial-grade construction. You’ll thank yourself three years from now when it’s still going strong.
Tech enthusiasts who love automation should seriously consider the AC Infinity Advance System at $679. Yes, it’s expensive, but you’re getting a complete ecosystem with smart controls that optimize your environment automatically. For busy professionals, the time saved and improved results often justify the investment.
Beginners overwhelmed by component selection will love the Spider Farmer Complete Kit at $399-$449. Everything arrives in one package, pre-matched for compatibility, letting you focus on growing rather than researching equipment.
Remember, your tent is just the foundation. Success comes from understanding your plants’ needs, maintaining proper environmental conditions, and continuously learning. Start with quality equipment that won’t frustrate you, and you’ll build confidence as you grow.
The indoor gardening community continues expanding, supported by improving technology and increasing knowledge sharing. Whether you’re growing herbs for cooking, vegetables for sustainability, or ornamental plants for enjoyment, a properly equipped 2×4 grow tent puts you in complete control of your garden’s destiny.
Recommended for You
- 7 Best Grow Tent 5 x 5 2025 – Expert Tested Reviews
- 7 Best 4×4 Grow Tents for Indoor Growing Success (2025)
- 7 Best Grow Tent Options for Indoor Gardening Success in 2025
Disclaimer: This article contains affiliate links. If you purchase products through these links, we may earn a small commission at no additional cost to you.
✨ Found this helpful? Share it with your friends! 💬🤗