In This Article
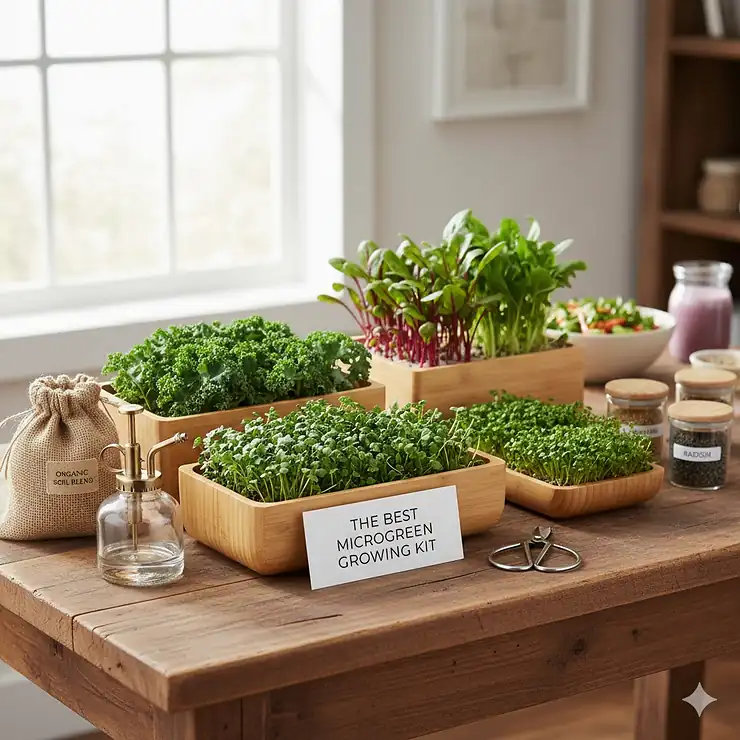
Picture this: You’re making a salad, and instead of reaching for wilted store-bought greens, you simply snip fresh, nutrient-dense microgreens from your countertop. Sounds amazing, right? The best microgreen growing kit transforms this dream into daily reality, and trust me, once you start growing these tiny nutritional powerhouses, there’s no going back.
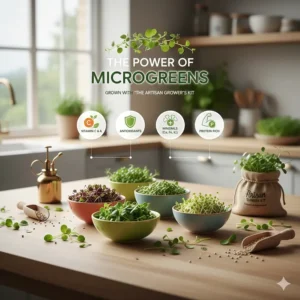
Microgreens pack a serious punch when it comes to nutrition. Research from the University of Maryland found these little greens contain 4 to 40 times more vitamins and nutrients than their mature counterparts. That’s not a typo—up to forty times more! Whether you’re concerned about getting enough vitamins C and E, or you want to boost your antioxidant intake, the right indoor microgreens setup delivers fresh superfood straight from your windowsill.
What makes microgreen growing kits so brilliant is their simplicity. You don’t need a green thumb, fancy equipment, or even outdoor space. Most home microgreens garden options fit perfectly on kitchen counters, require minimal maintenance, and produce harvests in just 7-10 days. For busy professionals, health-conscious families, or anyone living in an urban apartment, this is gardening at its most accessible and rewarding.
Quick Comparison: Top Microgreen Growing Kits at a Glance
| Product Name | Amazon ASIN | Price Range | Growth Time | Special Features | Best For |
|---|---|---|---|---|---|
| ZestiGreens Self-Watering Kit | B095Z7QR9T | $30-40 | 7-10 days | Dual hydro/soil, bamboo frame | Versatile growers |
| HAMAMA Ceramic Kit | B095T1FLZK | $55-70 | 7 days | Seed Quilt technology, ceramic tray | Complete beginners |
| ingarden Growing Kit | B094C3X2SS | $180-220 | 5-7 days | Automated LED, 4 colors | Tech lovers, low-light |
| Back to the Roots Ceramic | B0BPJV4YYR | $35-45 | 7 days | Stylish ceramic planter | Design-conscious |
| HAMAMA Plastic Tray Kit | B06WW8FG5Z | $40-50 | 7 days | Seed Quilts, BPA-free tray | Budget-minded beginners |
| Back to the Roots 6-Pack | B085PWHM5J | $25-35 | 7-10 days | Multiple varieties, organic | Variety seekers |
| Chef’n Microgreens Grower | B07DNPDGVG | $20-30 | 10-14 days | Budget-friendly, compact | First-time gardeners |
💬 Just one click – help others make better buying decisions too! 😊
Top 7 Microgreen Growing Kits: Expert Analysis
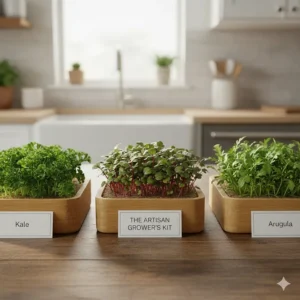
1. ZestiGreens Self-Watering Microgreens Growing Kit – Most Versatile Option
The ZestiGreens kit solves a common microgreens problem: some varieties prefer hydroponic growing while others thrive in soil. This clever design includes a removable hydroponic insert, letting you switch between methods depending on what you’re growing.
Key Specifications:
- 12″ x 6″ bamboo-framed tray
- Includes 2 hemp grow mats
- Blackout felt lid for germination
- Includes Red Garnet Amaranth + Superfood Mix seeds
- 16-page illustrated grow guide
This best microgreens growing kit shines with larger seed varieties like sunflower, pea, and cilantro that typically need soil. Simply remove the hydroponic insert, add organic potting mix, and you’re set. The bamboo surround adds visual appeal, and the self-watering base means you won’t accidentally drown or dry out your greens. The kit comes ready to grow with two seed packs and detailed instructions.
Price: $30-40 on Amazon
Customer Feedback: Users praise the flexibility this provides for experimenting with different microgreen varieties. The hemp mats are reusable and eco-friendly. Some note the tray size limits harvest quantity, but most find it perfect for weekly family consumption. US-based customer support gets excellent reviews.
✅ Pros:
- Dual capability (hydroponic or soil)
- Beautiful bamboo aesthetic
- Zero-risk satisfaction guarantee from US-based team
❌ Cons:
- Smaller growing surface than some competitors
- Hemp mats need replacement after several uses
2. HAMAMA Microgreens Growing Kit – Ceramic Tray – Best for Complete Beginners
If you’ve ever killed a houseplant (haven’t we all?), the HAMAMA microgreens kit is your redemption story. This innovative system uses patented Seed Quilt technology, which essentially means your seeds come pre-planted in a biodegradable mat—no measuring, no mess, no guesswork.
Key Specifications:
- Includes ceramic tray (stylish white finish)
- 3 Seed Quilt pads (Kale, Broccoli & Super Salad Mix)
- Self-watering design requires single fill
- BPA-free, food-safe materials
- Works in low-light conditions
The genius here lies in simplicity. You literally add water once, place the Seed Quilt in the tray, and walk away. No daily misting, no complicated schedules. The kit works even in low light conditions, making it perfect for apartments without sunny windowsills. Customers consistently praise how the picture-based instructions make growing foolproof—one reviewer mentioned their 6-year-old successfully managed the entire process.
Price: $55-70 on Amazon
Customer Feedback: Users love the guaranteed-to-grow promise (HAMAMA offers replacements or refunds if seeds fail). The ceramic tray receives particular praise for looking beautiful on countertops. Some note the Seed Quilts cost more than buying bulk seeds, but most agree the convenience justifies the premium for their microgreens starter package needs.
✅ Pros:
- Truly beginner-friendly with 30-second setup
- Works in low-light conditions
- Stylish ceramic tray doubles as home décor
❌ Cons:
- Seed Quilt refills more expensive than traditional seeds
- Limited to HAMAMA’s seed varieties
3. ingarden Microgreens Growing Kit – Best Premium Smart Garden
The ingarden represents the Tesla of top microgreen growing kits—sleek, sophisticated, and packed with technology. This isn’t just a tray; it’s a complete automated growing system with a 15-watt LED grow light that cycles through four growth stages automatically.
Key Specifications:
- Dimensions: 7.88″ x 15.25″ x 5.9″
- Available in 4 ceramic colors (Black, Rose, Beige, Mint)
- Patent-pending hydroponic watering system
- Automated LED with 4-stage growth programming
- Includes 3 pre-seeded organic pads
- 7-day germination guarantee
The ingarden grows microgreens 4 times faster than soil-based methods while using 90% less water. The stainless steel frame and ceramic bowl create a plastic-free system that looks gorgeous on any countertop—it’s won prestigious Red Dot and iF Design Awards. Each kit includes 3 pre-seeded organic pads (typically kale, arugula, and broccoli), and the system is so efficient that you’ll harvest fresh greens every 5-7 days.
Price: $180-220 on Amazon
Customer Feedback: Buyers rave about the aesthetic appeal and consistent results. A few mention the initial investment seems steep, but the quality construction makes it worthwhile. The automated light eliminates guesswork completely, which busy professionals especially appreciate. The carbon-neutral certification appeals to eco-conscious buyers.
✅ Pros:
- Award-winning design looks stunning
- Fully automated LED lighting system
- Carbon-neutral certified, eco-friendly
- Partnership donates meals to children in need
❌ Cons:
- Higher upfront cost than basic kits
- Requires access to electrical outlet
- Seed pad refills are proprietary
4. Back to the Roots Organic Microgreens Grow Kit with Ceramic Planter – Best Stylish Design
Back to the Roots turned microgreen growing into home décor with their elegant ceramic planter. This Oakland-based company started as an urban mushroom farm and has perfected making gardening accessible and attractive for city dwellers.
Key Specifications:
- White ceramic planter included
- USDA Certified Organic and Non-GMO seeds
- Mighty Mix seeds (Broccoli, Kale, Kohlrabi, Cabbage)
- Expandable soil disc and germination lid
- 100% Guaranteed to Grow
The ceramic planter elevates this from “gardening project” to “kitchen centerpiece.” The kit includes everything for your first grow, with varieties carefully selected for complementary flavors and nutrition. The expandable soil disc is particularly clever—it’s compact for storage but expands when watered. Back to the Roots also offers complimentary Green-Thumb Text Support, so you can get expert advice if questions arise.
Price: $35-45 on Amazon
Customer Feedback: Reviewers consistently mention how beautiful the ceramic planter looks on their counters. The organic certification appeals to health-conscious buyers. The main critique is that refill kits must be purchased separately, though the company makes seeds readily available on Amazon.
✅ Pros:
- Gorgeous ceramic planter design
- 100% organic and non-GMO certified
- Made in USA (Utah)
- Free Green-Thumb text support
❌ Cons:
- Ceramic adds weight (not ideal for windowsills)
- Single variety per purchase
5. HAMAMA Microgreens Growing Kit – Plastic Tray – Best Budget Seed Quilt Option
For those who love the HAMAMA Seed Quilt system but want a more affordable entry point, this plastic tray version delivers the same foolproof growing experience at a lower price.
Key Specifications:
- BPA-free plastic grow tray (lightweight)
- 2 Seed Quilt pads (Broccoli & Super Salad Mix)
- Patented Seed Quilt technology
- Self-watering design
- Growth guarantee included
This kit features the same game-changing Seed Quilt technology as the ceramic version—pre-seeded, pre-measured growing mats that make microgreen cultivation genuinely foolproof. The plastic tray is lightweight and durable, perfect for those who want portability or plan to have multiple trays in rotation.
Price: $40-50 on Amazon
Customer Feedback: Users appreciate getting the HAMAMA system at a more accessible price point. The lightweight tray makes it easy to move for optimal light placement. Many buyers use this as their first kit, then expand with additional trays. The plastic is high-quality food-grade material that lasts through many growing cycles.
✅ Pros:
- More affordable than ceramic version
- Lightweight and portable
- Same foolproof Seed Quilt technology
- Perfect for testing the system
❌ Cons:
- Plastic less aesthetically pleasing than ceramic
- Fewer Seed Quilt pads included (2 vs 3)
6. Back to the Roots DIY Microgreen Grow Kit – 6-Grow Variety Pack – Best for Variety Seekers
This comprehensive kit from Back to the Roots gives you six complete grows with multiple seed varieties, making it perfect for those who want to experiment with different flavors and find their favorites.
Key Specifications:
- 6 multi-variety seed packets (Broccoli, Kale, Purple Kohlrabi, Sango Radish, Red Cabbage)
- 6 compostable grow trays
- 6 expanding soil discs
- 6 germination lids
- USDA Certified Organic and Non-GMO
- Made in USA
The trend today has gone in a good direction – a focus on the healthy, natural and organic lifestyle. This kit provides everything you need for six separate growing cycles, allowing you to try different varieties and discover which microgreens your family loves most. Each seed packet contains a thoughtfully selected variety that’s easy to grow and packed with nutrition.
Price: $25-35 on Amazon
Customer Feedback: Buyers love the value proposition—six complete grows for the price many kits charge for one. The variety selection gets consistent praise for offering diverse flavors and colors. Some users save the compostable trays for multiple uses. The only common complaint is wishing it came with more refills, but those are readily available on Amazon.
✅ Pros:
- Excellent value (6 complete grows)
- Wide variety of seed types
- 100% Guaranteed to Grow
- Compostable, zero-waste materials
❌ Cons:
- No permanent tray included
- Compostable trays designed for single use
7. Chef’n Microgreens Grower – Best Budget-Friendly Pick
Sometimes simple is best, and the Chef’n proves that growing microgreens doesn’t require a huge investment. This straightforward white tray comes with everything needed for your first harvest at a price that won’t make your wallet weep.
Key Specifications:
- Dimensions: 6.25″ x 14.25″
- Includes stylish white tray and clear germination lid
- Seattle Seed Company starter pack (seeds + soil)
- Fits standard windowsills and countertops
- Discount code for seed reorders
The Chef’n embodies the “low-tech but effective” philosophy perfectly. You add soil to the tray, sprinkle seeds, water, cover, and wait. After 3 days, remove the lid and place in light. That’s it. While it lacks the bells and whistles of premium kits, the Chef’n delivers reliable results for about the cost of two takeout salads.
Price: $20-30 on Amazon
Customer Feedback: Users love this as an entry point into microgreen growing without major commitment. The tray cleans easily and works season after season. The clean white design fits any kitchen aesthetic. Note: Some recent reviewers mention receiving just the tray without seeds/soil, so verify contents before purchasing.
✅ Pros:
- Very affordable entry price point
- Clean, minimalist design
- Easy to clean and reuse indefinitely
- Discount code for Seattle Seed reorders
❌ Cons:
- Manual process (no self-watering)
- Some units may not include seeds/soil (check listing)
- Basic functionality only
How to Choose Your Perfect Microgreen Growing Kit
Selecting the best microgreen kit isn’t one-size-fits-all. Your ideal choice depends on several key factors that align with your lifestyle, space, and growing goals.
Consider Your Available Space
Measure before you buy! If you’re working with a narrow windowsill, the Chef’n or ZestiGreens kits offer compact footprints. Got generous counter space? The ingarden or HAMAMA systems provide larger growing areas for bigger harvests. Think vertically too—some growers stack multiple small trays to maximize production in tight quarters.
Match Your Experience Level
Complete novices should gravitate toward foolproof systems like HAMAMA that remove guesswork. These kits include everything pre-measured and often feature self-watering designs. If you’ve grown herbs before, mid-range options like ZestiGreens or Back to the Roots offer more control while still providing guidance.
Evaluate Light Conditions
This is crucial and often overlooked. Do you have a bright south-facing window? Simple kits without lights work perfectly. Living in a basement apartment or darker northern exposure? Invest in the ingarden with its automated LED system. Trying to decide? Remember that inadequate light produces leggy, pale microgreens with less flavor and nutrients.
Budget Realistically for Long-Term Use
Look beyond initial costs to ongoing expenses. The Chef’n kit starts cheap but requires separate seed and soil purchases. HAMAMA costs more upfront but includes multiple grows. Calculate cost-per-harvest rather than just sticker price. For daily microgreen consumers, premium systems with better yields often cost less over a year of use.
Think About Your Growing Goals
Are you growing for garnish or main salads? Single person or family of four? Prefer variety or consistency? These questions guide size and system choices. The home microgreens garden should match your consumption patterns—there’s no point growing massive harvests if they’ll wilt unused, nor purchasing tiny kits if you eat microgreens daily.
Essential Growing Tips for Maximum Success
Perfecting the Germination Phase
The first 2-4 days are critical for your microgreens starter package success. Keep seeds in darkness using a blackout dome or inverted tray. This simulates underground conditions and promotes strong root development. According to Penn State research, maintaining consistent moisture during germination significantly impacts final nutrient content.
Mist seeds 1-2 times daily, ensuring they’re damp but not waterlogged. Overwatering is the number one killer of microgreens. The soil or growing medium should feel like a wrung-out sponge—moist but not dripping.
Transitioning to Light
Once you see the first tiny green shoots peeking through (usually day 3-4), it’s time for light. Remove the blackout cover and position your tray where it receives bright, indirect sunlight for 4-6 hours daily. If using grow lights, maintain them 6-8 inches above the plants on a 12-hour cycle.
The greens will stretch toward the light, developing that vibrant color that signals nutrient development. Pale or yellow microgreens indicate insufficient light, while crispy, brown edges suggest too much direct sun or heat.
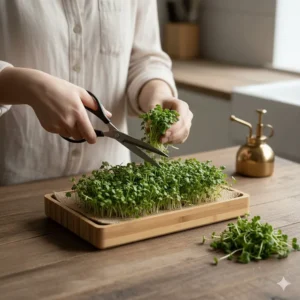
Harvesting at Peak Nutrition
Harvest when the first true leaves appear, typically 7-14 days depending on variety. Use clean, sharp scissors and cut just above the soil line. According to research published in the Journal of Agricultural and Food Chemistry, microgreens reach peak nutrient density right when the first true leaves fully open.
Harvest in the morning after watering for the crispest, most flavorful greens. Don’t leave them growing too long—nutrients actually decrease as plants mature. The sweet spot is that brief window when they’re fully green but still tender.
Preventing Common Problems
Mold: Usually caused by poor air circulation or overwatering. Space seeds properly and ensure good airflow around your indoor microgreens setup.
Leggy stems: Insufficient light. Move closer to windows or upgrade to grow lights.
Slow germination: Temperature too low. Most microgreens prefer 65-75°F.
Yellowing: Light or nutrient deficiency. Ensure adequate light exposure and use quality growing medium.
Understanding Microgreens Nutrition and Health Benefits
The Science Behind the Superfood
When researchers at the University of Maryland analyzed microgreens, they were shocked. These tiny plants contained up to 40 times more vitamins C and E than their mature counterparts. Dr. Qin Wang, the lead researcher, admitted they triple-checked the results because the numbers seemed too good to be true.
Here’s why microgreens are so nutrient-dense: during the early growth phase, plants mobilize stored nutrients from seeds to fuel rapid development. This creates an incredible concentration of vitamins, minerals, and phytonutrients in those tender leaves. Studies published in PMC show microgreens are particularly rich in vitamins C, E, K, beta-carotene, lutein, polyphenols, and essential minerals.
Specific Variety Benefits
Different microgreen varieties offer unique nutritional profiles. Broccoli microgreens excel in sulforaphane, a compound linked to cancer prevention. Radish varieties deliver glucosinolates that support detoxification. Red cabbage microgreens are anthocyanin powerhouses, while kale microgreens offer exceptional vitamin K for bone health.
Practical Health Applications
The National Institutes of Health research suggests microgreens may help manage chronic conditions including cardiovascular disease, diabetes, and inflammation. While they’re not miracle cures, incorporating microgreens into daily meals significantly boosts nutrient intake without requiring huge portions of vegetables.
For people who struggle to meet daily vegetable recommendations, microgreens offer a practical solution. A small handful provides nutritional punch equivalent to much larger servings of mature greens.
Maximizing Your Microgreens Investment
Creating a Continuous Harvest System
Smart growers stagger plantings every 3-4 days to ensure constant supply. With 2-3 trays in rotation, you’ll never run out of fresh greens. This works brilliantly with any of the top microgreen growing kits—just purchase additional trays.
Cost Comparison: Growing vs. Buying
Store-bought microgreens cost $4-8 for a 2-ounce container. A home microgreens garden produces 4-6 ounces per tray at about $2-3 cost (seeds and growing medium). That’s roughly 75% savings plus guaranteed freshness. Most growers report their kit pays for itself within 2-3 months.
Expanding Your Variety Collection
Once you’ve mastered basics with your microgreens starter package, experiment! Mustard greens add spicy kick, while amaranth brings beautiful magenta color. Peas offer sweet, crunchy texture, and basil microgreens deliver intense flavor perfect for Italian dishes.
✨ Don’t Miss These Exclusive Deals!
🔍 Take your nutrition to the next level with these carefully selected products. Click on any highlighted Amazon ASIN to check current pricing and availability. These kits will help you create authentic superfood harvests your family will love!
Growing Microgreens: Step-by-Step Success Guide
1. Prepare Your Growing Medium
For soil-based kits, moisten the growing medium before adding seeds. It should be evenly damp throughout, not soggy. For hydroponic systems, fill the base reservoir to the indicated line with clean, room-temperature water.
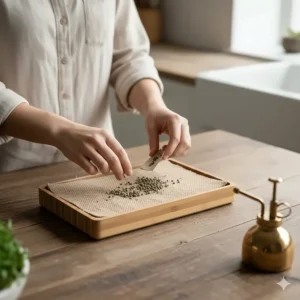
2. Distribute Seeds Evenly
Sprinkle seeds across the surface in a single, dense layer. They should nearly touch but not pile up. This maximizes yield while preventing mold from overcrowding. Different varieties require different density—follow your kit’s specific recommendations.
3. Cover and Wait
Place the blackout dome or cover over seeds. Set in a room temperature location (65-75°F is ideal). Check daily to ensure moisture remains consistent. You should see sprouting within 2-4 days for most varieties.
4. Introduce Light
Once sprouts are 1-2 inches tall with visible green, remove the cover and move to light. Whether using natural sunlight or grow lights, consistency matters more than intensity. Avoid direct hot sun that can scorch tender shoots.
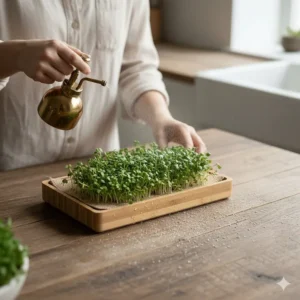
5. Maintain Proper Moisture
Water from the bottom (self-watering trays handle this automatically) or mist gently from above once daily. Microgreens need consistent moisture but hate wet feet. Many growers water in the morning, allowing any excess to evaporate during the day.
6. Harvest and Enjoy
When the first true leaves appear (different from the initial cotyledon leaves), harvest with clean scissors. Cut just above the soil line. Rinse gently, pat dry, and use immediately for maximum nutrition and flavor.
7. Clean and Repeat
After harvest, compost spent soil or growing medium, clean trays thoroughly, and start fresh. Most reusable kits last years with proper care, providing endless harvests for the cost of seeds and growing medium.
Troubleshooting Your Indoor Microgreens Setup
Problem: Seeds Won’t Germinate
Solution: Check seed age (use within 1-2 years), verify temperature (most need 65-75°F), and ensure consistent moisture. Old or heat-damaged seeds lose viability.
Problem: Mold or Fungus Growth
Solution: Improve air circulation with a small fan, reduce watering frequency, and ensure seeds aren’t overcrowded. Hydrogen peroxide spray (3% solution) can treat minor mold outbreaks.
Problem: Weak, Pale Stems
Solution: Insufficient light is almost always the culprit. Move closer to windows, extend grow light duration, or invest in stronger bulbs. Some varieties naturally have lighter stems (like sunflower), so know your variety’s characteristics.
Problem: Bitter or Unpleasant Taste
Solution: Often indicates harvest timing was off (too late) or temperature stress. Microgreens grown above 75°F can develop bitter compounds. Harvest earlier and maintain optimal growing temps.
Problem: Uneven Growth
Solution: Usually caused by uneven watering or lighting. Rotate trays daily and ensure water reaches all areas. Level your growing surface to prevent pooling in corners.
❓ Frequently Asked Questions About Microgreen Growing Kits
❓ What is the easiest microgreen growing kit for complete beginners?
❓ How long do microgreens take to grow in a home kit?
❓ Can you reuse microgreen growing trays multiple times?
❓ Do microgreen kits need sunlight or can they use artificial lights?
❓ Are microgreens really more nutritious than regular vegetables?
Wrapping Up Your Microgreen Growing Journey
Choosing the best microgreen growing kit really comes down to matching your lifestyle, space, and commitment level. If you want absolutely foolproof growing, the HAMAMA kits (both ceramic and plastic versions) deliver with innovative Seed Quilt technology available on Amazon. For tech lovers who appreciate beautiful design, the ingarden brings automation and aesthetics together perfectly. Budget-conscious beginners will find the Chef’n Microgreens Grower offers excellent value, while the ZestiGreens provides unmatched versatility for experimenting with different growing methods.
The beauty of top microgreen growing kits is how they transform nutrition from obligation to enjoyment. Instead of guilting yourself about eating more vegetables, you’ll actually look forward to snipping fresh, flavorful greens from your own countertop. Within weeks, microgreens become a natural part of your routine—sprinkled on morning eggs, layered in sandwiches, tossed into smoothies, or simply munched as surprisingly delicious snacks.
Starting your indoor microgreens setup requires minimal investment but delivers remarkable returns. You’ll save money compared to buying packaged microgreens, reduce food waste from wilted store produce, and gain satisfaction from growing your own superfood. Most growers report that once they start, they can’t imagine their kitchen without fresh microgreens ready for harvest.
Whether you’re motivated by health, sustainability, or the simple joy of watching seeds transform into vibrant greens, there’s a perfect microgreens starter package waiting for you on Amazon. Start small if you’re uncertain—even the basic Chef’n kit produces genuine results. As you gain confidence, expand your collection, try new varieties, and discover the incredible world of these tiny nutritional powerhouses.
The question isn’t really whether to start growing microgreens—it’s which kit matches your situation best. Review the options above with their Amazon ASINs, consider your space and goals, and take that first step. Within 7-10 days, you’ll harvest your first crop and wonder why you waited so long to start your home microgreens garden.
Recommended for You
- 7 Best Shiitake Mushroom Growing Kits 2025 (Expert Tested)
- 7 Best Oyster Mushroom Growing Kits That Actually Work 2025
- 7 Best Lion’s Mane Mushroom Grow Kit 2025 (Expert Tested)
Disclaimer: This article contains affiliate links. If you purchase products through these links, we may earn a small commission at no additional cost to you.
✨ Found this helpful? Share it with your friends! 💬🤗