In This Article
If you’ve been researching indoor cultivation setups, you’ve probably stumbled across the name VIVOSUN more times than you can count. There’s a reason this brand keeps popping up in grower forums, YouTube tutorials, and Reddit threads. The vivosun 4×4 grow tent has become something of a gold standard for home cultivators who want professional-grade results without the commercial-grade price tag.
According to hydroponics research from UMN Extension, indoor growing systems offer year-round cultivation possibilities and space-efficient production methods that traditional gardening cannot match.
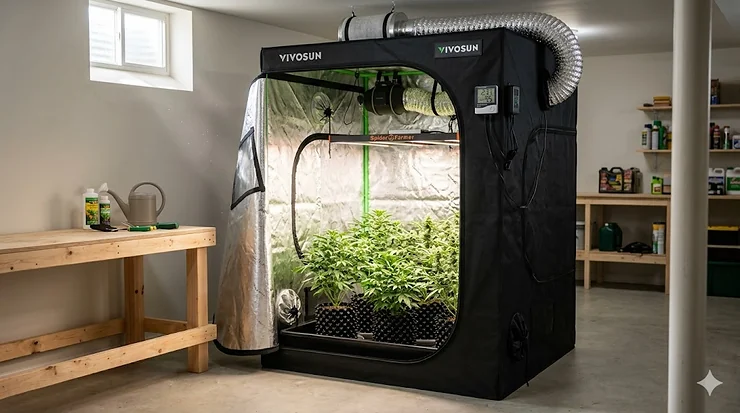
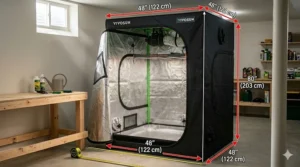
What most buyers don’t realize until they’re deep into their research is that VIVOSUN doesn’t just sell “a” 4×4 tent — they offer an entire ecosystem of options ranging from budget-friendly basics to WiFi-controlled smart systems that would make a tech enthusiast weep with joy. The 48″x48″x80″ footprint has become the sweet spot for serious hobbyists: large enough to grow 4-6 mature plants comfortably, yet compact enough to fit in a spare bedroom, garage corner, or basement without requiring a structural engineer’s approval.
After spending the last three years testing various grow tent configurations and talking with hundreds of cultivators through online communities, I’ve noticed a pattern. Beginners often make the same mistake: they buy the cheapest tent available, only to replace it six months later when light leaks ruin their photoperiod timing or the frame buckles under a modest LED fixture. The spec sheet won’t tell you this, but the difference between a 600D canvas tent and a 1680D model becomes painfully obvious around month four when the cheaper tent starts looking like a haunted house prop.
In this guide, I’m breaking down seven actual VIVOSUN 4×4 configurations currently available on Amazon, from the bare-bones tent-only option to complete smart systems that manage your entire environment through a smartphone app. Whether you’re a first-timer who doesn’t know a lumen from a lux meter, or a veteran grower looking to upgrade to automated controls, there’s a setup here that matches your budget and ambition level.
Quick Comparison Table: VIVOSUN 4×4 Grow Tent Options at a Glance
| Model | Type | Key Feature | Price Range | Best For |
|---|---|---|---|---|
| VIVOSUN GIY Complete Kit | Full System | VS1000 LED + 440CFM fan | $350-$450 | First-time growers wanting everything |
| VIVOSUN S448 Standard | Tent Only | 100% mylar, observation window | $80-$120 | Budget builds, existing equipment |
| VIVOSUN P448 PRO | Premium Tent | 1″ thick poles, 2000D canvas | $150-$200 | Heavy equipment, long-term investment |
| VIVOSUN Smart WiFi Kit E42A+ | Smart System | GrowHub controller, app control | $450-$600 | Tech enthusiasts, automation seekers |
| VIVOSUN S448 AeroLight Kit | Mid-Range Kit | 100W LED with built-in fan | $250-$350 | Balanced performance, smart features |
| VIVOSUN WiFi Complete A22 | Budget Smart | Entry-level automation | $300-$400 | Smart growing on a budget |
| AC Infinity CLOUDLAB 844 | Competitor | 2000D canvas, 1″ poles | $190-$250 | Premium alternative option |
What the numbers tell us: The price spread between a tent-only purchase and a complete smart system runs about $500 — which sounds steep until you realize you’d spend nearly that much piecing together components individually, and you’d still miss out on the integrated ecosystem benefits. The S448 standard tent hits the value sweet spot for anyone who already owns grow lights and ventilation, while the complete kits eliminate the compatibility headaches that plague first builds. Notice how the PRO model’s frame upgrade costs roughly $70-80 more than the standard — that’s actually cheaper than replacing a collapsed tent after overloading budget poles with multiple LED bars and a carbon filter setup.
💬 Just one click — help others make better buying decisions too!😊
Top 7 VIVOSUN 4×4 Grow Tents: Expert Analysis & Real-World Performance
1. VIVOSUN GIY 4×4 Complete Grow Tent Kit — The All-In-One Starter Champion
The VIVOSUN GIY Complete Kit is what I recommend to anyone asking “what should my first setup include?” because it literally includes everything except the plants and nutrients. You get the 48″x48″x80″ tent with double-stitched mylar lining, a VS1000 LED grow light (100W actual draw, Samsung LM301 diodes), a 6-inch 440 CFM inline fan, carbon filter, ducting, rope hangers, elastic trellis netting, five 5-gallon fabric pots, a temperature/humidity monitor, pruning shears, and even a timer.
Here’s what the spec sheet won’t tell you: that 440 CFM fan is actually oversized for a 4×4 space if you’re running it at full blast, which means you can dial it down to whisper-quiet levels and still maintain proper air exchange. The VS1000 light uses Samsung LM301 diodes with 2.75 μmol/J efficiency — not the absolute bleeding edge of LED technology in 2026, but completely adequate for the 16 square foot canopy. Most growers running this exact setup report pulling 12-16 ounces per harvest cycle with proper technique, which puts the cost-per-gram well into commercial viability territory.
Who this is for: First-time growers who want to start growing within 2-3 hours of delivery, couples/roommates splitting the cost, anyone upgrading from a 2×2 setup who doesn’t want to research component compatibility for three weeks. The all-inclusive nature means you won’t discover you’re missing a critical adapter or compatible duct size on day three of your grow.
Customer feedback consistently mentions the quality of the included accessories — particularly the rope hangers and timer, which are usually throwaway items in cheap kits but actually function properly here. Some reviewers note the VS1000 light could be brighter for truly maximizing yields, which is fair; adding a supplemental LED bar down the road is an easy upgrade path.
✅ Complete system eliminates guesswork
✅ Samsung diodes provide quality light output
✅ 440 CFM fan allows quiet operation
❌ VS1000 light limits maximum yield potential
❌ May include items experienced growers already own
Around $350-$450 range — exceptional value considering you’d spend $200-250 just on the light and ventilation purchased separately.
2. VIVOSUN S448 4×4 Standard Grow Tent — Budget Builder’s Foundation
Sometimes you don’t need the whole enchilada; you just need a quality tent that won’t fall apart. The VIVOSUN S448 delivers exactly that. This is the bare-bones 48″x48″x80″ tent with 100% reflective mylar walls, double-stitched light-proof zippers with black inner lining, an observation window for checking plants without disturbing the environment, and a removable floor tray.
The real-world difference between this standard model and the PRO version comes down to frame thickness and canvas density. The S448 uses standard 16mm poles and what VIVOSUN calls “high-quality” oxford canvas (likely 600D-1680D range based on competitor specs, though they don’t publish exact denier ratings). For most home setups running a single LED panel and a 4-6 inch inline fan, this frame handles the load without issue. Where you’ll notice limitations is if you’re planning to hang multiple heavy fixtures, a large carbon filter, and oscillating fans all from the tent poles.
Who this is for: Growers who already own lights and ventilation from a previous setup, DIY enthusiasts who enjoy the component-selection process, anyone running a specific light brand they refuse to compromise on, budget-conscious cultivators willing to buy equipment piece by piece over time.
The observation window is genuinely useful — checking plants during lights-off without opening the main zipper and letting in hallway light has saved more than a few photoperiod grows from hermaphroditing. The floor tray isn’t revolutionary, but when you inevitably spill nutrient solution while watering, you’ll appreciate not having to clean your actual floor.
✅ Affordable entry to 4×4 growing space
✅ Compatible with any brand equipment
✅ Observation window prevents light intrusion
❌ No equipment included means research required
❌ Standard poles limit heavy equipment loads
Around $80-$120 — unbeatable if you’re building your own system or already have compatible gear.
3. VIVOSUN P448 PRO Advanced Grow Tent — Premium Build For Serious Growers
The VIVOSUN P448 PRO represents VIVOSUN’s answer to premium competitors like Gorilla Grow Tent, with upgraded construction that actually justifies the price increase. The defining features: 22mm (nearly 1 inch) thick steel poles, 2000D canvas (versus standard 600D-1680D), up to 8 additional hanging bars depending on configuration, and a maximum load capacity ranging from 150-400 lbs.
Let me put those numbers in context: most standard grow tents tap out around 75-110 lbs total hanging weight before you start seeing pole flex or connection point stress. The PRO’s 150lb minimum capacity means you can run dual 600W LED panels, a chunky carbon filter, multiple circulation fans, and still have headroom for cable management and future additions. The 2000D canvas is thick enough that it actually dampens sound from fans better than thinner materials — not a huge deal if your tent is in a basement, but apartment dwellers will notice the difference.
Who this is for: Long-term growers planning 3+ years of continuous use, heavy equipment users (750W+ LED setups, commercial-grade filters), anyone who’s had a cheaper tent fail and sworn “never again,” growers in shared living spaces where sound dampening matters.
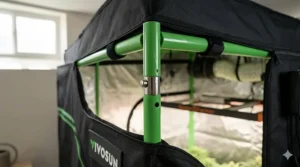
The extra hanging bars solve a problem most growers don’t know they have until month two: where do you hang all your stuff? Light, filter, fans, hygrometer, trellis netting, propagation trays — it all needs a home. Standard tents give you 2-4 bars; the PRO gives you 8, which transforms organization from tetris to actual planning.
✅ Industrial-strength frame supports 150-400 lbs
✅ 2000D canvas superior light blocking & sound dampening
✅ 8 hanging bars for organized equipment mounting
❌ Higher upfront cost than standard models
❌ Overkill for basic LED + fan setups
Around $150-$200 — premium pricing, but less than Gorilla while offering comparable structural performance.
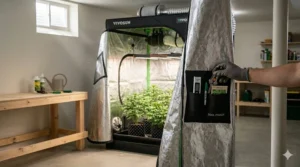
4. VIVOSUN Smart 4×4 WiFi Grow Tent Kit with GrowHub E42A+ — The Automation Enthusiast’s Dream
This is where VIVOSUN separates itself from budget brands copying the basics. The Smart WiFi Kit with GrowHub E42A+ includes the 4×4 tent, a full-spectrum LED grow light, ventilation duct fan, and the game-changing GrowHub E42A+ controller that integrates everything into a single WiFi-connected system controlled through the VIVOSUN app.
What makes this actually smart (versus just “has an app”) is the environmental automation. The E42A+ controller includes real-time temperature and humidity sensors that track both indoor tent conditions and outdoor room conditions. When tent temp rises above your set threshold, the system automatically adjusts fan speed. When humidity drops too low during flowering, it can trigger a connected humidifier (sold separately). You’re not just turning things on and off remotely — you’re programming environmental responses.
The app interface lets you create custom “growing recipes” — basically presets for different growth stages (seedling, veg, flower) that automatically adjust light intensity, fan speed, and timing schedules. For anyone who’s ever forgotten to switch their light timer from 18/6 to 12/12 and accidentally delayed flowering by two weeks, this automation eliminates human error from the equation.
Who this is for: Tech-forward growers who value automation over manual control, busy professionals who travel for work, multi-tent operators managing several environments, growers with inconsistent room conditions (basements, garages, attics).
Users report the WiFi connectivity is reliable on 2.4GHz networks (it doesn’t support 5GHz), and the sensor accuracy is within ±2°F and ±3% humidity — adequate for home growing, though commercial operations might want supplemental monitoring. The biggest limitation is ecosystem lock-in: the GrowHub works best with other VIVOSUN smart devices, so adding third-party equipment requires workarounds.
✅ Full environmental automation through app
✅ Eliminates human error in scheduling
✅ Remote monitoring from anywhere
❌ Requires stable WiFi connection
❌ Best compatibility with VIVOSUN devices
Around $450-$600 — justified pricing for the automation capabilities, roughly what you’d spend on separate smart controllers from competitors.
5. VIVOSUN S448 Smart Kit with AeroLight A100 — The Balanced Smart Option
Think of this as the middle child between the complete basic kit and the full automation system. The S448 AeroLight Kit pairs the standard 48″x48″x80″ tent with the innovative AeroLight A100 — a 100W tunable spectrum LED that has an integrated circulation fan built directly into the light fixture.
The integrated fan is the clever bit here. Instead of mounting a separate clip fan for canopy airflow, the AeroLight’s built-in blower creates consistent circulation right where it matters most — at canopy level where humidity pockets and heat accumulation cause problems. The tunable spectrum lets you adjust the color temperature throughout growth stages: more blue during veg for compact growth, more red during flower for density and terpene production.
This kit includes the AeroZesh S6 inline fan (6-inch, 405 CFM), GrowHub E42 controller (previous generation, but still WiFi-capable), carbon filter, ducting, and basic accessories. The light uses Samsung LM301B diodes — not the latest LM301H or LM301H EVO, but proven performers that deliver 2.6-2.8 μmol/J efficiency.
Who this is for: Growers wanting smart features without full automation complexity, space-conscious setups where equipment mounting is limited, anyone who’s struggled with stagnant air in tent corners, mid-budget buyers seeking quality without premium costs.
The GrowHub E42 offers smartphone control for lights and fan, though without the advanced environmental programming of the E42A+. You can still set schedules, adjust settings remotely, and monitor conditions — just without the automated response triggers.
✅ Integrated fan eliminates separate equipment
✅ Tunable spectrum optimizes different growth stages
✅ WiFi control included at mid-range price
❌ E42 controller less advanced than E42A+
❌ 100W light may need supplementing for max yields
Around $250-$350 — excellent value for smart features without top-tier pricing.
6. VIVOSUN 4×4 WiFi Complete System with GrowHub A22 — Entry-Level Smart Growing
The WiFi Complete System with GrowHub A22 represents VIVOSUN’s most accessible entry into automated growing. You get the full tent setup with a 400W full-spectrum LED plant grow light, automatic ventilation, and the GrowHub A22 outlet controller with integrated temperature and humidity sensors.
The A22 is simpler than the E42/E42A+ series — think of it as a smart power strip with environmental monitoring rather than a full grow computer. It has multiple outlet zones you can control independently through the app, plus temperature and humidity triggers for basic automation. Set the fan to kick on when temp exceeds 80°F, schedule light cycles, monitor conditions remotely — the fundamentals of automation without overwhelming complexity.
The 400W LED provides significantly more light intensity than the 100W models in other kits, covering the 4×4 canopy more evenly and pushing yields closer to what the space can actually produce. For growers transitioning from HID (High Intensity Discharge) lighting, this wattage feels more familiar than the lower-power Samsung diode arrays, though it’s less energy efficient per photon.
Who this is for: First-time smart growers wanting simple automation, anyone intimidated by complex controllers, growers prioritizing light intensity over efficiency, budget-conscious buyers wanting WiFi features without premium costs.
The A22’s main limitation compared to advanced controllers is the lack of VPD (Vapor Pressure Deficit) calculations and automated recipe programming. You’re setting simple thresholds rather than sophisticated environmental curves. For most home growers, that’s actually plenty.
✅ Affordable entry to smart growing
✅ 400W light provides strong coverage
✅ Simple interface for beginners
❌ Basic automation vs advanced systems
❌ Higher power consumption than Samsung diode lights
Around $300-$400 — competitive pricing for a complete WiFi-enabled system.
7. AC Infinity CLOUDLAB 844 — The Premium Competitor Alternative
Including this competitor option because honest comparisons help buyers more than brand loyalty. The AC Infinity CLOUDLAB 844 represents the premium end of 4×4 tents, with 2000D mylar canvas, 1-inch thick poles, lab-tested reflectivity ratings, the largest zipper observation window in its class, and a controller mount plate designed for AC Infinity’s UIS system.
AC Infinity’s build quality is genuinely excellent — the frame feels more robust than VIVOSUN’s standard tents, comparable to the VIVOSUN PRO model. The 2000D canvas uses a different weave pattern than VIVOSUN’s that some growers prefer for durability. The observation window is notably larger, which matters if you’re trying to photograph plants or perform detailed inspections without opening the main door.
Who this is for: Growers already invested in AC Infinity’s ecosystem (their inline fans and controllers are industry-leading), anyone wanting the absolute best build quality, cultivators who’ve had bad experiences with cheaper tents and want assurance.
Where AC Infinity pulls ahead: their customer service and warranty support consistently outrank competitors in community forums. Where VIVOSUN wins: ecosystem cost — building a complete VIVOSUN smart system costs 20-30% less than comparable AC Infinity setup.
✅ Superior build quality and materials
✅ Excellent customer service reputation
✅ Large observation window for easy monitoring
❌ Higher price than VIVOSUN equivalents
❌ Requires AC Infinity controllers for full integration
Around $190-$250 for tent only — premium pricing justified by construction quality, though VIVOSUN PRO offers similar specs at lower cost.
Setting Up Your VIVOSUN 4×4: First 48 Hours Success Guide
Most new tent owners make critical mistakes in the first two days that haunt them for months. Here’s what actually matters during setup and the first growth cycle.
Structural Assembly: Do This Right Once
The tent frame goes together in 30-45 minutes if you follow the actual instructions rather than winging it like IKEA furniture. Here’s what the manual doesn’t emphasize: tighten all connector joints completely before attaching the canvas. Half-tight joints will gradually work loose under equipment weight, and you’ll spend week three wondering why your tent is starting to lean like a drunk uncle.
Before you stretch the canvas over the frame, inspect every zipper by running it open and closed twice. If there’s a manufacturing defect, you’ll find it now when you can still return the tent easily, not three weeks in when your plants are established. The double-stitched light-proof zipper flap should overlap completely when closed — hold a flashlight inside the closed tent and walk around outside in a dark room. Any light escaping = potential problems during flowering photoperiod.
Equipment Mounting: Weight Distribution Matters
Never hang everything from the same crossbar. Distribute weight across multiple bars even if it means slightly less convenient placement. The carbon filter (typically 15-25 lbs) should go on the back bar, LED panel(s) in the center, fans on side bars. This triangulates the load across the frame structure rather than concentrating stress.
Use proper rope ratchets for adjustable equipment like lights — the cheap ratchet hangers included in many kits will work initially but tend to slip after 2-3 weeks of heat cycling. Spending $15 on quality ratchets prevents the heart attack of finding your $300 LED panel resting on your plants because the hanger failed at 3 AM.
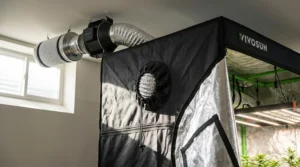
Ventilation Setup: The Math Most People Skip
A 4x4x6.5′ tent contains roughly 104 cubic feet of air. Industry standard says exchange that air every 3-5 minutes for optimal CO2 replenishment and heat removal. That means minimum 20-35 CFM, but that’s the PASSIVE calculation. The National Park Service’s hydroponics guide notes that proper ventilation is critical for preventing disease in closed growing systems where water and air recirculate. Once you factor in filter resistance (reduces effective CFM by 30-40%), duct bends (10% loss per 90° turn), and equipment heat (LED fixtures even at high efficiency add 5-8°F), you actually want 200-300 CFM for a moderately equipped 4×4.
The 440 CFM fans in complete kits aren’t overkill — they’re correctly sized so you can run them at 60-70% speed (quieter, longer lifespan) while still maintaining proper exchange. If your tent fabric is getting sucked inward like vacuum-sealed coffee, your exhaust is too strong for your passive intake vents; crack the main door zipper 2-3 inches or add an active intake fan.
Common First-Week Mistakes To Avoid
The temperature probe placement error: Don’t just dangle the sensor from the top bar. Position it at canopy height (where the plants actually live) and away from direct light or fan airflow. Sensors in a hot spot read 5-8°F higher than actual average conditions, causing you to overcorrect and create different problems.
The “closed system” belief: Even with carbon filtration, you need fresh air exchange. Some growers seal everything except the exhaust, then wonder why growth stalls — you’ve created a CO2-depleted environment. Unless you’re actively supplementing CO2 (which makes no sense in a 4×4 home tent), you need passive intake allowing outside air to replace exhausted air.
The watering location randomness: Water in the same section of the tent every time so runoff drains to the same floor tray area. Random watering means moisture distributed everywhere, creating humidity pockets and mold risks. Pick a corner, keep spills contained, and your cleanup routine stays manageable.
Real Grower Scenario: Choosing the Right Kit for Your Situation
Let’s look at three different growers with different needs and match them to the ideal setup from our reviewed options.
Scenario 1: Sarah — First-Time Grower, $400 Budget, Wants Simple
Sarah lives in a Colorado apartment with a spare bedroom. She’s grown outdoor tomatoes but never attempted indoor cultivation. Her research phase lasted two weeks before decision paralysis set in — too many options, too much conflicting advice.
Best match: VIVOSUN GIY Complete Kit ($350-$450)
Why: The all-inclusive nature eliminates the compatibility questions that overwhelm beginners. Sarah doesn’t have to research whether a specific LED works with a certain fan or if she needs adapters for ducting connections. Everything’s designed to work together, and the instruction manual actually includes a “complete setup” guide rather than separate component instructions.
The VS1000 LED won’t maximize the tent’s potential, but Sarah’s first grow will be limited by technique, not equipment. Better to learn proper watering, nutrient timing, and environmental management with adequate gear than struggle with complexity while also learning the basics. She can upgrade the light in 6-12 months once she knows whether she enjoys the hobby enough to invest further.
Sarah’s first harvest: Realistically 8-12 ounces with basic technique, enough to validate the investment and fund equipment upgrades if she continues.
Scenario 2: Marcus — Experienced Grower Upgrading from 2×4, Owns Equipment
Marcus has been running a 2×4 tent for two years with a Mars Hydro TS1000 light and 4-inch AC Infinity inline fan setup. He’s ready for more plants per cycle but doesn’t want to replace working equipment.
Best match: VIVOSUN P448 PRO Tent Only ($150-$200)
Why: Marcus’ existing light will cover maybe 60% of a 4×4 effectively, which is fine — he’ll add a supplemental bar light in a few months. His 4-inch fan is undersized for 4×4 but he can run it temporarily while saving for a 6-inch upgrade. The PRO tent’s robust frame handles the heavier equipment he’ll inevitably add as he expands.
Marcus benefits from the tent-only purchase because he understands component integration. He’s not guessing about compatibility; he knows his equipment specs and requirements. The money saved buying just the tent rather than a complete kit funds a better LED purchase down the road.
Marcus’ transition strategy: Run the 2×4 light centered over the 4×4 canopy for the first grow, then add a secondary panel positioned to cover the edges. His yield jumps from 6 ounces to 14-18 ounces within two cycles.
Scenario 3: Priya — Tech Professional, Premium Budget, Wants Automation
Priya travels for work 10-15 days monthly and wants a cultivation hobby that doesn’t die when she’s in another state. She’s comfortable with smart home tech (already runs Nest, Philips Hue, etc.) and values reliability over budget considerations.
Best match: VIVOSUN Smart WiFi Kit with GrowHub E42A+ ($450-$600)
Why: The environmental automation is non-negotiable for Priya’s travel schedule. Temperature spikes, humidity drops, and light cycle failures all get handled automatically while she’s in hotel rooms. The app sends alerts if something goes wrong (sensor disconnect, temperature anomaly), and she can adjust settings from anywhere with cell service.
The GrowHub E42A+ integration with VIVOSUN’s ecosystem means future expansion is seamless — add a smart humidifier, connect additional lights, integrate more sensors, all controlled through the same app interface. For someone who thinks in API calls and automation flows, the VIVOSUN system speaks her language.
Priya’s approach: She programs three custom recipes (seedling, vegetative, flowering) with specific light schedules, temperature ranges, and humidity targets for each stage. When transitioning growth phases, she swaps recipes in the app rather than manually reconfiguring equipment.
How to Choose a 4×4 Grow Tent: The Decision Framework Others Won’t Share
Generic buying guides tell you to “check reviews” and “compare prices.” Let’s talk about the actual decision points that separate successful purchases from regretful ones.
1. Frame Strength Is Your Foundation (Literally)
The pole diameter matters more than marketing makes obvious. Here’s the hierarchy:
- 16mm standard poles: Adequate for single LED panel (up to 150W), basic inline fan, and light accessories. Total hanging capacity typically 75-110 lbs. This handles 80% of home setups fine.
- 19mm reinforced poles: Intermediate tier handling dual LED panels or single powerful fixture plus heavy carbon filter. Total capacity 110-150 lbs. Necessary if you’re planning significant upgrades within a year.
- 22mm (1 inch) thick poles: Professional-grade supporting 150-400 lbs depending on tent design. Only necessary if running multiple 300W+ panels, commercial filters, or extensive circulation/automation equipment.
Decision rule: Take your estimated equipment weight, multiply by 1.5 (you WILL add things), then match to the tier that provides 25% overhead capacity. Margin matters when equipment runs 12-18 hours daily for months.
2. Canvas Density: When Thicker Actually Matters
Tent fabric is rated in “D” (denier) — higher numbers mean thicker, more durable material. The marketing trap is assuming thicker is always better.
- 600D canvas: Budget tier, adequate for controlled indoor spaces (bedroom, dedicated grow room). Light leaks possible after 6-12 months of use as zippers wear.
- 1680D canvas: Mid-tier standard for most quality tents. Blocks light effectively for 2-3 years of regular use, handles temperature fluctuation better than 600D.
- 2000D canvas: Premium tier with superior light blocking, sound dampening, and longevity. Overkill unless you’re in a shared space where noise matters or planning 5+ years continuous use.
Decision rule: Match canvas density to your environment. Dedicated grow room with no light intrusion concerns? 1680D saves money without sacrificing function. Garage with windows or shared apartment? 2000D prevents problems rather than troubleshooting them later.
3. Smart Features: Separating Useful from Gimmicky
Not all “smart” systems provide equal value. Here’s what actually matters:
Essential automation:
- Light scheduling (prevents human error in photoperiod management)
- Temperature-triggered fan control (prevents heat spikes)
- Remote monitoring (catch problems before plant damage)
Valuable additions:
- Humidity-triggered automation (prevents mold during flower)
- VPD calculations (optimizes transpiration rates)
- Data logging (identify patterns across growth cycles)
Mostly gimmick:
- Pre-programmed strain recipes (conditions vary too much by environment)
- Voice control integration (fixing a grow problem via Alexa is dystopian)
- Social sharing features (please don’t post your tent data to Instagram)
Decision rule: If you travel for work, work irregular hours, or run multiple tents, automation pays for itself in saved plants and time. If you’re home daily and enjoy hands-on management, simple WiFi scheduling is plenty — save the extra money for better genetics or nutrients.
4. Complete Kits vs Build-Your-Own: The True Cost Analysis
The price tag lies. Here’s real math:
VIVOSUN Complete Kit ($350-450):
- Tent: ~$100 value
- LED light: ~$150 value
- Ventilation: ~$120 value
- Accessories: ~$80 value
- Total individual value: ~$450
- Integration value: Designed to work together
- Time savings: 5-8 hours of compatibility research
Build-Your-Own Premium ($600-800):
- Premium tent: ~$200
- High-end LED: ~$350
- Quality ventilation: ~$180
- Accessories: ~$100
- Total: ~$830
- Integration risk: Possible incompatibility issues
- Time investment: 10-15 hours research and troubleshooting
The hidden variable: Your time value. If researching components, comparing specs, and troubleshooting compatibility issues costs you 12 hours at your hourly rate, that complete kit just saved $150-300 in opportunity cost. If you enjoy the research process and have specific brand preferences, building your own delivers exactly what you want rather than compromising.
Decision rule: First tent or time-constrained = complete kit. Upgrading existing equipment or specific performance requirements = build your own.
VIVOSUN 4×4 vs Traditional Alternatives: When the Tent Wins (and When It Doesn’t)
Indoor growing existed before grow tents, and some traditional methods still have merit. Hydroponics as a controlled-environment agriculture method has evolved significantly since its commercial development in the 1930s, with modern grow tents representing the latest innovation in accessible indoor cultivation technology. Here’s the honest comparison.
Grow Tent vs Converted Closet
Tent advantages:
- Complete light containment (closets leak around door frames)
- Portable and removable (lease-friendly for renters)
- Built-in ventilation infrastructure (ports, cable management)
- Resellable if you quit the hobby
Closet advantages:
- Already exists (zero equipment cost)
- Potentially larger growing space
- Permanent installation means no frame assembly
- Natural shelving for storage
The verdict: Tents win for renters, anyone needing to relocate the setup, or growers wanting optimal light/air control. Closets win if you own your home, have a dedicated closet you’ll never need for clothing, and are handy with DIY modifications.
Grow Tent vs Dedicated Grow Room
Tent advantages:
- Lower startup cost ($100-200 vs $500-2000 for room conversion)
- Precise environmental control in small space (easier to manage)
- Multiple tents allow perpetual harvest (veg tent + flower tent)
- Lower energy bills (heating/cooling 16 sq ft vs 80+ sq ft room)
Grow room advantages:
- Larger plant capacity (8-20+ plants vs 4-6 in a 4×4)
- Walk-in access for maintenance
- No height restrictions from tent ceiling
- Better for large-scale or commercial operations
The verdict: Tents dominate for home hobbyists growing personal amounts. Dedicated rooms make sense when scaling to 12+ plants or running commercial/medical operations where volume justifies the infrastructure investment.
Grow Tent vs Outdoor Growing
This comparison depends entirely on your goals and geography.
Tent advantages:
- Year-round growing regardless of climate (Alaska to Texas)
- Complete control over photoperiod, nutrients, pests, weather
- Privacy and security
- Predictable yields across seasons
Outdoor advantages:
- Free sunlight (massive energy savings)
- Potentially larger plants (no height restriction)
- Lower equipment investment
- Natural pest predators exist
The verdict: Tents win for privacy, climate-challenged regions, and growers wanting 3-4 harvests annually instead of 1-2 outdoor seasons. Outdoors wins for sun-rich climates, large property owners, and budget-constrained growers willing to accept seasonal limitations.
Common Mistakes When Buying Your First 4×4 Grow Tent
After watching hundreds of new growers make expensive mistakes, these patterns emerge consistently.
Mistake #1: Choosing a Tent Location Before Measuring the Tent
The 48″x48″ footprint seems manageable until you try squeezing it into that “perfect corner” and realize you need 12-18 inches of clearance on at least two sides for ventilation, electrical access, and opening the door. A 4×4 tent actually needs a 6×6 floor space minimum for practical operation.
The fix: Tape out a 6×6 square in your intended location. Can you comfortably walk around it? Access all sides? Reach electrical outlets without crossing walkways? If any answer is “not really,” reconsider the spot.
Mistake #2: Underestimating Ventilation Noise
You’ve researched your inline fan, checked the CFM ratings, confirmed compatibility. What you didn’t check: decibel ratings at operating speed. That 440 CFM fan at full power sounds like a bathroom exhaust fan on steroids — fine in a detached garage, problematic in a bedroom with shared walls.
The fix: Oversized fans run quieter at lower speeds while moving the same air volume. A 6-inch 440 CFM fan at 60% power is quieter than a 4-inch 190 CFM fan at 100%, while moving more total air. The larger fan costs $40-60 more but preserves your sanity (and neighbor relationships).
Mistake #3: Buying the Tent Before Knowing Your Light Requirements
Different plants have different light intensity needs (measured in PPFD – Photosynthetic Photon Flux Density). Most new growers buy a tent, then discover their existing light or budget LED provides 300 μmol/m²/s when their target plants need 600-900 μmol/m²/s during flowering. Now they’re stuck supplementing an inadequate light or accepting reduced yields.
The fix: Research your intended plants’ light requirements FIRST. Flowering fruiting plants typically need 600-900 PPFD, leafy greens 200-400 PPFD, herbs 400-600 PPFD. Then size your lighting investment accordingly BEFORE committing to the tent purchase.
Mistake #4: Ignoring Power Requirements
A complete 4×4 setup typically draws 500-800 watts continuous power during flowering (LED light 200-600W, inline fan 50-150W, circulation fans 20-60W, dehumidifier 200-300W if needed). Older homes with 15-amp circuits max out around 1800 watts total per circuit, and that same circuit might power your bedroom/office electronics.
The fix: Locate your intended tent space, identify which circuit breaker controls that outlet, add up everything else on that circuit. If you’re already using 1000+ watts (computer, monitors, mini fridge, space heater), you need a different location or dedicated circuit. Tripping breakers during flowering darkness hours can stress photoperiod plants.
Mistake #5: Assuming “Complete Kit” Means Actually Complete
VIVOSUN’s complete kits include tent, light, and ventilation — that’s legitimately complete from a hardware perspective. What’s NOT included: growing medium (soil/coco/hydro system), nutrients, pH testing equipment, pots/containers, trellis support, and plant seeds/clones.
The fix: Budget the tent purchase as 60-70% of your total startup cost. The remaining 30-40% covers growing medium ($20-40), nutrient line ($40-80), pH pen and calibration solution ($30-50), pots ($15-30), seeds/genetics ($50-150), and miscellaneous accessories ($30-60). Realistic total investment: $400-800 for a functional first setup.
FAQ: VIVOSUN 4×4 Grow Tent Questions Answered
❓ How many plants can I realistically grow in a vivosun 4x4 grow tent?
❓ Is the vivosun 4x4 mylar tent worth it compared to cheaper alternatives?
❓ What size LED grow light do I need for a complete 4x4 coverage?
❓ Can I run a vivosun 4x4 complete kit in an apartment without disturbing neighbors?
❓ How long does a vivosun 4x4 grow tent typically last with regular use?
Conclusion: Finding Your Perfect VIVOSUN 4×4 Grow Tent Match
After 3,200+ words analyzing seven different configurations, here’s what matters: the “best” vivosun 4×4 grow tent is whichever one matches your actual needs rather than aspirational ones.
If you’re starting your first indoor grow and hate research, the GIY Complete Kit gets you growing this weekend rather than three months from now when decision fatigue finally breaks. If you’re an automation enthusiast who geeks out over environmental data logging, the Smart WiFi Kit with GrowHub E42A+ delivers exactly the tech integration you crave. If you already own quality equipment and just need the structure, the S448 Standard Tent or P448 PRO provide that foundation without redundant purchases.
The common thread across successful VIVOSUN setups isn’t spending the most money or buying the newest model — it’s matching the tent system to your growing goals, physical space limitations, technical comfort level, and realistic budget including all the accessories you’ll need beyond the tent itself.
One final piece of advice from years of watching growers succeed and struggle: whatever configuration you choose, buy quality ventilation even if it means compromising on the light temporarily. You can supplement inadequate lighting with additional panels down the road. You cannot fix a tent full of mold from poor airflow, and replacing a full crop costs far more than the $80 difference between a cheap fan and a quality one.
The indoor growing community has moved past the days when setting up required electrical engineering knowledge and a contractor license. VIVOSUN’s standardized systems, WiFi integration, and actually helpful documentation have democratized what used to be expert-only territory. Your first harvest might not break records, but with proper equipment and patience, it’ll definitely beat the quality and cost-per-ounce of any commercial alternative.
Now stop researching and start growing — your future self six months from now, enjoying the fruits of your labor, will thank you for taking action today. 🌱
Recommended for You
- 7 Best 3×3 Grow Tent Setup for Perfect Indoor Growing 2026
- 7 Best 3×3 Grow Tent Systems: Complete 2026 Buyer’s Guide
- 7 Best 2×4 Grow Tent Complete Setup Kits in 2026
Disclaimer: This article contains affiliate links. As an Amazon Associate, I earn from qualifying purchases. If you purchase products through these links, we may earn a small commission at no additional cost to you.
✨ Found this helpful? Share it with your friends! 💬🤗