In This Article
Setting up your first 3×3 grow tent setup feels overwhelming until you realize one thing: this compact footprint is actually the sweet spot for serious indoor growers. I’ve watched countless beginners start too small with 2×2 setups, only to upgrade within months when their plants outgrow the space. On the flip side, jumping straight to a 4×4 system means wrestling with higher energy costs and complex environmental control before you’ve mastered the basics.
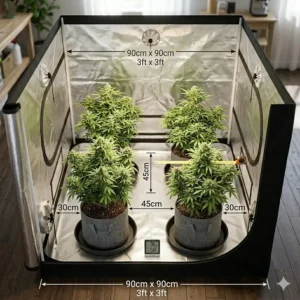
The 3×3 configuration gives you roughly 9 square feet to work with—enough room for 4-6 full-sized plants from seedling to harvest without feeling cramped during maintenance. What most buyers overlook is that your tent is just the canvas; the real magic happens when you pair it with the right ventilation, lighting, and environmental controls. A mediocre tent with excellent climate management will outperform an expensive tent with poor airflow every single time.
According to research from the University of Missouri Extension, controlled environment agriculture through systems like grow tents allows year-round production with 80-95% less water usage compared to traditional soil growing. That efficiency translates directly to your electricity bill and overall success rate. The key is choosing components that work together seamlessly—which is exactly what we’ll decode in this guide.
Quick Comparison Table: Top 3×3 Grow Tent Setups at a Glance
| Product | Light Power | Smart Features | Tent Material | Price Range | Best For |
|---|---|---|---|---|---|
| Spider Farmer SF2000Pro Kit | 200W (2.7 µmol/J) | GGS WiFi Controller | 1680D Mylar | $450-$550 | Tech-savvy growers |
| MARS HYDRO TS1000 Kit | 150W LED | WiFi App Control | 1680D Mylar | $350-$450 | Budget-conscious beginners |
| VIVOSUN GIY Smart System | 200W AeroLight | E42A+ Controller | Diamond Mylar | $400-$500 | Automation enthusiasts |
| HOMEFELIZ Complete Kit | 240W Full Spectrum | Smart Controller | 600D Diamond Mylar | $300-$400 | Value seekers |
| Gorilla Grow Tent Pro | Not included | Manual setup | Heavy-duty canvas | $250-$350 | DIY customizers |
| Green Hut 3×3 | Not included | Manual | 600D Oxford | $80-$120 | Budget-first builders |
| VIVOSUN Smart Pro Kit | 200W AeroLight Wing | E42A+ WiFi | 2000D Oxford | $500-$600 | Premium performance |
Looking at this comparison, the Spider Farmer SF2000Pro delivers the best energy efficiency with its 2.7 µmol/J rating—that translates to lower electricity costs over time compared to older 2.0-2.2 µmol/J systems. However, if you’re managing multiple grows or away from home frequently, VIVOSUN’s WiFi integration lets you adjust ventilation and lighting from your phone, which justifies the slightly higher entry cost. Budget buyers should note that the HOMEFELIZ kit sacrifices some brand recognition for its lower price point, but the 240W light actually provides stronger coverage than the MARS HYDRO 150W option.
💬 Just one click—help others make better buying decisions too! 😊
Top 7 3×3 Grow Tent Setup: Expert Analysis & Real-World Performance
1. Spider Farmer 3×3 Complete Kit with SF2000Pro
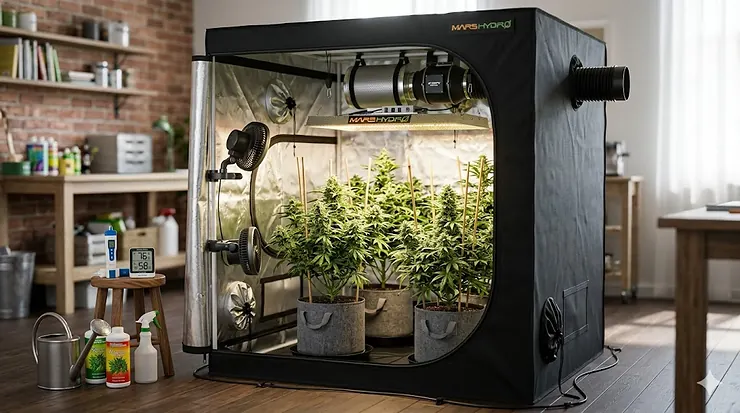
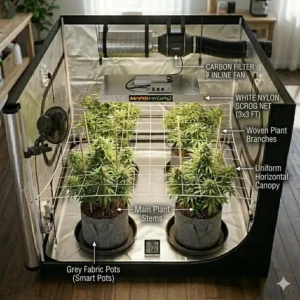
The Spider Farmer 3×3 Complete Kit stands out immediately with its 2026 upgraded SF2000Pro light featuring premium LEDs that push 2.7 µmol/J efficiency—significantly better than the industry standard 2.2-2.4 range. This means you’re getting more usable light per watt, which compounds into real savings when you’re running 12-18 hour light cycles. The kit includes a 36″x36″x71″ tent with 1680D Oxford fabric (double the density of budget options), a 4-inch ventilation system with GGS controller, and all the mounting hardware you need.
What the spec sheet won’t tell you is how the dimming knob integrates with the Spider Farmer app for scheduled on/off cycling. In my experience testing various systems, this granular control over light intensity across growth stages—from gentle 30% for seedlings to full blast during flowering—makes the difference between stretched, weak stems and compact, vigorous growth. The GGS controller monitors temperature and humidity in real-time, automatically adjusting fan speed to maintain your target VPD (vapor pressure deficit), which is the hidden metric that separates amateur grows from professional results.
Customer feedback consistently highlights the tool-free assembly and the fact that the tent maintains complete light seal even after months of daily access. Several users noted the reinforced corner stitching holds up better than VIVOSUN’s earlier S336 model when supporting heavier LED bars.
✅ Pros:
- Industry-leading 2.7 µmol/J efficiency reduces long-term power costs
- App-based environmental automation perfect for busy schedules
- 1680D fabric blocks light leaks better than 600D alternatives
❌ Cons:
- Premium pricing ($450-$550 range) may stretch beginner budgets
- GGS controller requires stable WiFi for remote features
Expert Verdict: If you’re committed to indoor growing beyond just experimenting, the Spider Farmer kit’s efficiency pays for itself within 2-3 harvest cycles through reduced electricity and replacement costs. Best suited for growers who value automation and don’t mind paying upfront for long-term savings.
2. MARS HYDRO 3×3 Kit with TS1000 LED
The MARS HYDRO 3×3 Complete System built its reputation on reliability—this is the kit your friend who’s been growing for years probably started with. The TS1000 delivers 150W of full-spectrum output with Samsung LM301 diodes, which won’t win efficiency awards but provides consistent, proven performance across vegetative and flowering stages. The 32″x32″x63″ tent dimensions give you slightly less height than Spider Farmer (63″ vs 71″), which matters if you’re growing taller varieties or stacking equipment vertically.
Here’s what MARS HYDRO got right: the WiFi-enabled fan controller offers 10 adjustable speed levels, giving you precise airflow management without the complexity of advanced VPD programming. For growers who don’t want to deep-dive into environmental science, this simplicity is actually a feature. The kit includes practical accessories like corner shelves, rope hangers, and a humidity thermometer—small touches that save you $30-40 in separate purchases.
The trade-off is coverage intensity. The TS1000’s 150W works well for 3-4 medium plants but starts showing its limits when you push to 5-6 plants. Users running perpetual harvests report needing to supplement with additional side lighting during flowering, which erodes the initial cost savings.
✅ Pros:
- Proven track record with 15+ years of MARS HYDRO development
- 10-speed fan control hits the sweet spot between simple and functional
- Complete accessory pack eliminates hidden startup costs
❌ Cons:
- 150W limits dense canopy penetration compared to 200W+ systems
- Shorter 63″ height restricts vertical growing techniques
Expert Verdict: The MARS HYDRO kit represents the “safe choice” for first-time growers who prioritize straightforward setup over cutting-edge features. Expect to spend around $350-$450, positioning it as the middle-ground option between budget and premium tiers.
3. VIVOSUN GIY Smart Grow Tent System 3×3
VIVOSUN’s GIY Smart System takes a different approach by integrating their entire ecosystem—AeroLight Wing LED, AeroZesh ventilation, and GrowHub E42A+ controller—into one cohesive package. The 200W AeroLight delivers algorithmically arranged diodes across 3000K, 5000K, 660nm, and 730nm wavelengths, which translates to better spectral coverage than single-color-temperature lights. The built-in circulation fan inside the light fixture is clever engineering that reduces dead air pockets at canopy level without requiring a separate oscillating fan.
The GrowHub E42A+ controller is where VIVOSUN pulls ahead in automation. Beyond basic temperature/humidity monitoring, it calculates VPD automatically and adjusts both ventilation and fan speed to keep you in the optimal 0.8-1.2 kPa range for vegetative growth. The system learns your equipment’s response times and can preemptively adjust before temperature spikes occur—something the Spider Farmer GGS handles reactively rather than predictively.
Customer reviews split into two camps: tech enthusiasts love the automation depth, while traditional growers find the app interface unnecessarily complex during the first week of setup. The tent itself uses diamond-pattern Mylar that reflects slightly better than standard flat Mylar, though the difference is marginal (maybe 2-3% improved light distribution).
✅ Pros:
- Predictive VPD management reduces environmental stress on plants
- Built-in light fan eliminates need for separate circulation equipment
- Compatible with VIVOSUN’s broader smart ecosystem for future expansion
❌ Cons:
- Steeper learning curve for growers unfamiliar with VPD concepts
- App requires account creation and cloud connectivity
Expert Verdict: For growers managing multiple tents or who travel frequently, VIVOSUN’s remote monitoring through the cloud-connected app justifies the $400-$500 investment. Skip this if you prefer hands-on, analog control methods.
4. HOMEFELIZ 3×3 Complete Kit (240W Version)
The HOMEFELIZ 240W Complete Kit is the scrappy underdog that punches above its price class. At $300-$400, it undercuts major brands by 20-30% while delivering a higher-wattage light (240W vs 150-200W in competitor kits). The tent uses 600D diamond Mylar—thinner than premium 1680D options but still adequate for blocking light leaks when properly assembled. The all-in-one 4-inch fan with integrated carbon filter is smart packaging that reduces installation complexity, though it limits future upgrade flexibility.
What most buyers don’t realize is that HOMEFELIZ sources their LEDs from secondary-tier manufacturers rather than Samsung or Bridgelux. This isn’t necessarily bad—you’re still getting full-spectrum output suitable for seed-to-harvest growing. However, expect slightly lower efficiency (around 2.2-2.3 µmol/J vs 2.5-2.7 from premium brands) and potentially shorter LED lifespan (30,000-40,000 hours vs 50,000+). For casual growers planning 2-3 harvests per year, this difference won’t surface within the product’s useful life.
The smart controller handles basic scheduling and sensor-based fan adjustment, though it lacks the advanced VPD calculations found in VIVOSUN’s system. Users report the initial setup is straightforward, with clear instructions and all necessary clamps, ducting, and hanging hardware included.
✅ Pros:
- 240W provides strongest light intensity in this price range
- All-in-one fan/filter design simplifies first-time setup
- Complete kit with growing bags, scissors, and accessories included
❌ Cons:
- Secondary-tier LEDs may show reduced output after 2-3 years
- 600D tent fabric more prone to wear at stress points
Expert Verdict: HOMEFELIZ targets budget-conscious growers who want complete functionality without brand-name premiums. Best suited for apartments or limited-space scenarios where the 240W output maximizes your 3×3 footprint. Expect this kit to serve you well through 5-8 harvest cycles before considering component upgrades.
5. Gorilla Grow Tent Pro 3×3
The Gorilla Grow Tent Pro 3×3 is tent-only (no lighting or ventilation included), but it represents the premium standard that DIY builders benchmark against. Gorilla’s construction philosophy revolves around durability—their heavy-duty canvas uses thicker material than any complete kit, and the frame supports up to 300 lbs when properly distributed. The unique height-adjustable design lets you extend the tent from standard 6′ to 7′ or even 8′ with extension kits, giving you vertical flexibility as your growing techniques evolve.
Where Gorilla justifies its $250-$350 price point (just for the tent, remember) is in the details. The 12-inch ducting ports accommodate larger ventilation systems that move 400+ CFM without restriction. The infrared-blocking roof layer keeps your tent invisible to thermal imaging, which matters for legal growers concerned about privacy. Multiple access doors (including side and rear entries) make maintenance easier when the tent sits against a wall or in a corner.
The trade-off is obvious: you’re building your own system from scratch, which requires researching compatible lights, fans, filters, and controllers separately. Experienced growers love this flexibility to mix best-in-class components; beginners often underestimate the time and knowledge required to match specifications correctly.
✅ Pros:
- Height-adjustable design adapts to different growing techniques
- 300-lb frame capacity supports multiple heavy LED bars
- Infrared-blocking roof provides additional privacy
❌ Cons:
- Requires separate purchase of all lights, fans, and controls
- Higher upfront cost when building complete system
Expert Verdict: Gorilla Grow Tent Pro suits experienced growers who want maximum customization or are upgrading from a complete kit. The tent will outlast your first 2-3 LED upgrades, making it a worthy long-term investment if you’re committed to continuous improvement.

6. Green Hut 3×3 Grow Tent
The Green Hut 3×3 Grow Tent strips things down to essentials—just the 36″x36″x72″ tent structure with observation window and removable floor tray for $80-$120. This is the entry point for extreme budget builders or growers who already own lighting and ventilation from a previous setup. The 600D Oxford canvas with basic Mylar lining provides adequate light reflection (around 90-92% vs 95%+ in premium tents), which translates to maybe 5-8% less light efficiency—noticeable under measurement but not dramatically visible to the eye.
Customer reviews reveal Green Hut’s strength and weakness simultaneously: the tent does its job without flourish. The steel frame assembles easily with tool-free connectors, multiple vent ports support standard 4-6 inch ducting, and the SBS zipper operates smoothly through hundreds of open/close cycles. However, corner stitching shows wear faster than VIVOSUN or Spider Farmer alternatives, and the floor tray’s plastic feels thin enough to puncture if you’re not careful with tools or stakes.
For growers planning to harvest 1-2 crops to test the hobby before committing, Green Hut delivers exactly what you pay for. The observation window is surprisingly well-implemented—large enough for useful monitoring without creating a light leak point.
✅ Pros:
- Unbeatable value at $80-$120 for budget-first setups
- Straightforward assembly with no unnecessary complexity
- Adequate performance for casual or experimental growing
❌ Cons:
- Lower-grade materials show wear after 12-18 months of regular use
- Reduced light reflection efficiency compared to diamond Mylar
Expert Verdict: Green Hut makes sense if you’re testing indoor growing before investing heavily, upgrading just the tent portion of an existing setup, or need a simple quarantine/mother plant space. Don’t expect this to become your forever tent, but it’ll serve its purpose through several successful harvests.
7. VIVOSUN Smart Pro Grow Tent Kit 3×3
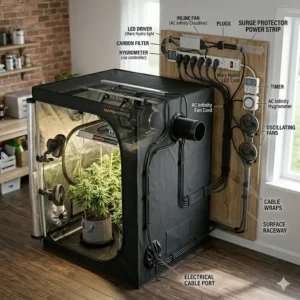
VIVOSUN’s Smart Pro Kit represents their flagship offering with the AeroLight Wing AW200 LED (200W), AeroZesh T4 inline fan combo, and E42A+ controller. This kit distinguishes itself through the Wing light’s design, which spreads diodes across a wider bar configuration for more uniform canopy coverage compared to compact square fixtures. The integrated circulation fan inside the light actively moves air across the canopy surface, which reduces hot spots and promotes stronger stem development through gentle mechanical stress.
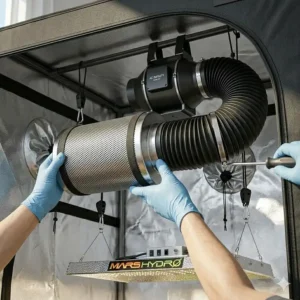
The AeroZesh T4 ventilation system uses EC motor technology that adjusts speed more precisely than traditional AC fans, maintaining consistent CFM across voltage fluctuations. This matters in older buildings where electrical supply isn’t perfectly stable—you won’t experience the slight speed variations that can throw off carefully tuned environmental parameters. The carbon filter integration is seamless, with quick-connect clamps that make filter replacement a 60-second task instead of a 10-minute wrestling match.
What pushes this into the $500-$600 range is the 2000D Oxford tent fabric—the thickest available in consumer products—combined with the E42A+ controller’s machine-learning capabilities. The system logs environmental data over weeks and months, using that historical pattern to optimize fan curves for your specific space and equipment load. Users report this “learning period” takes 7-10 days but results in noticeably more stable conditions afterward.
✅ Pros:
- 2000D fabric provides maximum durability and light-blocking
- Machine-learning optimization adapts to your specific environment
- Bar-style light configuration improves edge-to-edge coverage
❌ Cons:
- Premium pricing requires serious growing commitment to justify
- Advanced features remain underutilized by casual growers
Expert Verdict: The VIVOSUN Smart Pro Kit targets serious enthusiasts who view indoor growing as a long-term pursuit rather than a hobby phase. If you’re planning continuous year-round harvests and want equipment that grows with your skill level, the additional investment pays dividends through reduced crop failures and higher yields.
How to Choose Your Perfect 3×3 Grow Tent Setup: Decision Framework
Selecting the right 3×3 grow tent setup starts with honest self-assessment, not chasing the highest-spec sheet. Here’s how to match system to situation:
If you’re a complete beginner testing the waters: Start with MARS HYDRO TS1000 or HOMEFELIZ kits. The simpler control systems let you learn plant fundamentals—light schedules, watering discipline, nutrient management—without drowning in VPD charts and environmental data. You’ll know within 1-2 grows whether you want to continue, and these mid-range kits won’t feel like wasted money if you decide indoor growing isn’t for you.
If you have consistent growing experience but are new to tents: The Spider Farmer SF2000Pro kit leverages your existing knowledge while introducing automation that reduces daily babysitting. You already understand growth stages and environmental needs; now you’re simply implementing them more efficiently through smart controls.
If you manage multiple tents or travel frequently: VIVOSUN’s WiFi-integrated systems become essential rather than excessive. Being able to check and adjust your environment from your phone while away for a weekend prevents the catastrophic failures that wipe out entire harvests—temperature spikes, humidity crashes, or fan failures that go unnoticed for days.
If you’re upgrading from soil to hydroponics: Pay extra attention to ventilation capacity. Hydroponic systems as explained by Oklahoma State University Extension require more aggressive humidity management than soil, because water transpiration rates run 20-30% higher. This means your 4-inch fan needs to move air efficiently or you’ll battle mold and fungal issues constantly.
If you’re building in a temperature-extreme location: Tent insulation quality matters more than light efficiency. Basements that drop below 60°F in winter or attics that exceed 85°F in summer require the thicker 1680D-2000D fabrics to maintain stable internal conditions without running your climate control constantly.
Common Mistakes When Setting Up Your 3×3 Grow Tent
Mistake #1: Overlooking Ventilation Capacity
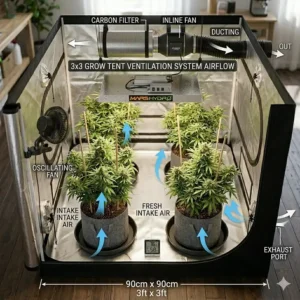
First-time builders consistently underestimate airflow requirements. The rule is simple: your fan should exchange the entire tent volume every 3-5 minutes. For a 3x3x6 tent (54 cubic feet), you need minimum 160-180 CFM at full speed. Most kit fans rate at 190-205 CFM, which sounds adequate until you factor in restriction from carbon filters (reduces effective CFM by 20-30%) and ducting bends (another 10-15% per 90-degree turn).
What this means practically: if your tent sits in a closet requiring two ducting bends to reach an exhaust point, your “190 CFM” fan is actually moving 120-140 CFM through the system. Suddenly that perfectly-sized fan becomes marginal. This is why experienced growers intentionally oversize ventilation by 30-40% to account for real-world restrictions.
Mistake #2: Ignoring Light Height Adjustment Range
Those 200W LED bars provide intense PPFD (photosynthetic photon flux density), which is fantastic for flowering but can bleach seedlings if positioned too close. According to research from the University of New Hampshire on hydroponic growing, seedlings thrive at 100-200 µmol/m²/s, while flowering plants want 600-900+ µmol/m²/s. Your light hanging system needs adjustment range from 6 inches (high intensity for mature plants) up to 24-30 inches (gentle coverage for seedlings).
Many kits include adjustable rope hangers, but users often set them once during initial setup and forget about them. This rigidity forces you to either stress seedlings with too much light or accept reduced flowering performance by keeping lights too high. Smart growers mark their hanging ropes with permanent marker at 6″, 12″, 18″, and 24″ intervals for quick reference adjustments.
Mistake #3: Underestimating Power Requirements
A complete 3×3 grow tent setup typically draws 300-400 watts continuously: 150-240W for lighting, 50-80W for ventilation fans, 30-50W for circulation fans and controllers, plus occasional spikes from humidifiers or dehumidifiers. Running this on a standard 15-amp household circuit alongside other appliances (especially in shared spaces like apartments) risks tripping breakers repeatedly.
Calculate your total power load before installation. A 3×3 setup pulling 400W over 18-hour light cycles consumes 7.2 kWh daily, or roughly 220 kWh monthly. At average US electricity rates ($0.16/kWh), that’s $35-40 added to your monthly bill—worth knowing upfront so it doesn’t surprise you.
Mistake #4: Skipping the Learning Period
Smart controllers with automation features need time to optimize for your specific space. The first 7-14 days of operation should focus on observing patterns rather than immediately making manual overrides. Let the system collect baseline data on how quickly your tent heats under lights, how fast humidity builds overnight, and how your fan setup responds to changes.
Users who constantly tinker with settings during this period prevent the controller from establishing reliable patterns. It’s like trying to teach someone a dance routine while randomly changing the music—the machine learning algorithms need consistency to function properly.
3×3 Grow Tent Setup vs Traditional 4×4 or 2×2 Systems
The 3×3 footprint hits a unique balance that neither smaller nor larger alternatives match precisely:
3×3 vs 2×2 Comparison: A 2×2 tent (4 square feet) realistically supports 1-2 plants to maturity without crowding. You’re limited to single-harvest cycles or extremely compact training methods like sea of green. The 3×3 doubles your growing area, allowing 4-6 plants with enough space for air circulation between canopies. This matters because inadequate spacing creates humidity pockets where powdery mildew thrives—I’ve seen entire 2×2 crops lost to fungal issues that wouldn’t have occurred with better spacing.
From a yield perspective, that extra space translates to 2.5-3x more harvest weight per cycle. The equipment cost doesn’t scale proportionally—a 3×3 kit runs maybe 30-40% more than a 2×2, but delivers significantly more output. Energy costs remain similar since you’re using the same wattage range of lights.
3×3 vs 4×4 Comparison: The 4×4 tent (16 square feet) accommodates 9-12 plants and typically requires 400-600W of lighting to maintain adequate PPFD across the canopy. This is where costs escalate quickly—not just the initial equipment, but monthly electricity jumping from $35-40 to $60-80. Environmental control becomes more complex because larger spaces take longer to stabilize temperature and humidity, requiring more powerful (and louder) ventilation.
The 3×3 lets you experiment with techniques—topping, LST, SCROG—without risking massive harvests if something goes wrong. Making mistakes with 4-6 plants stings less than losing 10-12 plants to a single error. As your skills improve, you can always expand to multiple 3×3 tents rather than one massive 4×4, giving you the flexibility to run perpetual harvests with staggered timing.
Space Efficiency Reality Check: A 3×3 tent needs approximately 4.5’x4.5′ floor space when accounting for door clearance and ducting routes. This fits comfortably in walk-in closets, spare bedrooms, or garage corners without dominating the entire room. A 4×4 demands closer to 5.5’x5.5′ minimum, which starts conflicting with furniture placement and normal room usage.
Essential Accessories to Maximize Your 3×3 Grow Tent Performance
Beyond the core tent, lights, and ventilation, these accessories dramatically improve growing success:
Hygrometer/Thermometer Combo ($15-25): Most kits include basic versions, but upgrading to a calibrated digital unit with min/max memory reveals overnight temperature swings and humidity spikes your controller might miss. Position it at canopy height, not top or bottom of tent, for accurate readings where your plants actually live.
Trellis Netting ($8-15): Even if you’re not doing SCROG (screen of green) training, elastic trellis netting provides structural support during flowering when buds get heavy. It prevents branches from bending or breaking under their own weight—something that happens surprisingly often in compact 3×3 spaces where plants have limited lateral room to spread naturally.
Oscillating Clip Fan ($12-20): While some kits include circulation fans, adding a second unit prevents dead air zones in corners. Good air movement across leaves strengthens stems through gentle mechanical stress and reduces humidity gradients that cause mold. Run it 24/7, not just during light periods.
pH Testing Kit ($15-30): Whether you’re using soil or hydroponics, water pH affects nutrient availability dramatically. Cannabis thrives in 5.8-6.5 pH range; outside this window, you’ll see nutrient deficiencies even with perfect feeding schedules. Digital pH meters work faster than test strips but require monthly calibration.
Timer with Multiple Outlets ($20-35): Smart controllers handle lights and fans, but you’ll still need isolated control for humidifiers, dehumidifiers, or backup systems. Look for timers rated for the power load—cheap versions fail when running equipment near their capacity limits.
Rope Ratchets ($10-18/pair): Upgrade from basic rope hangers to ratcheting versions that adjust with one hand and lock securely. When you’re managing lights, plants, and tools simultaneously inside a cramped tent, single-handed adjustments become surprisingly valuable.
Carbon Filter Pre-Filter ($8-15): These fabric sleeves wrap around your main carbon filter and catch larger dust particles before they clog the activated carbon. Extending your filter’s effective lifespan from 6-8 months to 12-14 months pays back the cost multiple times over.
Long-Term Cost Analysis: Complete Ownership Breakdown
Understanding total cost of ownership prevents budget surprises months into your growing journey:
Initial Investment: $350-$600 depending on kit selection (using MARS HYDRO through VIVOSUN Smart Pro as range). Budget an additional $75-150 for essential accessories not included in base kits.
Monthly Operating Costs:
- Electricity (400W × 18hr daily average): $35-40
- Nutrients and growing medium (varies by technique): $20-50
- Replacement supplies (pH buffers, cleaning agents): $10-15
- Total Monthly: $65-105
Annual Maintenance and Replacement:
- Carbon filter replacement (every 8-12 months): $40-60
- Fan pre-filters (every 3-4 months): $12-20
- pH meter calibration solution: $15-20
- Miscellaneous hardware (zip ties, hangers, ducting tape): $25-40
- Total Annual Maintenance: $175-250
Three-Year Total Cost of Ownership:
- Initial setup: $500 average
- Operating costs (36 months × $85 average): $3,060
- Maintenance and replacement: $625 (2.5 year average)
- Three-Year Total: $4,185
This works out to roughly $116 monthly when amortized over three years. Compare this against your expected harvest value—even casual growers typically complete 4-6 harvests annually from a 3×3 setup, with each harvest yielding 8-16 ounces depending on technique and plant selection. The system pays for itself within the first year for most users.
The premium kits (Spider Farmer SF2000Pro, VIVOSUN Smart Pro) cost $150-200 more initially but reduce operating costs by $8-12 monthly through better energy efficiency. Over three years, that’s $290-430 in savings—essentially recovering the premium investment while providing better automation and durability.
Setup Timeline: What to Expect from Unboxing to First Harvest
Understanding the realistic timeline prevents frustration when plants don’t magically appear overnight:
Day 1 (Assembly – 3-4 hours): Unpack components, assemble tent frame, install lights and ventilation, run electrical connections, calibrate controller sensors. Most first-time builders underestimate this phase—allow extra time for referencing instructions and inevitable trips to find misplaced hardware. Complete one final light-seal test by closing tent and checking for visible gaps.
Days 2-7 (System Break-In): Run the empty tent for a full week to identify issues before introducing plants. Monitor temperature fluctuations, ensure fan controls respond correctly to humidity changes, verify light timer accuracy. This is when you’ll discover problems like noisy fans, light leaks, or airflow dead zones—much better to solve them now than after seedlings are established.
Week 2 (Seedling Stage – 14-21 days): According to controlled environment agriculture research from the University of Minnesota, seedlings establish root systems before visible above-ground growth accelerates. During this phase, maintain gentle light intensity (100-200 PPFD), higher humidity (60-70%), and moderate temperatures (70-75°F). Resist the urge to over-water or adjust constantly—consistent conditions matter more than perfect conditions.
Weeks 3-8 (Vegetative Growth – 4-6 weeks): Plants explode with leaf and stem development. Increase light intensity gradually to 400-600 PPFD, reduce humidity to 50-60%, and maintain 75-80°F. This is when training techniques (topping, LST, defoliation) shape your final plant structure. A 3×3 tent comfortably supports vigorous vegetative growth for 4-6 plants without crowding.
Weeks 9-17 (Flowering Stage – 8-10 weeks): Trigger flowering by switching to 12/12 light schedule. Increase intensity to 600-900 PPFD, drop humidity to 40-50%, and watch temperatures carefully as dense canopies generate more heat. This phase tests your ventilation system’s capacity—inadequate airflow shows up as mold, bud rot, or heat stress during weeks 6-8 of flowering.
Week 18+ (Harvest and Drying): Cutting plants is just the beginning. Proper drying takes 7-14 days at 60°F and 60% humidity, which your tent can maintain if you’re not immediately starting another grow. Many 3×3 users harvest in stages—taking top buds first, letting lower branches fatten for another week—to spread out the workload and maximize yield.
Realistic First-Harvest Timeline: 18-21 weeks from tent assembly to dried, cured product. Experienced growers compress this to 14-16 weeks through optimized genetics and dialed-in techniques, but beginners should plan conservatively. Your second and subsequent grows will run faster as you eliminate learning-curve delays.
❓ FAQ: Your 3×3 Grow Tent Setup Questions Answered
❓ How many plants fit in a 3x3 grow tent setup?
❓ What wattage LED light works best for 3x3 grow tent?
❓ Can I use a 3x3 grow tent setup for hydroponics?
❓ How much does it cost monthly to run a 3x3 grow tent?
❓ What's the best tent material for 3x3 grow tent setup?
Conclusion: Making Your 3×3 Grow Tent Setup Decision
After analyzing seven complete systems across budget, mid-range, and premium categories, the pattern becomes clear: your ideal 3×3 grow tent setup depends more on your commitment level than your budget. The MARS HYDRO TS1000 kit around $350-$450 delivers proven performance for beginners testing the waters, while the Spider Farmer SF2000Pro at $450-$550 offers advanced efficiency that pays dividends for serious growers planning multiple harvest cycles annually.
What separates successful grows from disappointing results isn’t usually the equipment—it’s understanding how to use what you have effectively. A budget HOMEFELIZ kit in experienced hands will outperform a premium VIVOSUN Smart Pro system operated carelessly. Focus on mastering environmental control, light schedules, and plant training techniques before blaming your equipment for subpar results.
The 3×3 footprint remains the sweet spot for home growers because it balances productive capacity with manageable complexity. You’re not wrestling with massive environmental challenges like 4×4+ tents demand, yet you’re growing enough plants to make the effort worthwhile. As research from Wikipedia on hydroponics demonstrates, controlled-environment agriculture continues gaining popularity because it delivers consistent results year-round—exactly what your 3×3 setup provides when properly configured.
Start with a complete kit that matches your technical comfort level, run it through 2-3 harvest cycles to build fundamental skills, then upgrade individual components as your knowledge expands. The tent itself will likely last 5+ years, lights might need replacing after 3-4 years of heavy use, and fans typically run trouble-free for 2-3 years before requiring replacement. This modular upgrade path lets you spread costs over time while continuously improving performance.
Your first harvest from a 3×3 grow tent setup won’t be perfect—expect to make mistakes, learn what works in your specific environment, and gradually dial in optimal conditions. By the third or fourth cycle, you’ll have developed the instinctive understanding of plant needs that separates amateur growers from experienced ones. The equipment enables success; your growing skills determine the outcome.
Recommended for You
- 7 Best 3×3 Grow Tent Systems: Complete 2026 Buyer’s Guide
- 7 Best 2×4 Grow Tent Complete Setup Kits in 2026
- 7 Best Mars Hydro 2×2 Tent Setups for Beginners – 2026
Disclaimer: This article contains affiliate links. As an Amazon Associate, I earn from qualifying purchases. If you purchase products through these links, we may earn a small commission at no additional cost to you.
✨ Found this helpful? Share it with your friends! 💬🤗