In This Article
Ever tried growing plants indoors only to watch them struggle with inconsistent light, temperature swings, and mysterious pest invasions? You’re not alone. After testing dozens of setups, I’ve discovered that a grow tent 5 x 5 solves these headaches in ways that surprised even me.
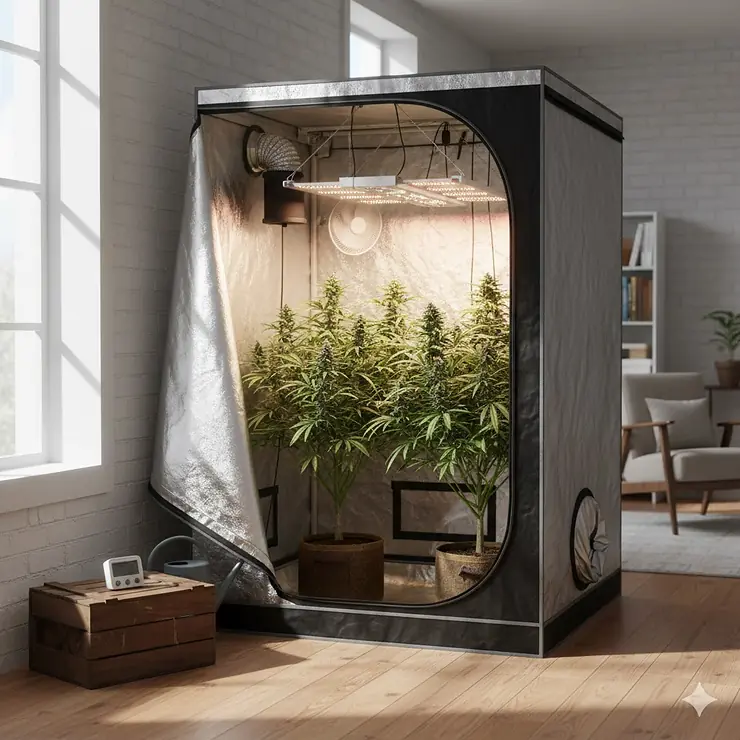
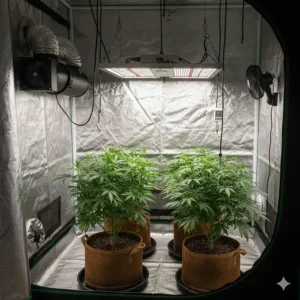
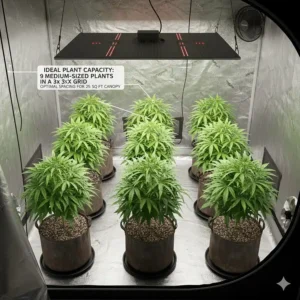
The beauty of a 5×5 grow tent lies in its sweet spot dimensions. It’s spacious enough to cultivate 9-12 full-size plants through their entire lifecycle, yet compact enough to fit in most spare rooms, basements, or garages. Think of it as your personal climate-controlled sanctuary where you’re the weather god—controlling every ray of light, every degree of temperature, and every whisper of airflow.
Hydroponics and controlled environment agriculture have revolutionized indoor growing by providing complete control over climate conditions, and modern grow tents make this accessible to everyone. According to the USDA National Agricultural Library, hydroponics is used to cultivate ornamental crops, herbs, and multiple vegetable types including cucumbers, lettuce, peppers, and tomatoes with remarkable efficiency. Whether you’re cultivating herbs, vegetables, or ornamental plants, a quality 5×5 grow tent creates the ideal environment for year-round success.
What makes the grow tent 5 x 5 particularly special? The 25 square feet of growing space offers incredible versatility. You can experiment with different plant varieties simultaneously, create separate zones for different growth stages, or maximize yields with a single massive canopy. The height—typically 6’7″ to 8′ with extensions—means you’ll never worry about your plants outgrowing their space.
In this comprehensive guide, I’ll walk you through the seven best options currently dominating the market, each tested and evaluated based on durability, light-proofing, ease of setup, and real-world performance. Let’s find your perfect growing environment.
Quick Comparison Table
| Product | Canvas Density | Pole Capacity | Height | Price Range | Best For |
|---|---|---|---|---|---|
| VIVOSUN S558 | 600D | 165 lbs | 80″ | $120-150 | Budget-Conscious Beginners |
| AC Infinity CLOUDLAB 866 | 2000D | 250 lbs | 80″ | $249 | Tech-Savvy Growers |
| Gorilla Grow Tent Pro | 1680D | 300 lbs | 83″-95″ | $343-430 | Premium Quality Seekers |
| Spider Farmer 5×5 | 1680D | 140+ lbs | 80″ | $160-200 | Balanced Performance |
| Mars Hydro 5×5 | 1680D | 155 lbs | 80″ | $140-180 | Year-Round Gardeners |
| VIVOSUN R556 Roof | 600D | 165 lbs | 72″ | $130-160 | Space-Efficient Setups |
| TopoGrow 5×5 | 600D | Standard | 78-80″ | $90-130 | Entry-Level Budget |
💬 Just one click – help others make better buying decisions too!😊
Top 7 Grow Tent 5 x 5: Expert Analysis
1. VIVOSUN S558 5×5 Grow Tent – Best Value Champion
The VIVOSUN S558 consistently tops my recommendations for growers seeking professional features without the premium price tag. This tent proves you don’t need to empty your wallet to get quality construction.
Key Specifications:
- Dimensions: 60″×60″×80″ (5’×5’×6’7″)
- 600D Oxford canvas with PE lining
- 100% reflective Mylar interior
- Tool-free corner connectors
- Weight capacity: 165 lbs
At approximately $120-150, this 5×5 grow tent delivers remarkable value. The 600D fabric might not match the ultra-premium tents, but it’s waterproof, tear-resistant, and double-stitched for excellent light blockage. What impressed me most? The transparent observation window lets you check plant progress without disturbing the internal climate—a feature often reserved for pricier models.
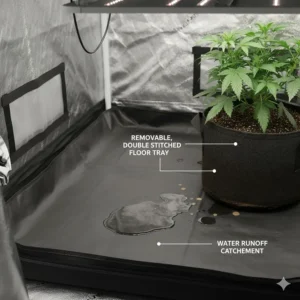
Customer feedback consistently praises the removable floor tray that makes cleaning effortless. One grower noted, “The strategically placed lower window aids in effective heat dissipation,” which is crucial for managing hot LED lights. The metal poles support up to 165 lbs when weight is properly distributed, accommodating most grow light and ventilation setups comfortably.
✅ Pros:
- Exceptional price-to-performance ratio
- Easy-view window for monitoring
- Tool-free assembly in under 30 minutes
❌ Cons:
- Lighter canvas than premium options
- Minor light leaks possible around zippers (easily fixable with tape)
2. AC Infinity CLOUDLAB 866 – The Tech Enthusiast’s Dream
If you’re serious about creating a professional-grade growing environment, the AC Infinity CLOUDLAB 866 represents the cutting edge of grow tent engineering. This isn’t just a tent—it’s a climate control command center.
Key Specifications:
- Dimensions: 60″×60″×80″
- 2000D Oxford canvas (thickest available)
- 22mm diameter steel poles (50% thicker than standard)
- Lab-tested reflective Mylar
- Weight capacity: 250 lbs
- Integrated controller mounting plate
Priced at $249, this 5×5 grow tent commands respect. The frame carries 2x more weight than standard grow tents with reinforced 22 mm diameter poles compared to standard 18 mm poles. The 2000D canvas eliminates virtually all light leaks, while the diamond Mylar interior is lab-tested with UV-Vis-NIR Spectrophotometry for maximum light reflectivity.
What sets the CLOUDLAB 866 apart? The integrated controller mounting plate with lightproof cable passthrough. This thoughtful design element allows clean, organized setups for smart fans, humidifiers, and LED controllers. The observation window is genuinely the largest I’ve encountered—you get a full view of your garden while maintaining environmental consistency.
Real users rave about the high-performance SBS™ zippers that provide smooth, jam-free access. Multiple growers report zero light leaks after months of use, and the reinforced tent corners handle heavy equipment like champions.
✅ Pros:
- Thickest 2000D canvas for ultimate durability
- Integrated smart controller mounting system
- Industry-leading 250 lbs weight capacity
- Largest viewing window available
❌ Cons:
- Premium pricing may stretch beginner budgets
- Heavier weight makes relocation challenging
3. Gorilla Grow Tent 5×5 Pro – The Industry Gold Standard
When professional cultivators need absolute reliability, they turn to Gorilla Grow Tent. The Pro series doesn’t just meet expectations—it shatters them with features that justify every dollar of its premium positioning.
Key Specifications:
- Dimensions: 60″×60″×83″ (extends to 95″ with included kit)
- 1680D threaded reflective fabric
- All-steel interlocking frame
- Weight capacity: 300 lbs
- Height-adjustable design
- EZ View windows with 360° access
Starting at $343-430 depending on configuration, this represents a significant investment. But consider this: the all-steel interlocking frame is 2-5x stronger than competitors’, with 300lb hang capacity for heavy equipment. That’s not marketing fluff—it’s engineering prowess you can feel.
The 1680D threaded fabric is 3-9 times denser than standard tents, providing exceptional light-proofing and durability. The included 1′ height extension kit lets you grow taller plants without constraints, and you can add optional 2′ extensions to reach an astounding 10 feet total height.
Growers consistently praise the diamond reflection technology that redistributes light more effectively than flat Mylar. The 360-degree wraparound zippers provide access from multiple angles, and the industrial-strength zippers show zero wear even after years of daily use. One commercial grower told me, “I’ve run three consecutive grows without a single structural issue—this tent earns its price.”
✅ Pros:
- Unmatched 300 lbs structural capacity
- Height-adjustable from 83″ to 95″ (or 10′ with extensions)
- Thickest 1680D canvas available
- Lifetime customer support from Northern California team
❌ Cons:
- Premium pricing requires serious investment
- Heavier construction demands two people for assembly
4. Spider Farmer 5×5 Grow Tent – The Balanced Performer
The Spider Farmer 5×5 has built a devoted following by nailing the fundamentals while offering thoughtful extras. This tent delivers professional results without overwhelming newcomers or experienced growers.
Key Specifications:
- Dimensions: 60″×60″×80″
- 1680D thickened Mylar canvas
- Observation window with secure closure
- Removable floor tray
- Weight capacity: 140+ lbs
Priced between $160-200, this grow tent 5 x 5 hits the sweet spot for mid-range budgets. The 1680D material provides robust light-blocking performance, and Spider Farmer’s quality control ensures consistent manufacturing standards. This tent is spacious enough to accommodate 9-12 full-size plants throughout their entire growth cycle, from seedling to harvest.
What makes Spider Farmer special? Their attention to practical details. The observation window uses hook-and-loop fasteners for quick access without compromising the seal. The floor tray sits perfectly flush, preventing water leaks, and multiple duct ports accommodate various ventilation configurations.
Customer reviews highlight the smooth SBS zippers that glide effortlessly even after months of use. One grower praised: “I’ve had my tent now for 9 months and I’m on my third grow in it. The zippers are still working great without snags. All the poles are holding up fine.”
✅ Pros:
- Premium 1680D canvas at mid-range pricing
- Reliable Spider Farmer brand reputation
- Observation window with secure closure
- Compatible with Spider Farmer’s complete ecosystem
❌ Cons:
- Weight capacity lower than premium tents
- Some users report minor stitching imperfections
5. Mars Hydro 5×5 Grow Tent – The Year-Round Warrior
Mars Hydro has earned respect in the growing community by focusing on what matters: creating stable growing environments that perform consistently season after season.
Key Specifications:
- Dimensions: 60″×60″×80″
- 1680D canvas construction
- 98% reflective Mylar lining
- Heavy-duty metal frame
- Weight capacity: 155 lbs
- Perfect for 6-8 plants (5-gallon containers)
At $140-180, the Mars Hydro 5×5 grow tent offers excellent value for serious growers. The tent features a heavy-duty metal frame supporting up to 155 lbs and fully sealed, durable 1680D canvas to prevent light leaks. The 98% reflective Mylar maximizes light efficiency while trapping warmth—essential for maintaining stable winter temperatures.
What distinguishes Mars Hydro? Their focus on year-round performance. The fully sealed design prevents light leaks while the reflective Mylar creates even heat distribution across the growing space. Multiple growers report successfully running grows through harsh winters thanks to the tent’s superior insulation properties.
The deep spill tray prevents water damage to floors, and the multiple duct ports accommodate various fan and filter configurations. Mars Hydro’s reputation for responsive customer service provides peace of mind, especially for newer growers navigating their first setups.
✅ Pros:
- Excellent winter insulation properties
- 98% reflective Mylar for maximum light efficiency
- Accommodates 6-8 full-size plants comfortably
- Responsive customer support
❌ Cons:
- Canvas slightly thinner than Gorilla series
- Limited height compared to adjustable models
6. VIVOSUN R556 5×5 Roof Cube Tent – The Space Optimizer
The VIVOSUN R556 brings innovative design to the 5×5 category with its sloped roof configuration—a game-changer for growers dealing with limited ceiling clearance or wanting maximum headroom for equipment.
Key Specifications:
- Dimensions: 60″×60″×72″
- Sloped roof design
- 600D Oxford canvas
- 100% litchi reflective Mylar (1.5x more reflective than diamond mylar)
- Tool-free assembly
- Weight capacity: 165 lbs
Priced at $130-160, this unique 5×5 grow tent solves a common problem: where to hang heavy ventilation equipment. The slanted roof creates dedicated space for mounting fans, filters, and ducting at the peak, leaving maximum vertical growing space for plants below.
The litchi reflective Mylar interior deserves special mention—it’s 1.5x more reflective than traditional diamond mylar, ensuring light reaches plants from optimal angles. Customer feedback consistently mentions how the roof design simplifies equipment installation and cable management.
One reviewer noted, “After one grow, I ended up moving back to the 2X4 tents as they’re easier on the back, but this roof design is brilliant for equipment mounting.” The pitched roof allows you to stand inside more comfortably during plant maintenance—your back will thank you during long pruning sessions.
✅ Pros:
- Innovative sloped roof maximizes headroom
- Superior litchi Mylar (1.5x more reflective)
- Equipment mounting at peak saves growing space
- More comfortable for tall growers
❌ Cons:
- Lower overall height (72″ vs standard 80″)
- Roof design may limit some lighting configurations
7. TopoGrow 5×5 Grow Tent – The Budget-Friendly Gateway
For growers taking their first steps into controlled indoor cultivation, the TopoGrow 5×5 offers a welcoming entry point without compromising essential features.
Key Specifications:
- Dimensions: 60″×60″×78″-80″ (varies by model)
- 600D Oxford Mylar exterior
- 96% reflective waterproof diamond Mylar interior
- 16mm metal rods with PP connectors
- Tool-free installation
- Multiple ventilation ports
At an incredibly accessible $90-130, this grow tent 5 x 5 proves quality doesn’t always require premium investment. The 600D fabric provides adequate light-proofing for most applications, while the 96% reflective Mylar interior ensures efficient light distribution.
TopoGrow focuses on practical functionality. The heavy-duty zippers feature double stitching with Mylar reinforcement around zipper tracks to prevent light leaks. Multiple round vents with mesh lining accommodate fans and filters, while rectangular vents provide additional ventilation options.
Customer reviews emphasize exceptional value: “For a decent tent at a great price, I have two TopoGrow tents and would recommend them to anyone looking.” Another grower praised the easy assembly: “Aside from that this tent is well worth the money. Went together extremely easy. I can tell it’s going to last for a long time.”
Is it perfect? No—the thinner poles and lighter canvas won’t withstand the same punishment as premium tents. But for beginners testing the waters or experienced growers needing an additional space, TopoGrow delivers surprising reliability.
✅ Pros:
- Exceptionally affordable entry point
- 96% reflective diamond Mylar interior
- Easy tool-free assembly
- Multiple ventilation options
❌ Cons:
- Thinner 16mm poles limit heavy equipment
- Canvas density lower than premium options
- May require light-leak patching around zippers
What is a Grow Tent 5 x 5?
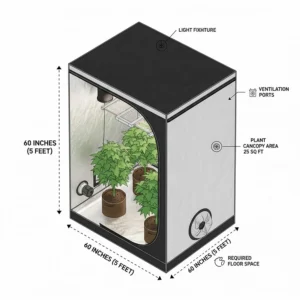
A grow tent 5 x 5 is a portable, enclosed growing environment measuring approximately 60 inches by 60 inches (5 feet by 5 feet) with heights typically ranging from 72 to 80 inches. These specialized structures create controlled microclimates for indoor plant cultivation using reflective interior surfaces, sturdy frame construction, and multiple ventilation ports. They allow growers to manage light exposure, temperature, humidity, and airflow precisely—critical factors for optimal plant development.
Understanding Canvas Density and Why It Matters
Canvas density might sound like technical jargon, but it’s actually your tent’s armor rating. Measured in “D” (denier), this number tells you how many grams of thread weigh 9,000 meters of fabric. Higher numbers mean thicker, more durable material that blocks light better and withstands wear longer.
Think of it this way: a 600D tent is like a sturdy rain jacket—it’ll keep you dry in a shower. A 1680D tent? That’s a heavy-duty winter parka that laughs at blizzards. And a 2000D canvas? You’re basically wrapping your plants in armor plating.
Breaking Down the Numbers
600D Canvas (Entry-Level Protection) This represents the minimum viable option for serious growing. It blocks most light, resists minor tears, and handles occasional bumps. Perfect for basement setups where environmental stresses are minimal. Expect 2-3 years of reliable service with proper care.
1680D Canvas (Professional Grade) The industry standard for commercial operations. This thickness eliminates virtually all light leaks, resists punctures from equipment, and maintains structural integrity through multiple grows. We’re talking 5+ years of dependable performance. Gorilla Grow Tents use 1680D fabric that is up to 9x denser than standard tents, providing exceptional durability for long-term use.
2000D Canvas (Maximum Protection) The pinnacle of grow tent engineering. This ultra-dense material blocks 100% of light, withstands aggressive handling, and provides superior climate insulation. AC Infinity’s CLOUDLAB series pioneered this thickness, and it shows—these tents outlast their competition by years.
Why Light-Proofing Demands Attention
Light leaks aren’t just annoying—they can sabotage your entire grow. Even tiny pinpoints of light during dark periods can stress plants, disrupting their natural growth cycles. The denser your canvas, the fewer headaches you’ll face chasing down rogue light beams.
Double-stitched seams, reinforced zipper channels, and quality materials work together to create an impenetrable barrier. Premium tents add features like zipper flaps and ribbon stitching around closures for extra insurance.
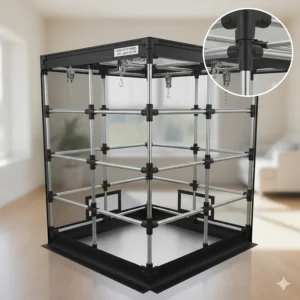
Frame Construction: The Backbone of Your Growing Space
Ever watched a tent collapse under heavy equipment? I have, and it’s heartbreaking. The frame determines whether your setup thrives for years or becomes a expensive disaster waiting to happen.
Pole Diameter Decoded
16mm Poles (Basic Support) Found in budget tents, these handle light-duty setups admirably. They’ll support basic LED panels and small fans without complaint. Total weight capacity typically maxes around 100 lbs. Fine for beginners with modest equipment.
19mm-22mm Poles (Standard Professional) The sweet spot for most growers. These thicker poles provide excellent stability and support 150-200 lbs of gear comfortably. AC Infinity’s 22mm poles are 50% thicker than standard 18mm construction, delivering noticeable rigidity benefits.
22mm+ with Interlocking Steel (Premium Construction) When you need to hang heavy ballasts, multiple large lights, and industrial ventilation, this is non-negotiable. Gorilla Grow Tents’ all-steel interlocking frames carry up to 300 lbs—that’s genuinely impressive engineering.
Understanding Weight Distribution
Weight capacity specifications assume proper distribution across multiple hanging points. Don’t hang 300 lbs from a single corner! Spread equipment across roof beams and use the extra hanging bars many premium tents provide.
Corner connectors matter too. Plastic connectors work fine for light loads, but metal interlocking pins eliminate wobble and prevent frame stress over time. If you’re investing in premium grow lights and fans, invest in a frame that can handle them confidently.
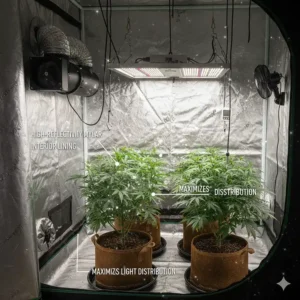
Mylar Reflectivity: Maximizing Every Photon
Light is plant currency, and your tent’s interior determines how much reaches your crops. Mylar—that shiny metallic-looking material lining grow tent interiors—acts like thousands of tiny mirrors, bouncing photons that would otherwise be wasted back onto your plants.
Reflectivity Percentages Explained
90-95% Reflective (Standard Mylar) Entry-level tents typically feature this range. It’s adequate for modest LED setups and prevents dramatic light loss. You’ll see consistent growth, though you might notice some dark spots in corners.
96-98% Reflective (Diamond Mylar) The embossed diamond pattern does more than look cool—it creates micro-angles that distribute light more evenly. Gorilla’s Diamond Reflection Technology redistributes up to 30% more lumens, creating less waste and giving plants more of what they need to thrive. This translates to fuller canopies and better penetration to lower branches.
Lab-Tested Premium Mylar AC Infinity takes reflectivity seriously, testing their Mylar with UV-Vis-NIR Spectrophotometry. This scientific approach ensures consistent quality—no dull patches or uneven coating. The difference shows in harvest yields.
Litchi Mylar Innovation
VIVOSUN’s litchi-patterned Mylar represents an interesting evolution. The textured surface creates more light-bouncing angles than traditional diamond patterns, potentially boosting reflectivity by 50% compared to standard designs. Early adopter feedback suggests noticeably improved light distribution, especially with bar-style LED fixtures.
How to Choose the Perfect Grow Tent 5 x 5
Selecting your ideal grow tent feels overwhelming at first, but breaking the decision into clear steps simplifies everything. Follow this systematic approach:
Step 1: Assess Your Available Space Measure your room carefully, accounting for door swing, ventilation ducting, and walking space around the tent. The tent’s 60″×60″ footprint seems manageable, but you’ll need at least 12-18″ on sides with duct ports. Height matters too—an 80″ tent requires minimum 90″ ceiling clearance with lights.
Step 2: Calculate Your Plant Capacity Needs A 5×5 grow tent accommodates 9-12 full-size plants in 5-gallon containers comfortably, or 16-20 smaller plants in 3-gallon pots. Consider your target yields and growing style. Sea of Green (SOG) methods favor more smaller plants, while Screen of Green (ScrOG) works with fewer larger specimens.
Step 3: Evaluate Your Equipment Weight Total your planned equipment: LED lights, carbon filters, inline fans, oscillating fans, and any additional gear. Add 25% safety margin to your calculation. Match this figure against tent weight capacities—never exceed 80% of rated capacity for long-term reliability.
Step 4: Consider Your Experience Level Beginners benefit from tents with intuitive features: tool-free assembly, clear observation windows, and straightforward ventilation port placement. Experienced growers might prioritize advanced features like controller mounting plates, multiple access points, and height adjustability.
Step 5: Match Budget to Quality Tier Entry-level ($90-150): Adequate for learning and experimentation Mid-range ($150-250): Solid performance for regular growing Premium ($250-450): Professional features and long-term durability
Step 6: Research Brand Reputation Read real user reviews, check company responsiveness to problems, and investigate warranty policies. Established brands like Gorilla, AC Infinity, VIVOSUN, Spider Farmer, and Mars Hydro have proven track records.
Step 7: Verify Compatibility with Your System Ensure duct port sizes match your ventilation equipment (typically 4″, 6″, or 8″). Check that lighting fixtures fit comfortably within height restrictions. Confirm electrical port placements work for your controller setup.
Essential Accessories for Your 5×5 Growing Environment
Your grow tent forms the foundation, but strategic accessories transform it into a thriving ecosystem. Here’s what actually matters:
Lighting Systems
LED grow lights have revolutionized indoor cultivation. For a 5×5 space, target 600-800 watts of quality LED power for flowering, or 400-500 watts for vegetative growth. Bar-style fixtures like Spider Farmer’s G7000 or Mars Hydro’s FC6500 provide superior coverage and uniformity compared to older panel designs.
Position lights 18-24″ above plant canopies initially, adjusting as plants develop. Dimmable drivers let you fine-tune intensity for different growth stages—seedlings need gentler light than flowering plants demand.
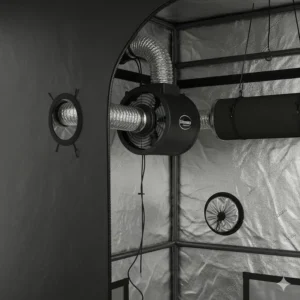
Ventilation and Climate Control
Hydroponics and controlled environment agriculture systems require careful environmental management, particularly temperature, humidity, and airflow control for optimal plant growth. Research from Oklahoma State University Extension demonstrates that hydroponic systems provide more complete control of nutrient content, pH and growing environment, resulting in faster growth due to more available oxygen in root areas. Inline exhaust fans (rated 400-600 CFM for 5×5 spaces) create negative pressure that pulls fresh air through intake ports while expelling hot, humid air.
Pair your exhaust with a quality carbon filter to eliminate odors—essential for maintaining good neighbor relations. AC Infinity’s CLOUDLINE series offers smart controllers that automatically adjust fan speed based on temperature and humidity readings.
Climate Monitoring
Wireless hygrometers track temperature and humidity precisely. Look for models recording min/max values and trending data. Maintaining 70-80°F with 40-60% relative humidity during vegetative growth, then 65-75°F with 35-45% humidity during flowering prevents most common issues.
Supplemental Equipment
Oscillating clip fans (6″ models work beautifully) strengthen plant stems while preventing stagnant air pockets where mold thrives. Mount 2-4 fans at different heights for complete air circulation. Trellis netting supports heavy branches during flowering, preventing breakage and maximizing light exposure.
Setting Up Your Grow Tent 5 x 5: Step-by-Step Installation
Assembly intimidates many first-time growers, but modern tents use intuitive designs that snap together quickly. Here’s the foolproof process:
Preparation Phase (15 minutes) Clear your installation area completely, allowing room to spread components. Unpack everything and verify all parts against the instruction manual. Lay out poles by size and identify connectors. This organization prevents frustrating searches mid-assembly.
Frame Construction (30-45 minutes) Connect base poles first, creating a stable foundation. Most tents use color-coded or labeled poles—follow the system religiously. Insert vertical poles into corner connectors, then add top frame pieces. Diagonal support bars add crucial rigidity once the basic frame stands.
Don’t fully tighten connectors until the entire frame is assembled. This allows adjustments if poles don’t align perfectly. Once satisfied, firmly secure all connections. The frame should feel solid without wobbling.
Canvas Installation (20-30 minutes) Open all zippers completely before attempting to slide the cover over the frame—this single step prevents 90% of installation headaches. Start from one corner and gradually work the fabric over poles, two people make this exponentially easier.
Once positioned, zip everything shut and inspect for proper alignment. The fabric should sit taut without excessive pulling or sagging. Adjust corner positions if necessary.
Interior Setup (30-60 minutes) Install the floor tray first—it’s nearly impossible to add later. Hang your primary grow light using adjustable ratchet hangers, positioning it according to manufacturer specifications. Mount inline fans and carbon filters to roof support bars, ensuring ducting routes smoothly through ports.
Add oscillating fans last, positioning them to create gentle air movement across the canopy without directly blasting plants. Test all equipment before introducing plants.
Final Checks (15 minutes) With all equipment installed and running, close the tent completely and turn off room lights. Look for any light leaks around zippers, seams, or ports. Small leaks can be patched with black duct tape. Check that all ducting connections are secure and airtight.
Maintenance Tips for Longevity
Your grow tent is an investment worth protecting. Regular maintenance extends lifespan dramatically:
Between-Grow Cleaning Protocol
Remove all equipment and plants. Vacuum the floor tray and interior surfaces to eliminate dust and debris. Wipe down Mylar walls with diluted hydrogen peroxide solution (1:4 ratio) to kill any lingering pathogens. Allow complete drying before next grow.
Inspect zippers for debris caught in teeth—this prevents future jamming. Lubricate zipper tracks lightly with silicone spray if movement becomes stiff. Check all corner connections and poles for signs of stress or damage.
Ongoing Care Practices
Never overload hanging bars beyond rated capacity. Distribute weight evenly across multiple mounting points. When moving the tent, disassemble rather than attempting to drag or lift when fully assembled—frames aren’t designed for this stress.
Store collapsed tents in cool, dry locations away from direct sunlight. UV exposure degrades canvas over time. If storing long-term, include desiccant packets inside the folded tent to prevent moisture accumulation and mildew.
Zipper Preservation
Zippers represent the most common failure point in grow tents. Always open and close them slowly and deliberately. If a zipper catches, never force it—back up slightly and try again. Keep zipper tracks clean and free from fabric snags.
When opening doors frequently during grows, consider using the hook-and-loop straps many tents provide to hold doors open rather than constantly zipping and unzipping.
Common Mistakes to Avoid
Learning from others’ errors saves time, money, and heartache. Here are pitfalls I see repeatedly:
Underestimating Ventilation Needs Inadequate airflow causes a cascade of problems: excessive heat, high humidity, weak stems, and increased disease pressure. Size your exhaust fan to completely exchange tent air every 1-3 minutes. For a 5×5 tent with 200 cubic feet interior volume, minimum 400 CFM exhaust capacity is essential with lights running.
Neglecting Light Intensity Management More light isn’t always better. Seedlings and clones need gentle illumination, while flowering plants demand intense output. Running lights at maximum power continuously stresses young plants and wastes electricity. Use dimmers and adjust height appropriately for each growth stage.
Ignoring Humidity Control Relative humidity dramatically affects plant health. Too high invites mold and fungus; too low causes nutrient uptake problems and stress. Invest in a quality hygrometer and adjust accordingly. Small humidifiers and dehumidifiers are inexpensive compared to lost crops.
Overcrowding the Space That 5×5 tent looks spacious until you fill it with 15 plants, lights, fans, and try to maneuver for maintenance. Leave working space between plants and walls. You’ll need access for watering, training, and inspection. Overcrowding also restricts airflow and creates microclimates with poor conditions.
Skimping on Foundation Quality Yes, you can save $50 buying the cheapest tent available. You’ll regret it when zippers fail mid-grow, canvas tears from normal use, or frames bend under equipment weight. Quality construction pays dividends through years of reliable service.
Optimizing Your Grow Tent 5 x 5 for Maximum Yields
Getting good results is straightforward, but achieving exceptional harvests requires optimization. Here’s how elite growers maximize their 5×5 spaces:
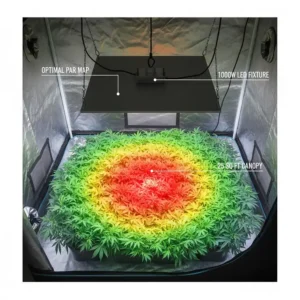
Light Distribution Strategies
Even canopy coverage transforms yields. Position bar-style LEDs parallel to each other for uniform light distribution. Single-panel lights create hot spots directly below while leaving corners dimmer. Consider supplemental side lighting if running single-source fixtures.
Measure PPFD (photosynthetic photon flux density) at multiple canopy points using a quantum sensor. Target 600-800 μmol/m²/s for flowering, 300-400 μmol/m²/s for vegetative growth. Adjust light height and intensity to maintain these levels consistently.
Training Techniques for Space Efficiency
Screen of Green (ScrOG) netting maximizes 5×5 horizontal space brilliantly. Install trellis nets 12-18″ above pots and train branches horizontally across the screen during vegetative growth. This creates an even canopy that captures light efficiently while supporting heavy flowers.
Low-Stress Training (LST) using tie-downs and gentle branch manipulation increases yield per plant without requiring netting infrastructure. Combine with strategic pruning to remove lower branches that receive insufficient light.
Climate Optimization
Controlled environment agriculture systems benefit from precise management of temperature, humidity, and CO2 concentrations, with hydroponic systems using up to 90% less water than traditional methods according to research documented by agricultural scientists. VPD (Vapor Pressure Deficit) calculations take temperature and humidity together to determine optimal conditions for transpiration and growth.
Target VPD ranges:
- Seedlings/Clones: 0.4-0.8 kPa
- Vegetative Growth: 0.8-1.2 kPa
- Flowering: 1.0-1.5 kPa
Smart controllers like AC Infinity’s CONTROLLER AI+ automatically adjust ventilation to maintain target VPD ranges, removing guesswork from climate management.
Troubleshooting Common Issues
Even well-maintained systems encounter occasional problems. Here’s how to diagnose and resolve them:
Temperature Fluctuations
Symptom: Temps swing more than 10°F between lights-on and lights-off periods.
Solutions: Add thermal mass (water containers) inside tent to buffer temperature changes. Improve ventilation efficiency—hot spots indicate poor air circulation. Consider an inline heater for lights-off periods during cold seasons, or portable AC units for excessive heat.
Humidity Management Challenges
Symptom: Humidity spikes above 60% during flowering or drops below 30% in dry climates.
Solutions: For high humidity, increase exhaust frequency and reduce plant density. Add a small dehumidifier if necessary. For low humidity, introduce bowls of water, use a humidifier, or hang damp towels inside the tent.
Light Leaks Appearing
Symptom: Pinpoints of light visible when lights are off and room lights are on.
Solutions: Identify leak sources systematically by entering the closed tent with room lights on. Mark problem areas, then patch with black duct tape or weatherstripping. Pay special attention to zipper tracks and duct port cinches.
Odor Escaping Despite Carbon Filter
Symptom: Distinctive plant smells detectable outside tent.
Solutions: Verify carbon filter age—most require replacement every 6-12 months with continuous use. Ensure exhaust fan CFM rating matches filter specifications. Check for loose ducting connections or tears. Consider adding a second, smaller filter at intake ports.
Structural Sagging or Weakness
Symptom: Frame poles bending under equipment weight or corners spreading.
Solutions: Redistribute equipment weight across multiple hanging points. Remove non-essential items. Consider upgrading to a tent with higher weight capacity if your current setup is maxed out. Add extra support bars if your tent model allows.
Seasonal Considerations for Year-Round Growing
Indoor growing liberates you from seasonal constraints, but environmental factors still demand attention:
Winter Challenges
Cold ambient air requires less active ventilation, but don’t eliminate it entirely—stagnant air invites problems. Reduce exhaust speed rather than turning it off completely. Some growers run lights during overnight periods when electricity rates are lower and heat generation is beneficial.
Humidity drops dramatically in heated buildings. Humidifiers become essential equipment rather than optional. Monitor closely and adjust as needed—dry air stresses plants and reduces yield potential.
Summer Complications
Excessive heat becomes the primary enemy. AC Infinity tents with 2000D canvas provide superior insulation, but you’ll still battle high ambient temperatures. Run lights during cooler nighttime hours if possible. Consider upgrading to more efficient LED fixtures that generate less heat per photon.
High-CFM ventilation becomes crucial. Boost exhaust fan speeds and ensure robust fresh air intake. Small portable AC units or evaporative coolers supplement ventilation when ambient temps exceed 85°F consistently.
Shoulder Season Optimization
Spring and fall offer ideal ambient conditions for indoor growing. Take advantage of moderate temperatures by dialing back active cooling and heating. This reduces electricity consumption while maintaining excellent growing conditions.
Comparing 5×5 vs Other Tent Sizes
Understanding how a grow tent 5 x 5 fits within the broader landscape helps confirm it’s the right choice:
| Size | Floor Space | Plant Capacity | Best For | Considerations |
|---|---|---|---|---|
| 2×2 | 4 sq ft | 1-2 plants | Micro grows, seedlings | Very limited space |
| 2×4 | 8 sq ft | 2-4 plants | Hobbyists, small spaces | Linear layout |
| 3×3 | 9 sq ft | 4-6 plants | Beginner setups | Good starter size |
| 4×4 | 16 sq ft | 6-9 plants | Popular intermediate | Industry standard |
| 5×5 | 25 sq ft | 9-12 plants | Serious growers | Optimal versatility |
| 4×8 | 32 sq ft | 12-16 plants | Large-scale hobby | Long footprint |
| 8×8 | 64 sq ft | 24+ plants | Commercial operations | Significant investment |
The 5×5 grow tent occupies the sweet spot between manageable size and substantial production capacity. It’s large enough for meaningful yields yet doesn’t require dedicated grow rooms or commercial-grade equipment.
Budget Breakdown: Total Cost of Ownership
Understanding complete costs prevents unpleasant surprises. Here’s realistic pricing for different quality tiers:
Budget-Friendly Setup ($400-600 Total)
- TopoGrow 5×5 Tent: $90-130
- Basic 600W LED: $150-200
- 4″ Inline Fan/Filter Combo: $80-120
- Oscillating Fans (2): $30-50
- Accessories (hygrometer, hangers, timers): $50-100
This entry-level configuration handles basic growing adequately but may require upgrades as experience grows.
Mid-Range Setup ($800-1200 Total)
- Spider Farmer or VIVOSUN Tent: $160-200
- Quality 650W LED (Spider Farmer SF7000): $350-450
- 6″ Inline Fan/Filter with Controller: $200-300
- Oscillating Fans (3-4): $50-80
- Climate monitoring and control: $100-150
- Premium accessories: $100-150
This represents the optimal balance for most serious growers—professional results without excessive investment.
Premium Setup ($1500-2500+ Total)
- Gorilla Grow Tent Pro or AC Infinity CLOUDLAB: $250-430
- High-End LED (800W+ with UV/IR): $600-900
- Smart Ventilation System (AC Infinity CLOUDLINE): $300-450
- Complete Climate Control (humidifier, dehumidifier, fans): $200-350
- Advanced Monitoring (VPD meters, CO2 monitors): $150-300
- Professional-Grade Accessories: $200-350
This tier delivers commercial-quality results with maximum control and longevity. The investment pays dividends through consistent, large harvests and years of reliable service.
Operating Costs (Monthly)
Electricity represents the primary ongoing expense:
- LED Grow Lights (600-800W, 18h/day): $50-80
- Ventilation (150W continuous): $15-25
- Supplemental Equipment (fans, controllers): $10-20
- Climate Control (as needed): $20-50
Total monthly electricity: $95-175 depending on local rates and equipment efficiency. Factor nutrients, growing medium, and periodic filter replacements (~$30-50 monthly) for complete budgeting.
Environmental Impact and Sustainability
Modern grow tents enable surprisingly eco-friendly cultivation when properly configured:
Water Conservation Benefits
Hydroponic systems can use up to 90% less water when compared to conventional farming because water and nutrients are recirculated in a controlled environment, eliminating runoff and discharge of pollutants into local waterways. According to research published by the National Center for Biotechnology Information, this closed-loop approach makes hydroponics particularly valuable for urban agriculture and regions facing water scarcity.
Collection trays capture excess irrigation, allowing reuse after pH/EC adjustment. This closed-loop approach minimizes water waste—critical in drought-prone regions.
Energy Efficiency Considerations
LED technology has revolutionized indoor growing’s carbon footprint. Modern fixtures generate 2-3x more photons per watt compared to older HPS (High-Pressure Sodium) technology while producing less waste heat. This double benefit—more light with less cooling needed—dramatically reduces total energy consumption.
Smart controllers optimize ventilation by running fans only when necessary rather than continuously. This intelligent management can reduce fan electricity usage by 40-60% compared to constant-speed operation.
Pesticide Reduction
Controlled environments eliminate most pest and disease pressures that plague outdoor cultivation. Hydroponics provides a soil-less environment, reducing the risk of soil-borne pests and diseases, with Integrated Pest Management techniques implemented more effectively. This means minimal or zero pesticide application—beneficial for personal health and environmental impact.
Growing Organic in Your 5×5 Space
Organic cultivation principles adapt beautifully to controlled tent environments:
Soil Selection and Amendments
Quality organic potting soil forms your foundation. Look for mixes containing composted materials, worm castings, and beneficial microorganisms. Avoid chemical fertilizers and stick with organic amendments: bone meal, kelp meal, bat guano, and compost.
Living soil approaches using cover crops and mulch layers create self-sustaining ecosystems within your grow bags. The tent’s controlled environment allows these complex soil communities to thrive without external weather disrupting their balance.
Organic Pest Management
Prevention trumps treatment in organic systems. Maintain proper environmental conditions to keep plants stress-free and naturally resistant. Introduce beneficial insects (ladybugs, predatory mites) at first sign of problems rather than reaching for sprays.
Neem oil and insecticidal soaps provide safe intervention when needed. The tent’s enclosed nature makes these treatments more effective—pests have nowhere to escape and hide.
Sustainable Practices
Compost plant material after harvest, returning nutrients to future grows. Reuse growing medium by amending and refreshing between cycles. Choose fabric pots that last for years over single-use plastic. These small decisions compound into significant environmental benefits over time.
FAQs
❓ How many plants fit in a grow tent 5 x 5 comfortably?
❓ What wattage LED light works best for a 5x5 grow tent?
❓ Can I use a 5x5 grow tent in a bedroom safely?
❓ How often should I replace my grow tent carbon filter?
❓ What's the difference between 1680D and 600D tent canvas?
Conclusion: Choosing Your Perfect Growing Sanctuary
After exploring seven exceptional options and diving deep into the technical aspects, the decision becomes clearer. Your ideal grow tent 5 x 5 depends on your specific circumstances:
Choose the VIVOSUN S558 if you’re budget-conscious and starting your first serious grow. It delivers solid performance without premium pricing, perfect for learning fundamentals while producing quality results.
Select the AC Infinity CLOUDLAB 866 when technology integration matters and you want industry-leading construction. The smart controller mounting plate and thickest available canvas justify the premium for tech-savvy growers planning long-term operations.
Invest in the Gorilla Grow Tent Pro if budget isn’t a primary concern and you demand absolute best quality. The height-adjustable design, 300 lb capacity, and legendary durability make this the last tent you’ll ever need to buy.
The Spider Farmer 5×5 and Mars Hydro 5×5 occupy the sweet spot for most growers—balancing quality, features, and price intelligently. You won’t feel you’ve compromised, yet you haven’t overspent on unnecessary bells and whistles.
Consider the VIVOSUN R556 Roof for space-constrained setups or when you appreciate innovative design that solves real problems. The sloped roof truly does simplify equipment mounting while maximizing growing height.
Finally, the TopoGrow 5×5 welcomes beginners testing indoor growing before committing to premium equipment. It’s adequate for learning while keeping financial risk minimal.
Whichever path you choose, remember that the tent is just the beginning. Pair it with quality lighting, proper ventilation, and consistent care. Your new controlled environment opens doors to year-round cultivation of herbs, vegetables, or ornamental plants with yields and quality that outdoor gardens simply can’t match.
The beauty of a grow tent 5 x 5 lies not just in the space it provides, but in the control it grants you over every aspect of your growing environment. You’re no longer at weather’s mercy, limited by seasons, or vulnerable to pests. You’re creating your own microclimate where plants thrive exactly as nature intended—just with you holding the reins.
Start building your perfect growing sanctuary today. Your future harvests are waiting.
Recommended for You
- 7 Best 4×4 Grow Tents for Indoor Growing Success (2025)
- 7 Best Grow Tent Options for Indoor Gardening Success in 2025
- 7 Best Carbon Filter for Grow Tent 2025 – Expert Reviews & Guide
Disclaimer: This article contains affiliate links. If you purchase products through these links, we may earn a small commission at no additional cost to you.
✨ Found this helpful? Share it with your friends! 💬🤗