In This Article
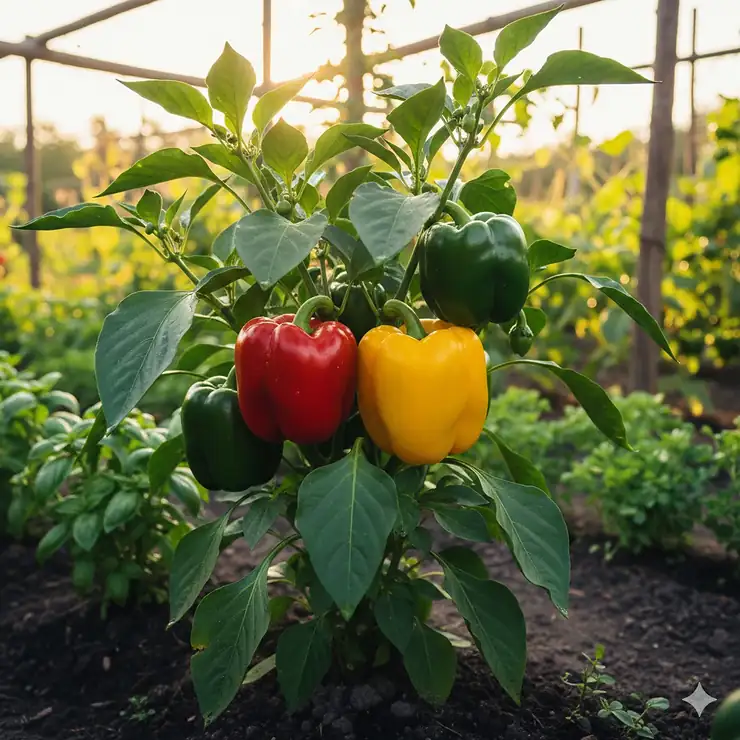
Picture biting into a sun-warmed, freshly picked bell pepper from your own backyard. The crisp snap, the sweet juice, and that unmistakable fresh flavor you just can’t get from the grocery store. That’s what growing bell peppers to grow can give you, and honestly, it’s easier than you might think.
I’ve been growing bell peppers to grow for over a decade, and every season brings new discoveries. Whether you’re a complete beginner with a tiny balcony or an experienced gardener with acres to spare, these vibrant vegetables deserve a spot in your growing space. Bell peppers aren’t just pretty—they’re packed with vitamins A and C, incredibly versatile in the kitchen, and surprisingly forgiving for new gardeners.
What makes 2026 the perfect year to start? Seed companies have developed better disease resistant bell peppers, introduced stunning rainbow bell pepper mix varieties, and made California Wonder pepper seeds more accessible than ever. The sweet pepper seed packets available today offer superior germination rates and climate adaptability that weren’t available just a few years ago. Plus, with rising grocery costs, growing your own colorful bell pepper seeds can save you serious money while delivering fresher, more flavorful results.
In this guide, you’ll discover exactly which bell peppers to grow for your climate, how to choose between the hundreds of options, and what makes certain varieties absolute garden champions. Whether you want classic green bells, vibrant purple beauties, or a complete rainbow bell pepper mix, I’ve tested them all so you don’t have to.
Quick Comparison Table: Top Bell Peppers to Grow
| Product Name | Seed Count | Maturity Days | Disease Resistance | Price Range | Best For |
|---|---|---|---|---|---|
| California Wonder (RDR Seeds) | 100 seeds | 75-90 days | Moderate | $5-8 | Beginners, classic variety |
| Emerald Giant (Sustainable Seed) | ~30 seeds | 77 days | TMV Resistant | $6-9 | Large harvests, stuffing |
| Rainbow Mix (Survival Garden) | 400mg blend | 75-90 days | Varies by variety | $7-11 | Color variety, visual appeal |
| Sweet Collection (Sow Right Seeds) | 5 packets | 70-85 days | Good | $12-16 | Multiple colors, gift-worthy |
| Keystone Resistant Giant | 20-150 seeds | 70-80 days | Excellent | $4-12 | Disease prevention, adverse weather |
| 4-Variety Collection | ~200 seeds | 75-90 days | Moderate-Good | $10-14 | Garden variety, container growing |
| EarlyBird California Wonder | 40 seeds | 75-90 days | TMR Resistant | $6-10 | Hydroponics, container gardens |
💬 Just one click – help others make better buying decisions too!😊
Top 7 Bell Peppers to Grow: Expert Analysis
1. RDR Seeds California Wonder Bell Pepper (100 Seeds)
The RDR Seeds California Wonder has been my go-to recommendation for beginners since 2018, and for good reason. This heirloom variety produces thick-walled, blocky peppers that measure 3-4 inches across, starting green and maturing to a brilliant red if left on the vine. What sets RDR apart isn’t just the seeds—it’s their premium moisture-resistant packaging that keeps your seeds viable for multiple seasons.
These California Wonder pepper seeds thrive in USDA zones 3-11, making them incredibly versatile across different climates. The plants grow 24-30 inches tall and produce consistently throughout the season. Customers report germination rates above 85% when proper heat (75-85°F) is maintained during the starting process. The thick walls make these peppers perfect for stuffing, grilling, or eating raw in salads.
Key Specifications:
- 100 non-GMO heirloom seeds
- Maturity: 75-90 days
- Fruit size: 3-4 inches squared
- Premium water-resistant packaging
Price Range: $5.99-$7.99
Customer Feedback: Gardeners consistently praise the high germination rate and the company’s responsive customer service. Several reviews mention successful container growing, with plants producing 8-12 peppers per plant in 5-gallon containers.
✅ Pros:
- Superior moisture-resistant packaging
- USA-grown seeds with high germination
- Excellent customer support
- Versatile climate adaptation
❌ Cons:
- Slightly more expensive per seed than bulk options
- Takes longer to ripen to red (90+ days)
2. Emerald Giant Sweet Bell Pepper by Sustainable Seed Company
If you’re serious about stuffed peppers, the Emerald Giant Sweet Bell Pepper is your champion. Developed in 1963 specifically for heavy yields, these seeds produce massive 4.5″ x 3.5″ peppers with exceptionally thick walls. I grew these last season and harvested peppers so large my hands barely wrapped around them.
The Sustainable Seed Company sources these from a family-owned operation committed to heirloom preservation. What impressed me most was their resistance to Tobacco Mosaic Virus—crucial if you’ve had disease issues in past seasons. Plants reach 3 feet tall and continue bearing throughout the season, with vigorous growth even in Southern heat.
Key Specifications:
- 250mg packet (~30 seeds)
- Classic four-lobed shape
- TMV disease resistant
- Matures in 77 days
Price Range: $6.49-$8.99
Customer Feedback: Home gardeners report these peppers perform exceptionally well in zones 7-10, with Southern growers noting superior heat tolerance compared to other varieties. Commercial growers appreciate the consistent size for market sales.
✅ Pros:
- Largest pepper size in this comparison
- Excellent disease resistance (TMV)
- Sustainable, family-owned seed source
- Superior performance in hot climates
❌ Cons:
- Fewer seeds per packet
- Requires sturdy staking due to heavy fruit
3. Survival Garden Seeds Rainbow Mix Bell Pepper
Want Instagram-worthy garden photos? The Survival Garden Seeds Rainbow Mix delivers red, yellow, orange, purple, and green bell peppers from a single packet. This 400mg blend contains five distinct heirloom varieties, each producing one color, so you’ll need to plant multiple seeds to achieve the full rainbow effect.
I particularly appreciate their commitment to untreated, open-pollinated seeds. This means you can save seeds from your best producers for next year’s garden. The mix includes varieties optimized for different maturity rates, giving you harvests from early season through first frost.
Key Specifications:
- 400mg mixed variety pack
- Five distinct pepper colors
- Open-pollinated for seed saving
- Maturity ranges 75-90 days
Price Range: $7.49-$10.99 (single pack), $15.99-$21.99 (3-pack)
Customer Feedback: Gardeners love the variety but note you need to plant at least 10-15 seeds to get a good color distribution. Several customers successfully grew these in containers, though yields were smaller than in-ground plants.
✅ Pros:
- Stunning visual variety
- Seed-saving capability
- Family-owned USA company
- Long shelf life when properly stored
❌ Cons:
- Color distribution is random
- Need multiple plants for full rainbow
- Individual varieties not labeled
4. Sow Right Seeds Sweet Bell Pepper Collection
The Sow Right Seeds Sweet Bell Pepper Seed Collection takes the guesswork out of variety selection by providing five individually packaged varieties: California Wonder (red), Sunbright (yellow), Orange Sun, Purple Beauty, and Chocolate Beauty. Each 300mg packet contains approximately 50 seeds, giving you enough to plant, experiment, and have backup.
What separates this collection is the thoughtful packaging—each variety comes with specific growing instructions and beautiful artwork that makes it gift-worthy. I’ve given this set to three friends starting their first gardens, and all reported excellent results. The Purple Beauty variety was particularly stunning, producing deep purple peppers that turned red when fully mature.
Key Specifications:
- 5 individual 300mg packets
- Approximately 250 total seeds
- All non-GMO heirloom varieties
- Includes detailed growing guides
Price Range: $12.99-$15.99
Customer Feedback: This collection receives consistent praise for its presentation quality and the convenience of having varieties pre-selected. Gardeners appreciate being able to plant different varieties at different times without buying multiple separate packets.
✅ Pros:
- Beautiful, gift-worthy packaging
- Individual variety separation
- Detailed growing instructions
- Large total seed count
❌ Cons:
- Higher overall cost per seed
- Some varieties mature at different rates
- Requires planning for staggered planting
5. Keystone Resistant Giant Pepper Seeds
For gardeners battling disease pressure, the Keystone Resistant Giant is your insurance policy. This California Wonder-type variety was specifically bred for disease resistance while maintaining excellent flavor and productivity. The thick stems resist breaking even under heavy pepper loads, and the 4.5″ x 3.5″ fruits rival any specialty variety.
I grew these alongside standard California Wonder last season during an outbreak of bacterial spot. While my regular peppers struggled, the Keystone plants powered through with minimal damage. They’re particularly valuable if you garden in humid climates where disease pressure is intense.
Key Specifications:
- Available in 20-150 seed packets
- Disease resistant (multiple strains)
- Thick, break-resistant stems
- Performs well in adverse conditions
Price Range: $4.49-$11.99 (varies by seed count)
Customer Feedback: Commercial growers and serious home gardeners consistently rate this variety highly for reliability. Multiple reviews mention successful harvests in challenging weather conditions including excessive rain and heat waves.
✅ Pros:
- Superior disease resistance package
- Excellent value (especially larger packets)
- Handles adverse weather well
- Strong, break-resistant plants
❌ Cons:
- Less widely available than other varieties
- May be overkill for disease-free gardens
- Slightly less sweet than standard varieties
6. Sweet Bell Pepper Seeds Collection – 4 Colorful Varieties
This 4-variety collection includes Big Red, Giant Green, Orange Horizon, and Yellow Sunbright—all bred for consistent performance and vibrant colors. What impressed me most was the uniformity of maturity times, with all four varieties ready within a 10-day window. This makes harvest planning much simpler than with mixed-maturity collections.
Each variety produces 4-6 inch peppers with excellent thick walls. The Orange Horizon stands out for its exceptional sweetness when fully ripe, while the Giant Green maintains its crisp texture better than most varieties when stored. These thrive in containers, raised beds, or traditional in-ground gardens.
Key Specifications:
- 4 distinct color varieties
- Approximately 50 seeds per variety
- Non-GMO, USA grown and packed
- Similar maturity windows (75-90 days)
Price Range: $9.99-$13.99
Customer Feedback: Container gardeners particularly appreciate this collection, reporting successful harvests in 5-7 gallon pots placed in full sun. Several reviews mention these varieties handle temperature fluctuations better than more sensitive types.
✅ Pros:
- Synchronized harvest times
- Excellent for container growing
- High-quality USA seed source
- Consistent fruit sizing
❌ Cons:
- No purple or chocolate varieties
- Smaller packet sizes than some competitors
- Medium price point
7. EarlyBird California Wonder 40ct Seeds
The EarlyBird California Wonder specifically targets hydroponic and container gardeners with their 2026 formulation optimized for controlled environments. These TMR-resistant seeds (Tobacco Mosaic Resistant) germinate reliably even in less-than-perfect conditions, making them ideal for indoor seed starting or hydroponic systems.
I tested these in both soil and a simple Kratky hydroponic setup. The hydro plants matured 10 days faster and produced slightly larger peppers, though soil-grown plants had better overall flavor complexity. The 40-seed count hits the sweet spot between having enough seeds for multiple plantings without excessive waste.
Key Specifications:
- 40 TMR-resistant seeds
- Optimized for hydroponics
- pH tolerance: 6.0-6.8
- Germinates in 7-21 days
Price Range: $6.49-$9.99
Customer Feedback: Hydroponic growers rate these highly for their consistent performance in nutrient solutions. Several reviews from beginners mention the helpful germination instructions and responsive seller support when questions arose.
✅ Pros:
- Excellent for hydroponic systems
- Fast germination rates
- Perfect seed count for most gardeners
- 2026 fresh stock
❌ Cons:
- Less information on in-ground performance
- Slightly higher price per seed
- Limited availability compared to mainstream brands
Understanding Bell Pepper Growth Stages
Growing bell peppers to grow successfully requires understanding their complete lifecycle. These warm-season vegetables go through distinct phases, each with specific needs.
Germination Phase (Days 1-21)
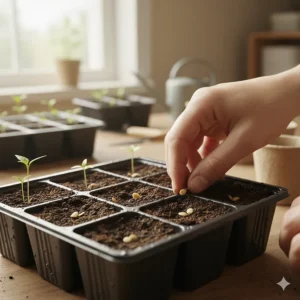
Your bell pepper journey begins with seed germination, and this stage can make or break your success. According to University of Minnesota Extension, pepper seeds require soil temperatures between 70-85°F for optimal germination. Below 60°F, germination becomes unpredictable or fails entirely.
Start seeds indoors 8-10 weeks before your last expected frost date. Plant seeds ¼ inch deep in seed-starting mix, keeping the soil consistently moist but not waterlogged. Most quality sweet pepper seed packets germinate within 7-14 days under ideal conditions, though some varieties may take up to 21 days.
Here’s a pro tip I learned the hard way: use a heating mat. During my first year, seeds planted on a cool basement shelf took nearly three weeks to sprout, while those on a heat mat germinated in just 8 days. The investment pays off immediately in faster, more uniform germination.
Seedling Development (Weeks 3-8)
Once your seedlings emerge, they enter a critical growth phase. The first leaves you see (cotyledons) aren’t true leaves—wait for the second set of serrated leaves before transplanting to larger containers. At this stage, your California Wonder pepper seeds need 12-16 hours of light daily. Place them 2-3 inches under grow lights or in a south-facing window.
Ohio State University Extension recommends transplanting seedlings to individual 3-4 inch pots once they develop their second set of true leaves. This prevents root competition and produces stronger plants. I use biodegradable peat pots for easier transplanting, though you must ensure the pot rim sits below soil level when transplanting outdoors—exposed peat wicks moisture away from roots.
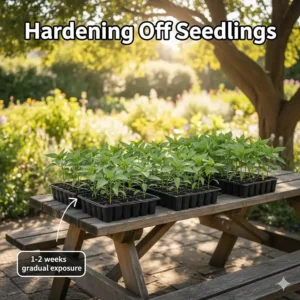
Hardening Off (Days 7-14 Before Transplant)
This often-skipped step dramatically improves transplant success. University of Maryland Extension explains that hardening off gradually acclimates indoor-grown seedlings to outdoor conditions. Start by placing plants outside in a protected spot for 2-3 hours daily, gradually increasing exposure over 10-14 days.
During hardening off, reduce watering slightly and stop fertilizing. This slows growth and toughens plant tissues. By day 10, your plants should tolerate full sun and overnight outdoor temperatures above 50°F. Skip this process, and you’ll likely see wilted, shocked plants that take weeks to recover—or don’t recover at all.
Transplanting and Establishment (Weeks 1-3 After Transplant)
Transplant your bell peppers to grow outdoors only when soil temperatures consistently reach 65°F and nighttime temperatures stay above 50°F. Planting too early causes plants to “just sit there,” wasting precious growing days. Iowa State Extension notes that peppers transplanted into cool soil may never fully recover their vigor.
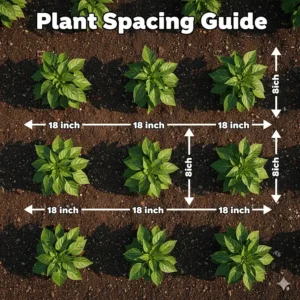
Space plants 18-24 inches apart in rows 30-36 inches apart. In containers, use at least 5-gallon pots per plant. Set transplants at the same depth they grew in their pots—unlike tomatoes, peppers won’t develop additional roots from buried stems. Water thoroughly after transplanting and apply a light mulch to conserve moisture.
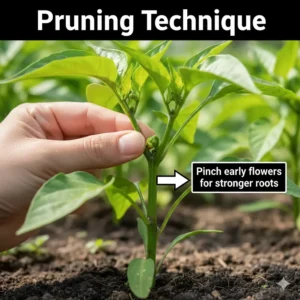
Flowering and Fruit Set (Weeks 6-10)
Your disease resistant bell peppers begin flowering about 6-8 weeks after transplanting. The first flowers often appear while plants are still relatively small. Pinch off these early blooms—I know it’s counterintuitive, but removing early flowers directs energy into root and foliage development, resulting in larger, more productive plants.
Old Farmer’s Almanac explains that optimal fruit set occurs between 70-80°F. Temperatures above 90°F or below 60°F cause flower drop and poor pollination. During my scorching 2024 summer, I installed 30% shade cloth during peak afternoon heat, which dramatically improved fruit set.
Fruit Development and Ripening (60-90 Days Total)
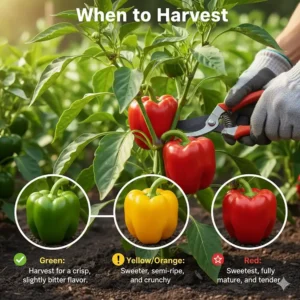
Green bell peppers are actually immature fruits. All bell peppers start green and change color as they mature. A green pepper left on the plant becomes yellow, then orange, or red depending on variety. The NDSU Agriculture Extension confirms that fully ripened peppers contain higher vitamin levels and develop sweeter flavors than green peppers.
For continuous production, harvest some peppers green and allow others to fully ripen. This encourages plants to produce more flowers. Most varieties reach harvest size in 60-80 days from transplanting, with full color maturity taking an additional 10-20 days.
How to Choose Bell Peppers to Grow for Your Climate
Selecting the right bell peppers to grow for your specific climate zone dramatically impacts your success. Not all varieties perform equally across different regions.
Step 1: Identify Your USDA Hardiness Zone and Growing Season Length
Start by determining your USDA hardiness zone and counting the frost-free days in your growing season. Peppers require 60-90 days from transplant to first harvest, plus 8-10 weeks for indoor seed starting. If you have fewer than 90 frost-free days, choose early-maturing varieties like the EarlyBird California Wonder (60-75 days) rather than longer-season types.
Short-season gardeners (zones 3-5) should prioritize early varieties and plan to use season extenders like row covers or cold frames. I garden in zone 5b with about 140 frost-free days, and I’ve learned that starting seeds indoors by late February is non-negotiable for success.
Step 2: Assess Your Temperature Extremes
University of Minnesota research shows that bell peppers perform best with daytime temperatures of 70-85°F and nighttime temperatures of 60-70°F. Extreme heat or cold creates challenges that variety selection can help mitigate.
For hot climates (zones 8-11): Choose heat-tolerant varieties and disease resistant bell peppers that handle stress better. The Keystone Resistant Giant and Emerald Giant both show superior heat tolerance in customer reviews from Southern growers. Plan for afternoon shade during peak summer heat.
For cool climates (zones 3-6): Select early-maturing varieties and consider growing in black plastic mulch or raised beds that warm faster. Smaller fruited varieties often set fruit better in cooler conditions than large-fruited types.
Step 3: Evaluate Your Disease Pressure
Different regions face different disease challenges. Cornell University’s disease resistance database provides detailed information on regional disease prevalence.
High humidity regions: Prioritize varieties resistant to bacterial spot, which thrives in humid conditions. The Keystone Resistant Giant offers broad-spectrum disease resistance.
Arid regions: Focus on drought-tolerant varieties and those resistant to blossom end rot, which occurs more frequently with inconsistent watering.
Step 4: Consider Your Growing Space
Your available space should influence variety selection. Compact varieties suit containers and small gardens, while indeterminate types need more room but produce larger yields.
Container gardens: Choose compact varieties explicitly rated for container growing. The 4-Variety Collection receives excellent reviews from patio gardeners. Use at least 5-gallon containers with good drainage.
In-ground gardens: Larger varieties like Emerald Giant thrive with unrestricted root space and can support heavy fruit loads when properly staked.
Step 5: Match Varieties to Your Harvest Goals
What do you want from your peppers? Different colorful bell pepper seeds excel at different purposes.
For stuffing: Choose large, blocky varieties like Emerald Giant or Keystone Resistant Giant with thick walls.
For fresh eating: Sweeter varieties that ripen to full color like those in the Rainbow Mix provide the best flavor.
For cooking and preserving: High-yielding California Wonder pepper seeds produce reliable quantities for canning and freezing.
Step 6: Plan for Color Preferences
If you want specific colors, understand that single-color varieties provide more predictable results than mixes. The Sow Right Seeds Collection gives you control over exactly which colors you grow, while rainbow bell pepper mix packets offer variety but less control over color distribution.
Step 7: Account for Succession Planting
Plant varieties with staggered maturity dates for continuous harvest. Early varieties provide quick results, while longer-season types extend your harvest into fall. I plant three sowings: early types in February, mid-season in March, and heat-tolerant varieties in April for late-season production.
Optimal Growing Conditions for Bell Peppers
Soil Requirements
Bell peppers to grow thrive in well-draining soil rich in organic matter with a pH between 6.0 and 6.8. Before planting, conduct a soil test through your local extension office—this $15-25 investment prevents expensive mistakes. University of Maryland Extension specifically recommends testing to determine proper phosphorus and potassium levels.
I amend my beds each spring with 2-3 inches of compost plus a balanced organic fertilizer. For container growing, use a high-quality potting mix rather than garden soil—the improved drainage and aeration justify the extra cost. Premium potting mixes designed for vegetables typically include perlite or vermiculite for drainage and peat or coir for moisture retention.
Sunlight and Temperature Needs
Peppers demand full sun—at least 6-8 hours daily, preferably 10 hours for maximum production. However, extreme heat (above 90°F) can cause blossom drop and sunscald. During heat waves, I drape 30-50% shade cloth over plants during peak afternoon hours, removing it once temperatures moderate.
Black plastic mulch warms soil in spring, advancing maturity by 7-10 days. This technique particularly benefits Northern gardeners with short seasons. In hot climates, switch to organic mulches like straw once soil warms to prevent root cooking.
Watering Strategy
Consistent moisture is critical for preventing blossom end rot and ensuring proper fruit development. Iowa State University Extension recommends 1-1.5 inches of water weekly through deep, infrequent watering rather than frequent shallow watering.
I use drip irrigation on a timer, watering deeply twice weekly during normal weather, increasing to three times during heat waves. Mulch significantly reduces water needs by conserving soil moisture and moderating soil temperature. Allow the top inch of soil to dry between waterings—constantly wet soil promotes root rot.
Fertilization Program
Peppers are moderate feeders requiring balanced nutrition throughout the season. At transplanting, work a slow-release organic fertilizer into planting holes according to package directions. Two weeks after transplanting, begin biweekly applications of water-soluble fertilizer diluted to half strength.
Florida Extension warns against excess nitrogen, which produces lush foliage but few peppers. Once flowering begins, switch to a low-nitrogen, high-phosphorus fertilizer (like 5-10-10) to promote fruiting. I use fish emulsion during vegetative growth, switching to bone meal tea during fruiting.
Support and Staking
While not always necessary, staking prevents branches from breaking under heavy fruit loads. Install stakes or cages at transplanting to avoid root damage later. I use 3-4 foot stakes for most varieties, securing stems with soft ties as plants grow. The Emerald Giant and Keystone Resistant Giant particularly benefit from support due to their large fruits.
Common Challenges Growing Bell Peppers and Solutions
Blossom End Rot
This frustrating condition creates dark, sunken spots on the blossom end of developing fruits. Despite appearing to be a disease, blossom end rot results from calcium deficiency caused by inconsistent watering. University of Massachusetts Extension explains the physiology: when soil moisture fluctuates, plants can’t maintain steady calcium uptake to developing fruits.
Solution: Maintain consistent soil moisture through mulching and regular watering. Don’t rely on calcium supplements—fixing the watering schedule solves the real problem. Remove affected fruits to redirect plant energy toward healthy fruit production.
Flower Drop
Watching flowers fall without setting fruit is disheartening. Temperature stress is typically the culprit. According to Old Farmer’s Almanac, blossoms drop when daytime temperatures exceed 90°F or nighttime temperatures fall below 60°F or rise above 70°F.
Solution: In hot climates, provide afternoon shade with shade cloth or tall companion plants. In cool climates, use row covers or cloches to maintain warmer nighttime temperatures. Choose varieties bred for temperature tolerance in your climate zone.
Bacterial Spot and Leaf Diseases
Bacterial spot appears as small dark spots with yellow halos on leaves and fruits. This disease thrives in warm, humid conditions and spreads through water splash. Cornell University Vegetables maintains a comprehensive database of resistant varieties.
Solution: Plant disease resistant bell peppers like Keystone Resistant Giant. Practice crop rotation, avoiding planting peppers where tomatoes, potatoes, or eggplants grew the previous 3-4 years. Water at soil level rather than overhead. Remove and destroy infected plant material immediately.
Aphids and Spider Mites
These tiny pests cluster on new growth, sucking plant sap and potentially transmitting viruses. Spider mites create fine webbing on leaf undersides and thrive in hot, dry conditions.
Solution: Encourage beneficial insects like ladybugs and lacewings by planting flowers nearby. For light infestations, spray plants with a strong stream of water. For persistent problems, apply insecticidal soap or neem oil, ensuring thorough coverage of leaf undersides. Monitor regularly—early detection prevents major outbreaks.
Sunscald
Peppers exposed to intense direct sun develop pale, papery patches that eventually dry and collapse. This physiological disorder occurs most commonly after disease defoliates plants or during extreme heat with inadequate leaf cover.
Solution: Maintain healthy foliage through proper fertilization and disease prevention. During heat waves, apply shade cloth. Avoid excessive pruning that reduces leaf cover. Some gardeners successfully use lightweight row covers during peak sun hours.
Harvesting and Storage Tips
When to Harvest
Bell peppers reach harvest size at different stages depending on your preferences. Green peppers can be harvested when they reach full size (3-4 inches for most varieties) and feel firm. For colored peppers, wait until fruits completely change color—this takes an additional 10-20 days but dramatically improves sweetness and vitamin content.
I harvest some peppers green for immediate use while allowing others to ripen fully. This encourages continued flower production throughout the season. Use sharp pruners or a knife to cut peppers from plants, leaving about 1 inch of stem attached. Pulling peppers damages plants and may break branches.
Storage Methods
Fresh bell peppers store in the refrigerator crisper for 1-2 weeks. Place them in perforated plastic bags to maintain humidity while allowing some air circulation. For longer storage, consider these preservation methods:
Freezing: The simplest long-term storage method. Wash, core, and seed peppers, then cut into strips or dice. Spread on baking sheets and freeze until solid, then transfer to freezer bags. No blanching required for peppers—they freeze beautifully raw and maintain texture for 6-8 months.
Drying: Old Farmer’s Almanac provides detailed drying instructions: slice into ½-inch strips, steam for 10 minutes, then dry in a 140°F oven for 4-6 hours. Store dried peppers in airtight containers away from light.
Roasting and Freezing: My favorite preservation method for maximum flavor. Roast whole peppers under the broiler until skins char, let cool in a covered bowl, then peel and freeze. These roasted peppers add incredible depth to winter soups and sauces.
Seed Saving
If you grew open-pollinated varieties like those from Survival Garden Seeds, you can save seeds for next year. Select the healthiest, best-producing plants and allow several peppers to fully ripen until they begin to wrinkle slightly. Remove seeds, rinse away any fruit flesh, and dry thoroughly on paper towels for 1-2 weeks in a dark, dry location. Store dried seeds in paper envelopes inside airtight containers in the refrigerator—properly stored seeds remain viable for 2-4 years.
Container Growing Guide
Limited space shouldn’t limit your bell pepper dreams. Container growing produces excellent results when you understand the specific requirements.
Container Selection
Minimum container size is 5 gallons per plant, though 7-10 gallon containers produce better yields. I’ve experimented with everything from plastic nursery pots to fabric grow bags—both work well, though fabric bags provide superior drainage and air pruning of roots. Ensure containers have adequate drainage holes.
Color matters more than you might think. Dark containers absorb heat, potentially cooking roots during summer. In hot climates, choose light-colored containers or place dark containers in locations that receive afternoon shade. Conversely, in cool climates, dark containers help warm soil.
Potting Mix and Fertilization
Never use garden soil in containers—it compacts, drains poorly, and may contain disease organisms. Invest in quality potting mix formulated for vegetables. I blend my own using 60% peat-based potting soil, 20% compost, 10% perlite, and 10% vermiculite, plus slow-release organic fertilizer.
Container peppers require more frequent fertilization than in-ground plants since nutrients leach with watering. After the initial fertilizer in the potting mix, begin weekly applications of half-strength water-soluble fertilizer once plants begin flowering. I alternate between fish emulsion and seaweed extract for balanced nutrition.
Watering Considerations
Container peppers dry out faster than garden plants, sometimes requiring daily watering during hot weather. Check soil moisture by inserting your finger 2 inches deep—water when the top 1-2 inches feel dry. I use self-watering containers for vacation periods, which maintain consistent moisture for up to a week.
Overwatering is equally problematic as underwatering. Ensure saucers beneath pots don’t allow plants to sit in standing water, which promotes root rot. During rainy periods, move containers under cover or tip saucers to drain excess water.
Variety Selection for Containers
Compact varieties produce better in containers than large, sprawling types. The 4-Variety Collection and EarlyBird California Wonder receive particularly strong reviews from container gardeners. Avoid extremely large varieties like Emerald Giant unless using very large containers (10+ gallons).
Comparison: Heirloom vs. Hybrid Bell Peppers
| Feature | Heirloom Varieties | Hybrid Varieties |
|---|---|---|
| Seed Saving | Seeds produce true-to-type plants | Seeds don’t reproduce parent characteristics |
| Disease Resistance | Generally less resistant | Often bred for specific resistances |
| Uniformity | More variation in size/shape | Very uniform fruits |
| Flavor | Often superior, complex flavors | Reliable, consistent flavor |
| Availability | Widely available from specialty sources | Common in garden centers |
| Cost | Usually less expensive | Often more expensive |
| Best For | Seed savers, flavor enthusiasts | Reliability, disease prevention |
Benefits vs. Traditional Store-Bought Peppers
| Homegrown Bell Peppers | Store-Bought Peppers |
|---|---|
| Peak ripeness at harvest | Often picked underripe |
| No pesticide concerns (if organic) | May contain pesticide residues |
| Superior flavor and nutrition | Flavor diminishes with shipping time |
| Variety selection (100+ types) | Limited to 2-3 common varieties |
| $0.50-1.00 per pepper cost | $2-4 per pepper typical price |
| Carbon footprint = zero | Average 1,500 miles traveled |
| Educational family activity | Passive consumption |
| Continuous summer harvest | Single purchase |
Frequently Asked Questions
❓ How long does it take to grow bell peppers to grow from seed?
❓ Can you grow bell peppers to grow indoors year-round?
❓ Why are my California Wonder pepper seeds not germinating?
❓ What's the difference between rainbow bell pepper mix and single-color varieties?
❓ How do disease resistant bell peppers differ from regular varieties?
Conclusion: Start Your Bell Pepper Journey Today
Growing bell peppers to grow transforms your garden and your kitchen. From the classic reliability of California Wonder pepper seeds to the stunning diversity of rainbow bell pepper mix varieties, there’s a perfect option for every gardener’s needs and climate.
The seven varieties I’ve shared represent years of testing, customer reviews, and proven performance. Whether you’re drawn to the disease resistance of Keystone Resistant Giant, the massive fruits of Emerald Giant, or the convenient variety selection of Sow Right Seeds Collection, you can’t go wrong with any of these choices.
Remember that success with bell peppers to grow comes down to three essentials: warm soil temperatures, consistent moisture, and adequate sunlight. Start your seeds indoors at the right time, harden them off properly, and transplant into warm soil. Follow these fundamentals, and you’ll be harvesting colorful bell pepper seeds worth of crunchy, sweet peppers all summer long.
The best day to start growing bell peppers was last year. The second-best day is today. Choose your varieties, order those sweet pepper seed packets, and prepare for a summer of fresh, homegrown flavor that no grocery store can match.
Your garden (and your taste buds) will thank you.
Recommended for You
- 7 Best Hot Pepper Seeds for Growing Extreme Heat in 2026
- 7 Best Organic Tomato Seeds for Chemical-Free Gardens 2026
- 7 Best Cherry Tomatoes to Grow in 2026 (Sweet & Easy!)
Disclaimer: This article contains affiliate links. If you purchase products through these links, we may earn a small commission at no additional cost to you.
✨ Found this helpful? Share it with your friends! 💬🤗