In This Article
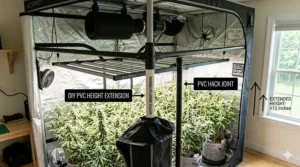
A grow tent height extension is a hardware add-on — usually a set of steel pole segments paired with a matching skirt of reflective fabric — that bolts onto your existing frame and raises the ceiling, typically by one to two feet, so taller plants, bigger lights, and real canopy training finally have somewhere to go.
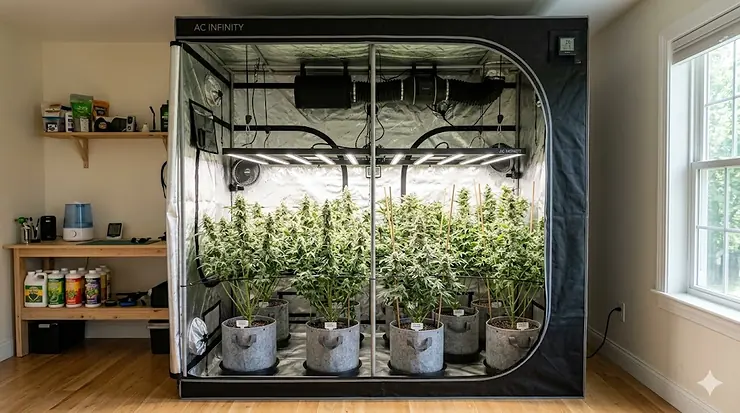
Every indoor grower eventually has The Moment. You’re standing in your tent, headlamp on because the overheads are off, staring at a cola that’s three inches from making out with your LED panel. Your plant did not read the spec sheet. It does not care that the tent was rated for “compact” growth. It just kept going — and now you’re either topping aggressively, supercropping out of desperation, or googling “grow tent height extension” at 11 p.m. like the rest of us.
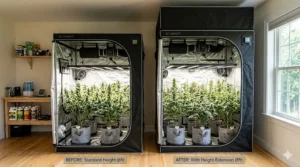
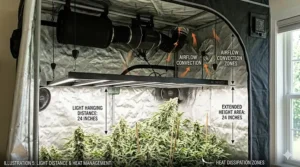
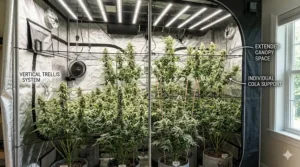
Here’s the thing nobody tells you when you buy your first tent: the listed height is the frame height, not the usable height. Subtract your light fixture, the hanging hardware, a few inches of safety clearance so you don’t scorch your top cola, and a fabric pot or two, and that “6-foot-11 tent” suddenly feels more like 4-foot-something of actual grow space. A height extension gives that lost real estate back — more room for vertical training methods like SCROG and topping, better clearance for quantum board lights that need to sit higher than old-school panels, and enough vertical breathing room that heat doesn’t just pool at canopy level and cook your top buds.
This guide breaks down seven real, currently available products — true structural extension kits, support accessories that make taller setups stable, and a couple of clever workarounds that buy you functional height without touching a single tent pole. We’ll tell you which one actually fits your situation, not just which one has the flashiest spec sheet.
Quick Comparison: 7 Grow Tent Height Extension Picks at a Glance
| Product | Category | Best For | Approx. Price Range |
|---|---|---|---|
| Gorilla Grow Tent 2 ft. Height Extension Kit (4×4) | Structural extension | Standard-footprint growers | $60–$90 |
| Gorilla Grow Tent 2 ft. Height Extension Kit (5×5) | Structural extension | Large multi-plant rooms | $90–$135 |
| Gorilla Grow Tent LITE Line 2’x4′ Extension Kit | Structural extension | Budget Lite-line owners | $35–$55 |
| Gorilla Grow Tent Pro 2×4 (Built-In Extension) | Complete tent, extension included | New setups, no retrofitting | $260–$360 |
| AC Infinity Heavy-Duty Mounting Bars (4×4′) | Bracing accessory | Reinforcing an extended tent | $30–$45 |
| VIVOSUN High CFM Support Pole Kit (4-Pack) | Bracing accessory | Budget multi-size bracing | $20–$30 |
| iPower GLROPEX2 Adjustable Rope Hangers | Functional workaround | Repositioning lights, no rebuild | $10–$18 |
A few things jump out once you actually line these up side by side. Three of the seven entries are literally the same engineering — a steel pole segment plus reflective fabric — scaled across different tent sizes and price tiers, which tells you the “real” extension kit market is smaller and more specialized than it looks. The accessories in the bottom half of the table aren’t competing for the same job at all; they’re solving the consequences of having more vertical space (sagging walls, wobbly trellis nets) or sidestepping the structural rebuild entirely. If your budget tops out under $30, skip straight to the rope hangers and circle back later.
💬 Just one click — help others make better buying decisions too!😊
Top 7 Grow Tent Height Extension Kits & Accessories — Expert Picks
1. Gorilla Grow Tent 2 ft. Height Extension Kit (4×4)
The Gorilla Grow Tent 2 ft. Height Extension Kit is the default answer to “how do I make my 4×4 taller” for a reason — it’s purpose-built by the same company that made the tent. The kit bolts in below the existing roof section and typically pushes a standard 7-foot Original-line tent up toward the 9-foot mark, using the same powder-coated, interlocking steel poles as the rest of the frame. In practice, that matters more than it sounds: a generic universal pole won’t match Gorilla’s pin spacing, so a same-brand kit is the difference between a rock-solid ceiling and one that flexes every time you brush past it with a watering can.
What most buyers overlook is the lining. The extension panel uses the same diamond-pattern reflective fabric as the rest of the tent, so you’re not creating a dark, light-absorbing “extension zone” that quietly tanks your PPFD near the new walls. Growers running SCROG nets or training vertically into the new space get the extra room without sacrificing reflectivity where it counts.
Feedback on this kit clusters around two themes: installation takes real effort for a solo grower (recruit a second pair of hands), and once it’s in, the frame feels noticeably more rigid than the budget alternatives people tried first.
✅ Matches OEM canvas density and reflectivity exactly
✅ Steel interlocking frame rated for heavy hanging loads
✅ Genuinely adds 50–60% more usable canopy height
❌ Only fits Gorilla-brand tents of the matching footprint
❌ Two-person installation recommended
Price/Value: In the $60–$90 range, it’s not the cheapest pole kit on the market, but for an exact-fit structural upgrade, the value verdict is straightforward: pay once, get a permanent fix.
2. Gorilla Grow Tent 2 ft. Height Extension Kit (5×5)
Same core engineering as the 4×4 version, scaled up for growers running bigger, multi-plant footprints. The Gorilla Grow Tent 2 ft. Height Extension Kit (5×5) uses the identical 300-pound-capacity steel pole system, which is the spec that actually matters here — at 5×5, you’re likely hanging a heavier light bar, a trellis net spanning the full width, and possibly a second clip fan, all from that same new ceiling.
In real-world terms, that load rating means you can run a serious vertical SCROG across a 25-square-foot canopy without the top rail sagging mid-cycle. The trade-off most people don’t anticipate: a bigger footprint means a bigger, heavier shipping box and a fussier solo install, since you’re working with longer pole sections that want to wander while you’re trying to pin them.
Most reviewers who’ve already done a 4×4 install describe the 5×5 version as “the same job, just longer,” which tracks with the shared design.
✅ Same proven frame engineering at a bigger scale
✅ 300 lb hang capacity handles heavier multi-light setups
✅ Diamond-reflective lining keeps light efficiency consistent in the new zone
❌ Bulkier box, trickier to install alone
❌ Premium price reflects the larger size, not extra features
Price/Value: Expect roughly $90–$135. For a 5×5 grower, that’s a fair multiple over the 4×4 kit given the added material — not a markup for markup’s sake.
3. Gorilla Grow Tent LITE Line 2’x4′ Height Extension Kit
If the Original-line kits feel like overkill for your setup, the Gorilla Grow Tent LITE Line 2’x4′ Height Extension Kit is the budget on-ramp into the same ecosystem. It’s built for Gorilla’s LITE sub-line — a more affordable tent series that already ships with a smaller, complimentary extension built in — and this kit stacks on top of that.
The practical interpretation of “LITE” here: lighter-gauge poles and thinner canvas than the Original line, which keeps the price down but also means it’s a better match for smaller lights and fewer accessories hanging off the new ceiling, not a five-light commercial canopy. Pair it with the tent’s already-included shorter extension and you get a meaningful jump in headroom for a fraction of the Original-line cost.
This is the kit I’d point a first-time grower toward if they’re already in the Gorilla LITE ecosystem and just need a bit more room for their plants to finish flowering without lollipopping every node.
✅ Most affordable entry point into Gorilla’s extension system
✅ Lighter materials make solo installation genuinely easier
✅ Stacks with the tent’s included base extension for extra lift
❌ Thinner canvas than Original/Pro lines under high airflow
❌ Lower practical ceiling height than the premium kits
Price/Value: Around $35–$55 — easily the best dollar-per-inch ratio on this list for Lite-line owners specifically.
4. Gorilla Grow Tent Pro 2×4 (Built-In Extension Kit Included)
Instead of retrofitting, the Gorilla Grow Tent Pro 2×4 bakes the extension into the original purchase. It ships at 6’11”, with an included 1-foot extension kit bringing it to 7’11” out of the box, and an optional 2-foot kit available to push it to 8’11” for growers who genuinely need a sativa-friendly ceiling.
What the spec sheet doesn’t say plainly: this is the Pro line, which means 1680D thread-density canvas (versus the 600D–800D you’ll find on budget tents) and an all-steel frame rated for 300 pounds of hanging weight. In practice, that thicker canvas is the difference between a tent that holds its shape after two years of zipping and unzipping daily versus one that starts sagging at the seams by month eight. The 360-degree wraparound zippers and EZ-View windows are nice-to-haves, but the real story is durability under sustained extended-height stress.
This is the pick for someone setting up fresh who doesn’t want to measure, drill, or retrofit anything — buy once, extension already engineered in.
✅ Extension integrated from the factory, zero retrofit guesswork
✅ 1680D canvas and 300 lb frame built for long-term extended use
✅ EZ-View windows for monitoring without disturbing the environment
❌ Significant up-front cost versus tent + kit bought separately
❌ Overkill if you don’t need the premium durability tier
Price/Value: Roughly $260–$360 for the complete tent. It’s the priciest item here, but you’re paying for a tent-plus-extension system, not a standalone accessory.
5. AC Infinity Heavy-Duty Grow Tent Mounting Bars (4×4′)
Here’s the accessory nobody mentions until their tent walls start bowing inward. The AC Infinity Heavy-Duty Grow Tent Mounting Bars don’t add height — they make the height you already added usable. Once you’ve extended a tent upward, you’ve also increased the surface area your exhaust fan is pulling against, and high-CFM ventilation can suck thin tent walls inward hard enough to crush your canopy edges.
The steel bars span the interior and lock in place with adhesive grip pads and hook-and-loop straps — no drilling into your new extension seam required. The genuinely clever part is the support-clamp system, which doubles the weight capacity at each mounting point, so the same bars that stop wall collapse also become a mounting rail for trellis netting, clip fans, or supplemental side lighting aimed inward at the lower canopy.
Reviewers tend to install these after extending their tent and wishing they’d done it sooner, once a high-CFM fan started visibly flexing the fabric.
✅ Stops walls collapsing inward under strong exhaust airflow
✅ Doubles as a trellis and supplemental-light mounting rail
✅ No-drill adhesive and strap mounting
❌ Doesn’t add any vertical height on its own
❌ Clamps add bulk that can crowd a fully-extended canopy
Price/Value: Around $30–$45. Think of it less as an upgrade and more as cheap insurance for a tent you’ve already invested in extending.
6. VIVOSUN Grow Tent High CFM Support Pole Kit (4-Pack)
The budget cousin to the AC Infinity bars, the VIVOSUN High CFM Kit uses an adjustable pole-and-hook system (roughly 24″–48″ depending on the variant) instead of fixed clamp bars, and the flexibility is the whole pitch — one kit covers 2×2, 2.3×2.3, 2.7×2.7, and 3×3 tents, or a longer variant spans up to 4×4 and 5×5.
The real-world trade-off versus the AC Infinity option: VIVOSUN’s hooks are sized for 16mm–19mm poles, so compatibility depends on your tent’s actual pole diameter, not just its footprint. If you’ve got an off-brand tent with unusually thick or thin frame poles, measure before you buy. For Gorilla, Mars Hydro, or VIVOSUN tents in the listed sizes, it bolts on without drama and does the same core job — stopping wall sag once you’re running a stronger fan than your tent’s stock design anticipated.
✅ One kit flexes across four different tent footprints
✅ Cheapest entry point into structural bracing on this list
✅ Simple hook-and-pole assembly, no tools required
❌ Hook sizing limits cross-brand compatibility
❌ Lower load capacity than AC Infinity’s clamp system
Price/Value: Typically $20–$30 — the budget pick if you just need basic bracing and aren’t pushing a high-end ventilation setup.
7. iPower GLROPEX2 Adjustable Rope Clip Hangers (2-Pair)
Sometimes the smartest fix isn’t structural at all. The iPower GLROPEX2 is a pair of ratchet-style rope hangers — 8 feet of braided rope per pair, rated for 150 pounds, with reinforced metal internal gears — that let you reposition your light or carbon filter higher or lower with one smooth pull, no ladder, no re-measuring poles.
Here’s what most new growers miss: a huge chunk of “I need a taller tent” problems are actually “my light is mounted too low and I have no way to raise it” problems. A quantum board mounted on fixed S-hooks at a fixed height can’t adapt as your plants stretch through veg. Ratchet hangers solve that specific headache for the cost of a takeout dinner, freeing up functional inches of clearance without anyone touching the tent frame.
This is the product I’d tell a beginner to buy first, before spending real money on structural extension kits, simply to confirm whether their height problem is actually a tent problem or a hardware problem.
✅ Cheapest way to free up functional headroom instantly
✅ One-pull ratchet adjustment as plants grow through stages
✅ 150 lb-per-pair capacity handles heavy light bars and filters
❌ Doesn’t change the tent’s actual physical ceiling height
❌ Nylon rope can stretch slightly under sustained heavy load
Price/Value: Around $10–$18 for the pair. Lowest price on this entire list, and arguably the highest ROI if your real problem is light placement, not tent geometry.
✨ Don’t Miss These Exclusive Deals!
🔍 Take your grow tent height extension to the next level with these carefully selected products. Click on any highlighted item to check current pricing and availability. These tools will help you create the extra growing headroom your plants will love!
How to Choose the Right Grow Tent Height Extension
- Diagnose the actual problem first. Is your plant too tall, your light mounted too low, or your trellis netting eating headroom? Each has a different fix, and only one of them requires a structural kit.
- Confirm brand and model compatibility. Most true extension kits are tent-specific — a Gorilla kit won’t fit a VIVOSUN tent, full stop. Check your tent’s exact model before ordering.
- Measure your room’s ceiling, not just the tent. A 2-foot extension on a 7-foot tent needs 9+ feet of actual room clearance, including hanging hardware. According to Oklahoma State University Extension’s guidance on LED grow light placement, fixture distance from canopy is one of the biggest levers on plant response, so don’t extend yourself out of room to properly position the light.
- Match frame load rating to what you’re hanging. A light bar, a trellis net, a clip fan, and a carbon filter add up fast — check the kit’s rated hang capacity, not just the tent’s.
- Decide between structural and functional fixes. If you only need a few extra inches for light positioning, rope ratchets solve it for a fraction of the cost of a pole kit.
- Budget for the knock-on accessories. Extended ducting, longer rope hangers, and bracing bars are easy to forget until you’re mid-install and short a part.
- Check the return policy before you order. These are awkward, heavy, freight-class items — know your return window in case fit or sizing doesn’t work out.
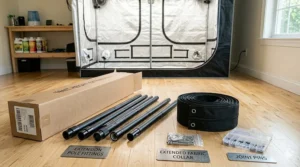
Practical Usage Guide: Installing a Height Extension Kit Without Losing a Weekend
Lay every pole and connector out before you start — extension kits ship with parts that look interchangeable but aren’t, and discovering that three pins into assembly is how Saturdays disappear. Empty the tent completely; do not attempt this with a live canopy inside, both for the plant’s sake and your own patience.
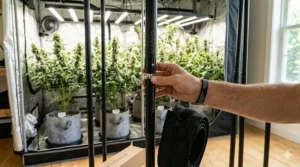
Most kits install in the same general order: detach the existing roof rail, slide the new extension poles into the now-exposed lower connectors, zip or velcro the matching fabric skirt around the new gap, then reattach the roof rail on top of the extension. Tent walls under tension can feel like they’re fighting you during this step — they’re not, you’ve just temporarily lost the structural support the roof rail normally provides.
Once assembled, do a 24-hour empty test run with your full light and fan load before moving plants back in. Check every seam for light leaks and every pole junction for wobble. Common 30-day mistakes: skipping the empty-tent test run, under-tightening pole pins because they “seem snug,” and forgetting that ducting and rope hangers both need extra length to reach the new, higher mounting points.
Real-World Scenarios: Matching the Right Extension to Your Grow
The apartment grower running a single 4×4 tent who’s hitting their LED panel with the top cola every cycle is the textbook case for the Gorilla Grow Tent 2 ft. Height Extension Kit (4×4) — exact-fit, structurally sound, and sized for exactly this footprint without overbuying.
The multi-plant grower with a 5×5 room running a full-width SCROG net and a heavier light bar needs the 5×5 version of that same kit, specifically because the higher weight rating matters once you’re spanning that much canopy with trellis and hardware.
The budget-conscious first-timer who just bought a Gorilla LITE tent and is realizing their plants want another six inches doesn’t need a Pro-line rebuild — the LITE Line 2’x4′ kit stacked on the tent’s included base extension solves it without blowing the budget on a setup they’re still learning.
Anyone whose actual complaint is “my light can’t go any higher” rather than “my tent is too short” should start with iPower’s rope ratchet hangers before spending a dollar on poles — it’s a five-minute fix that often makes the structural kit unnecessary entirely.
Common Mistakes When Adding Height to a Grow Tent
❌ Buying an extension kit before measuring the room’s actual ceiling clearance, then discovering the light still can’t sit far enough above canopy.
❌ Assuming “universal” pole accessories fit every tent brand — pole diameter and pin spacing vary more than people expect.
❌ Skipping reinforcement at the new seam, then wondering why the frame flexes once a heavy light bar and trellis net are both hanging from it.
❌ Forgetting ducting, rope hangers, and power cords all need extra length once mounting points move higher.
❌ Stacking a height extension and a high-CFM fan upgrade in the same week without adding bracing — that’s exactly the wall-bowing scenario mounting bars exist to prevent.
Grow Tent Height Extension vs. Buying a Taller Tent From Scratch
Retrofitting an existing tent with an extension kit almost always costs less than replacing it outright, and it preserves whatever ducting, bracing, and light positioning you’ve already dialed in. The catch is compatibility — you’re locked into kits made for your exact tent brand and model, and not every brand even offers one.
Buying a taller tent from the start sidesteps all of that, at the cost of paying full tent price again and re-doing every bit of setup you’d already finished. It tends to make more sense when you’re upgrading footprint and height simultaneously — say, moving from a 2×4 to a 4×4 — since you’re replacing the tent anyway. If height is your only complaint and the rest of your setup is dialed in, an extension kit is the more economical move nine times out of ten.
What to Expect: Real-World Performance After Extending Your Tent
The most underrated side effect of adding height isn’t more room for the plant — it’s a bigger air volume for your fan to manage. A taller tent takes longer to exchange its full air volume per minute at the same CFM rating, which can mean slightly slower temperature and humidity recovery after you open the door.
On the lighting side, more vertical distance between fixture and canopy changes your light distribution, not just its intensity. Research on close-canopy lighting strategies published in Frontiers in Plant Science has found that tightening the distance between LED fixtures and canopy can meaningfully improve photon capture efficiency in indoor growing setups — which is a useful reminder that “more headroom” doesn’t automatically mean “raise your light as high as it’ll go.” Use the new space for plant training and trellis room first, and only raise the fixture as far as your light’s actual coverage pattern requires.
Long-Term Cost & Maintenance of an Extended Grow Tent
The extension kit itself is a one-time cost, but the downstream expenses are worth budgeting for: longer ducting runs, possibly a stronger fan to manage the larger air volume, and replacement rope hangers every season or two as nylon rope and ratchet gears wear under sustained load.
Electricity is the sneaky long-term line item. Running a more powerful light bar at a greater hanging distance, or running fans longer to manage a bigger tent volume, adds up over a 12-month grow calendar. The U.S. Department of Energy’s research on horticultural lighting notes that switching to LED fixtures alone offers a meaningful reduction in electricity consumption per square foot of grow area compared to legacy lighting technology — a relevant data point if you’re extending height specifically to accommodate a bigger, more power-hungry fixture. Factor that ongoing cost in alongside the upfront price of the kit itself.
Features That Actually Matter (And Those That Don’t)
Reflective fabric density (1680D versus 600D) matters far more than most buyers realize — it’s the difference between a tent that holds shape and light-tightness for years versus one that starts sagging and leaking light at the seams within a season. Pole gauge and the locking-pin mechanism matter too; a frame that flexes under load will eventually loosen its seams.
What matters less than the marketing suggests: window count and “EZ-View” branding are nice for monitoring but don’t affect structural performance at all. A “300 lb hang capacity” claim sounds impressive on every box, but it’s only meaningful in context — distributed across multiple mounting points, not as a single hook’s rating. Read the fine print on how that capacity is achieved before assuming your five-light, full-trellis setup is covered.
Safety, Structural Load & Electrical Considerations for Taller Tents
More vertical space means more hanging weight concentrated on the same frame footprint — a light bar, a trellis net, a clip fan, and a carbon filter all pulling on poles that were originally engineered for a shorter, lighter setup. Distribute weight across multiple mounting points rather than a single center hook, and re-check pole tightness a week after installation once everything has settled under load.
Electrically, a taller tent often invites a more powerful light fixture, which means a heavier draw on the same circuit you were already running fans and a dehumidifier from. Before extending height specifically to fit a bigger light, confirm your circuit’s total amperage can handle the added load — this is a basic electrical safety check worth doing regardless of how exciting the new headroom is.
Benefits vs. Traditional Alternatives
| Approach | Upfront Cost | Effort | Long-Term Flexibility | Best For |
|---|---|---|---|---|
| Height extension kit | Low–Moderate | Moderate (1 install) | High | Existing tent, height-only problem |
| Buy a taller tent | High | Low (no retrofit) | High | Upgrading footprint + height together |
| Low-stress training / SCROG | None | Ongoing | Moderate | Budget growers, patient training |
| Do nothing, top aggressively | None | Ongoing stress on plant | Low | Short-term fix, not recommended long-term |
Height extension kits sit in a useful middle ground: cheaper and less disruptive than replacing the tent, but a genuine structural fix rather than an ongoing workaround. Training methods like SCROG or topping cost nothing upfront but demand consistent attention all season and only partially solve the underlying clearance problem. If your tent and accessories are otherwise dialed in, the extension kit route delivers the best ratio of cost to long-term flexibility.
Price Range & Value Analysis
| Tier | Price Range | What You Get |
|---|---|---|
| Budget | $10–$30 | Rope ratchet hangers, basic support poles |
| Mid-range | $35–$135 | Brand-matched structural extension kits |
| Premium | $260–$360 | Complete tent with extension engineered in |
The jump from budget to mid-range buys you an actual structural fix instead of a workaround — worth it the moment your real problem is tent geometry rather than light placement. The jump from mid-range to premium only makes sense if you’re buying a brand-new tent anyway; paying premium-tier money just to retrofit an existing setup rarely pencils out.
Frequently Asked Questions
❓ How do you add height to a grow tent?
❓ Will a Gorilla Grow Tent extension kit fit other tent brands?
❓ How much does a grow tent height extension kit cost?
❓ Does a taller grow tent improve yield?
❓ Can you extend a grow tent without buying a structural kit?
Conclusion
A cramped tent ceiling is one of the most common — and most fixable — bottlenecks in indoor growing, and the fix doesn’t have to mean replacing your entire setup. Whether that’s a brand-matched Gorilla Grow Tent extension kit, a bracing accessory like AC Infinity’s mounting bars or VIVOSUN’s support poles keeping your newly tall tent from collapsing inward, or something as simple as iPower’s rope ratchet hangers buying you functional clearance for a few dollars, the right grow tent height extension comes down to correctly diagnosing what’s actually squeezing your plants before you spend a cent.
Start with the cheapest fix that could plausibly solve your problem, confirm compatibility with your exact tent model before ordering a structural kit, and budget for the small downstream accessories — extra ducting, a bracing kit, a fresh pair of rope hangers — that tend to get forgotten until install day. Get that sequence right, and your next grow cycle finishes with a canopy that has room to actually finish, instead of one fighting your tent’s ceiling for the last three weeks of flower.
✨ Don’t Miss These Exclusive Deals!
🔍 Ready to give your plants the room they’ve been asking for? Compare current pricing on these grow tent height extension picks and find the one that matches your setup.
Recommended for You
- Best Shorty Grow Tent in 2026: 7 Top Picks for Low Ceilings
- 7 Best Cannabis Drying Tent Picks for Perfect Cures in 2026
- 7 Best Propagation Chamber Tent Options in 2026 for Thriving Starter Plants
Disclaimer: This article contains affiliate links. As an Amazon Associate, I earn from qualifying purchases. If you purchase products through these links, we may earn a small commission at no additional cost to you.
✨ Found this helpful? Share it with your friends! 💬🤗